🧢 Beautiful ✨ Detailed πŸ’ Adorable

GrannySquare Baby Blanket with shell boarder Pattern

GrannySquare Baby Blanket with shell boarder Pattern
4.2β˜… Rating
5-7 Hours Time Needed
1.4K Made This
βœ‚οΈ

Beginner Friendly Level

Perfect for those just starting their crochet journey, with clear instructions and simple techniques

⏱️

Weekend Treat

Takes 5-7 hours, making it an enjoyable project to finish over a couple of days.

πŸ€—

Soft Hug

Gentle, plush, and full of warmth, creating a sense of comfort and coziness wherever they find a home.

About This GrannySquare Baby Blanket with shell boarder Pattern

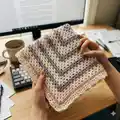
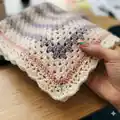
This pattern creates a centred granny square baby blanket worked from the middle out, with alternating rounds of white and dusty rose and a final candyfloss pink edging. It features standard US stitches and clear, photographed steps to guide you through each round. The pattern is ideal for beginners and includes a decorative shell (v-stitch) border for a beautiful finished edge.

GrannySquare Baby Blanket with shell boarder Pattern crochet pattern - detailed view of completed project

Worked in Paintbox Aran yarn and a 5mm hook, the blanket finishes at approximately 34" x 34". You will learn corner construction, color changes, and a v-stitch shell border.

Why You'll Love This GrannySquare Baby Blanket with shell boarder Pattern

I absolutely love this pattern because it combines the timeless charm of the granny square with a delicate shell border that elevates a simple blanket into something special. I enjoy how easy it is to memorise the rounds, which makes it relaxing to crochet while still producing beautiful results. The colour changes create soft stripes without complicated joins, and I always find the v-stitch shell border gives a lovely finished frame. I hope you feel the same satisfaction finishing each round and seeing the blanket grow into a cozy piece you'll be proud to gift or keep.

GrannySquare Baby Blanket with shell boarder Pattern step 1 - construction progress GrannySquare Baby Blanket with shell boarder Pattern step 2 - assembly progress GrannySquare Baby Blanket with shell boarder Pattern step 3 - details and accessories GrannySquare Baby Blanket with shell boarder Pattern step 4 - final assembly and finishing

Switch Things Up

I love how easy it is to customise this blanket with color choicesβ€”try soft pastels, bold brights, or a neutral palette for a modern look.

Change the stripe pattern by repeating different numbers of rounds in each colour to create wider or narrower stripes.

Use a bulkier aran or chunky yarn and a larger hook to make a thicker, more snuggly blanket that works great as a lapghan.

For a smaller version make fewer repeats, or for a larger blanket continue the pattern outward until you reach your desired size.

I often add a contrast-coloured round right before the shell border to make the shell edge pop visually.

Try substituting the v-stitch shell for a picot or scallop edge if you prefer a different decorative finish.

Mix textures by using a velvet or chenille yarn for alternating rounds for an ultra-soft resultβ€”just be mindful of yarn care instructions.

Embellish with small crocheted flowers or appliques sewn into corners for a personalised touch for a baby gift.

If you want a reversible look, choose a border technique that mirrors the granny clusters so both sides look tidy.

I recommend making a small sample square first to test colour changes and tension before committing to the full blanket.

Common Mistakes & How to Fix Them

βœ— Not counting clusters at the end of rounds can create uneven edges; count your 3-dc clusters and corner groups after each round to ensure four corners stay consistent. βœ— Changing yarn without securing tails can lead to loose ends later; fasten off neatly and weave in tails or secure with a couple of small stitches as you go. βœ— Skipping the chain-2 corner space instructions will distort the square corners; always work the full [3dc, ch2, 3dc] in the corner chain spaces to keep corners square. βœ— Crocheting too tightly makes rounds curl and the blanket smaller; use consistent, slightly relaxed tension and the recommended 5mm hook for the intended size and drape. βœ— Forgetting to slip stitch into the 3rd chain at the end of rounds can alter the starting point; always ss into the 3rd ch (the top of the starting ch3) to join rounds cleanly.

GrannySquare Baby Blanket with shell boarder Pattern

Make a soft, classic granny square baby blanket with a pretty shell border using Paintbox Aran yarn. This beginner-friendly pattern walks you through the centre-out granny square construction, color changes, and a decorative v-stitch shell edge. Perfect for gifting or keeping, the finished blanket measures approximately 34" x 34" and uses three coordinating colours for a delicate striped effect.

Beginner Friendly 5-7 Hours

Materials Needed for GrannySquare Baby Blanket with shell boarder Pattern

β€” Main Fabric

  • 01
    Paintbox Aran (Aran weight) - Paper white - amount not specified (use enough for alternating rounds and border)
  • 02
    Paintbox Aran (Aran weight) - Dusty rose - amount not specified (used for accent rounds)
  • 03
    Paintbox Aran (Aran weight) - Candyfloss pink - amount not specified (used for final edging)

β€” Tools Required

  • 01
    5mm crochet hook
  • 02
    Scissors
  • 03
    Yarn needle

Progress Tracker

0% Complete

β€” Materials :

Info :

5mm crochet hook Scissors Yarn needle Yarn - I used Paintbox Aran yarn in 3 different colours Blanket measures approximately 34" x 34"

β€” Abbreviations :

Infos :

ch Chain. sc Single crochet. dc Double crochet. ss Slip stitch. chsp chain space.

β€” Let's get started! :

Info :

Making the ring: With dusty rose yarn make a slip knot and chain 3 ss in to first chain You have now made the ring :)

Round 1 :

ch 3 (this counts as first dc) 2dc into ring 3dc in to ring, ch2 (do this 2 more times) ss in to 3rd ch You should now have 4 clusters of dc with a chsp in between each one You should have 4 corners

Round 2 :

ch 3 (this counts as first dc) 2dc in to chsp [3dc, ch 2, 3dc] in to next chsp (this makes your corner) [3dc, ch2, 3dc] in to next chsp (this makes another corner) [3dc, ch2, 3dc] in to next chsp (this makes another corner) 3dc in to first chsp, ch2 then ss in to third ch

Round 3 :

ch 3 (this counts as first dc) 2dc into chsp 3dc in to next chsp [3dc, ch2, 3dc] in to next chsp (forms corner) 3dc in to next chsp [3dc, ch2, 3dc] in to next chsp (forms corner) 3dc in to next chsp [3dc, ch2, 3dc] in to next chsp (forms corner) 3dc in to next chsp 3dc in to first chsp, ch2 then ss in to third ch

Round 4 :

ch 3 (this counts as first dc) 2dc in to chsp 3dc in to next chsp 3dc in to next chsp [3dc, ch2, 3dc] in to next chsp (forms corner) 3dc in to next chsp 3dc in to next chsp [3dc, 2ch, 3dc] in to next chsp 3( forms corner) 3dc in to next chsp 3dc in to next chsp [3dc, ch2, 3dc] in to next chs (forms corner) 3dc in to next chsp 3dc in to next chsp 3dc in to first chsp, ch2 then ss in to third ch

Round 5 :

ch 3 (this counts as first dc) 2dc in to chsp 3dc in to next chsp (4 times) in to corner chsp [3dc, ch2, 3dc] 3dc in to next chsp (4 times) in to next corner chsp [3dc, ch2, 3dc] 3dc in to next chsp (4 times) in to next corner chsp [3dc, ch2, 3dc] 3dc in to next chsp (4 times) 3dc in to first chsp, ch2 then ss in to third ch and fasten off

β€” Changing yarn :

Info :

Attach the white yarn to any corner

β€” Continue the blanket :

Info :

Continue with rounds starting with: ch3, 2dc and putting 3dc in every chsp 3dc,ch2, 3dc in to every corner 3dc, ch2, ss into 3rd ch into the starting corner

Info :

Repeat [3 rounds of white and 2 rounds of dusty rose] 4 times

β€” Finishing off :

Info :

Once you have completed your rounds, do 3 more rounds of white, fasten off

Info :

Attach pink yarn and do one round, fasten off

β€” Shell boarder :

Info :

Attach white yarn ch1, 1sc in to every stitch 3sc in to every corner sc in to ch1

Info :

Now we are back at the first corner we can now do a v-stitch round: ch2, skip 1 (1dc, ch1, 1dc in to same stitch). This makes your v-stitch

Info :

Work [skip 2, (1dc, ch1, 1dc in to same stitch)] until you get to the corner.

Info :

As you come to your corner [skip1, (1dc, ch1, 1dc in to same stitch)] until the corner is finished. continue with v-stitch until you get back to the first corner

β€” Shell boarder continuation :

Info :

At the first corner, dc into same stitch as ch3, ch 1 then ss in to 3rd ch

Info :

Now let's do the shell boarder :) ch3 [5dc into v-stitch, 1dc into next v-stitch] repeat until back at ch3

Info :

Once you are back to the ch3, ss in to 3rd ch

Info :

Fasten off and sew in all ends

β€” Blanket complete :

Info :

Blanket complete :) Block or gently shape as needed and enjoy your finished granny square baby blanket

Assembly Instructions

  • After finishing the rounds and edging, fasten off and weave in all yarn tails neatly along the back using a yarn needle to prevent unraveling.
  • Attach the white yarn to any corner to begin the shell border, then work 1 sc into every stitch and 3 sc into each corner chain space before starting the v-stitch round.
  • When working the v-stitch shell round, place 5 dc into each v-stitch and 1 dc into the next v-stitch as described, and align shells so corners remain square.
  • At the final shell round, slip stitch into the 3rd chain of the starting ch3 to join, fasten off, and sew in all ends securely for a clean finish.

Important Notes

  • πŸ’‘This is a beginner friendly pattern; if you need help there are YouTube videos and photos included for each stage.
  • πŸ’‘You may sell your finished blanket, but the pattern itself is copyright protected and must not be copied or redistributed.
  • πŸ’‘When changing colours attach the new yarn in a corner to make a neat transition and hide ends within corner stitches.
  • πŸ’‘Fasten off securely and weave in ends as you go to avoid bulky joins and a messy finish.

Thank you for choosing this granny square baby blanket pattern β€” I hope it brings warmth and handmade love to your home. Whether you make it as a new baby gift or a cozy keepsake, be proud of every stitch you create. Share your finished blanket with me on Instagram @cherry_tree_crochet and enjoy crocheting! 🧢✨

You ask,

we answer.

FAQs

What size will the finished piece be?

The finished blanket measures approximately 34" x 34" when using Paintbox Aran yarn and a 5mm hook as recommended.

Can I use different yarn weights for this pattern?

Yes, but different yarn weights and hook sizes will change the final size and drape; adjust hook and yarn amounts accordingly and swatch first.

Do I need prior crochet experience for this pattern?

This pattern is beginner friendly, so basic knowledge of chain, double crochet, slip stitch, and reading rounds is all you need.

How long does this project typically take to complete?

Most crocheters finish this baby blanket in about 5-7 hours, though time will vary based on speed and how many rounds you complete.