About This Goose Mittens Pattern
This pattern teaches you how to crochet a pair of Goose Mittens worked from the top down in the round, held in two strands for a thicker fabric. It includes clear rounds for shaping the mitten, creating a thumb hole, and making the thumb. Simple color changes create the goose look with an orange beak and white lower hand.
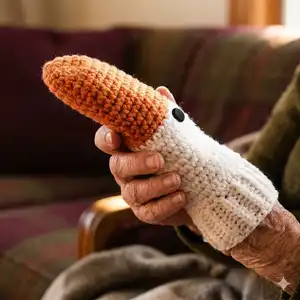
The mittens are sized by custom fitting as you go, allowing you to make teen to adult sizes easily. The instructions include eye placement and finishing tips so your mittens look polished.
Why You'll Love This Goose Mittens Pattern
I absolutely love this pattern because it turns a simple mitten into a playful goose design that brings a smile every time. I enjoy working with two strands held together for a plush texture — it makes the mittens warm and durable. I love that the pattern is flexible, so you can fit any hand size by trying on as you go. I also appreciate how a small color change and a pair of eyes add so much character with minimal extra work.
Switch Things Up
I love customizing these mittens by changing the colors — try pastel tones or bold contrasting shades to change the look entirely.
I often swap the orange beak color for a pink or yellow to make whimsical variations for kids.
If you want a thicker mitten, I prefer using a bulkier yarn or holding three strands instead of two and using a larger hook for a chunky finish.
To make a mini keychain version, use fingering weight yarn held double and a much smaller hook to scale down the pattern.
I sometimes add short embroidered eyelashes or a stitched smile under the eyes to give the goose more personality.
Try adding a simple cuff rib by working alternating front and back loop rounds for a snug wrist finish — I do this for extra warmth.
For a waterproof finish, consider using a yarn with wool blends and treat the mittens with a washable waterproofing spray after finishing.
I like to experiment with eye types — flat-back eyes, small buttons, or tiny crocheted discs each give a different expression to the goose.
To fit very large hands, I recommend adding more increase rounds after round 4 and trying the mitten on as you go until you reach the desired width.
I also make matching sets by crocheting a hat or scarf in the same color combination to create a coordinated look.
Common Mistakes & How to Fix Them
✗ Skipping the step of holding two strands together will make the fabric too thin and lose the intended warmth; always hold both strands together as instructed.
✗ Not working the mitten in a spiral and instead joining rounds can create a visible seam and break the continuous shaping; work in spiral as directed for a smooth result.
✗ Making the thumb hole chain too loose or too tight will affect thumb fit and thumb shaping; make the chain the instructed length and adjust by using an even number of chains if you need a larger hole.
✗ Forgetting to weave in the magic ring end after round 3 can leave a loose center at the top of the mitten; weave in the magic ring end when indicated to secure the start.
✗ Placing the safety eyes without measuring can look off-center or uneven; place eyes between the 2nd and 3rd round of white and check symmetry before securing.
✗ Stopping increases too early for larger hands will make the mitten too narrow; try the mitten on and add extra increases (sc in st, inc in next) as suggested to reach proper width.