๐Ÿงถ Beautiful โœจ Detailed ๐Ÿ’ Adorable

Gingerbread Amigurumi Pattern

Gingerbread Amigurumi Pattern
4.7โ˜… Rating
5-7 Hours Time Needed
1.2K Made This
โœ‚๏ธ

Intermediate Level

Ideal for those with basic crochet experience, featuring slightly more advanced stitches and techniques to expand your skills.

โฑ๏ธ

Weekend Treat

Takes 5-7 hours, making it an enjoyable project to finish over a couple of days.

๐Ÿงธ

Cute Companion

An adorable friend to cherish, handcrafted with love to bring comfort and joy for years to come.

About This Gingerbread Amigurumi Pattern

This pattern creates a charming gingerbread amigurumi with a white icing hat and colorful sprinkles. You will crochet the hat, body, arms, and finish the face and decorations using simple amigurumi techniques. The design includes full round-by-round instructions for consistent shaping and placement.

Gingerbread Amigurumi Pattern crochet pattern - detailed view of completed project

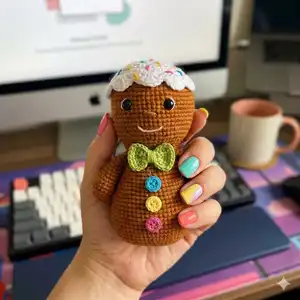
Perfect for gifting or seasonal decor, the finished doll is soft and huggable. Detailed photos and clear rounds help you assemble and decorate with confidence.

Why You'll Love This Gingerbread Amigurumi Pattern

I absolutely love this pattern because it combines simple amigurumi construction with playful decorative details that really bring the character to life. I enjoyed designing the icing hat and little sprinkles โ€” they give so much personality with just a few embroidery stitches. The pattern is structured so you can follow each round easily, which I find makes the whole project relaxing and satisfying. I hope you feel the same joy making and gifting this little gingerbread friend.

Gingerbread Amigurumi Pattern step 1 - construction progress Gingerbread Amigurumi Pattern step 2 - assembly progress Gingerbread Amigurumi Pattern step 3 - details and accessories Gingerbread Amigurumi Pattern step 4 - final assembly and finishing

Switch Things Up

I love how easy it is to customize this gingerbread pattern by changing yarn colors; try pastel yarns for a softer look or bright colors for a playful version.

I often make the doll bigger or smaller by switching yarn weight and hook size; bulky yarn with a larger hook produces a chunky, cuddly version while thinner yarn makes a tiny keychain-sized friend.

I sometimes swap the white icing for cream or pink and add metallic embroidery thread for sparkly sprinkles when gifting for special occasions.

I like to experiment with different eye sizes and placements to change the expression โ€” moving the eyes slightly closer or farther apart creates very different personalities.

For a posable version, I add thin wire inside the limbs so they can be bent; this makes a great decorative piece if you want the arms posed holding tiny props.

I also enjoy adding little accessories like crocheted scarves, hats, or felt buttons to make mini outfits and seasonal variations.

Another idea I use is to embroider small cheeks or freckles for a more detailed face โ€” just a couple of small stitches and a contrast yarn color can change the whole vibe.

If you prefer a safer toy for small children, substitute embroidered eyes instead of safety eyes and sew buttons securely or replace them with crocheted appliques.

I encourage you to mix techniques too: try surface slip-stitch decoration on the body or add a tiny crocheted candy cane as a prop for a holiday set.

Finally, I recommend creating a matching set by varying sizes and colors โ€” a family of gingerbread dolls makes a charming seasonal display and lovely handmade gifts.

Common Mistakes & How to Fix Them

โœ— Skipping stitch markers when working in continuous rounds can cause you to lose the start of the round; place a marker at the beginning of each round and move it as you crochet. โœ— Stuffing too much at once causes lumps and uneven shaping; stuff gradually in small amounts while shaping to keep a smooth finish. โœ— Not counting stitches after increases or decreases will lead to incorrect shaping; count your stitches often and at the end of each round to ensure accuracy. โœ— Changing tension mid-project creates uneven fabric and mismatched parts; maintain consistent tension and check gauge by comparing completed pieces as you go. โœ— Forgetting to secure color changes and ends can cause unraveling later; weave in ends as you change colors and after finishing each piece to keep everything tidy.

Gingerbread Amigurumi Pattern

Make a sweet gingerbread amigurumi with clear step-by-step rounds and charming details. This pattern guides you through crocheting the hat, body, arms, and finishing touches so you can create a delightful handmade companion. Perfect as a gift or seasonal decoration, the finished doll measures about 15 cm with the recommended yarn and hook. Enjoy stitching the little details like the icing hat and sprinkles for added personality.

Intermediate 5-7 Hours

Materials Needed for Gingerbread Amigurumi Pattern

โ€” Main Fabric

  • 01
    White yarn suitable for 1.80-2.00mm hook (YarnArt Jeans brand used in project) - small amount for hat and icing
  • 02
    Brown yarn suitable for 1.80-2.00mm hook - approximately 50-100g for body, head, arms
  • 03
    Colored yarn scraps for sprinkles (small amounts of pink, blue, yellow)
  • 04
    White and black sewing yarn for facial details
  • 05
    Fiberfill stuffing - small bag
  • 06
    3 small buttons for decoration
  • 07
    8 mm safety eyes (2 pieces)

โ€” Tools Required

  • 01
    Crochet hook size 1.80-2.00 mm
  • 02
    Scissors
  • 03
    Sewing needle for assembly and embroidery
  • 04
    Yarn needle for weaving in ends
  • 05
    Stitch markers
  • 06
    Polyester fiberfill stuffing
  • 07
    Pins for assembly (optional)
  • 08
    3 small buttons
  • 09
    8 mm safety eyes (2 pieces)

Progress Tracker

0% Complete

โ€” Hat :

Info :

Start with white color.

Round 1 :

6 sc into a magic ring. (6)

Round 2 :

(inc) 6 times. (12)

Round 3 :

(sc,inc) 6 times. (18)

Round 4 :

(2sc, inc) 6 times. (24)

Round 5 :

(3sc, inc) 6 times. (30)

Round 8 :

(4 sc, inc) 6 times. (36)

Round 9 :

(5sc, inc) 6 times. (42)

Round 10 :

(6 sc,inc) 6 times. (48)

Round 11 :

(7sc, inc) 6 times. (54)

Round 12 :

(8sc, inc) 6 times. (60)

Round 13 :

(Skip 2 stitches, 5 dc in 1 stitch, skip 2 stitches, sc) Repeat along the whole row.

โ€” Materials :

Info :

Hook: 1.80-2.00. White and brown yarns suitable for your hook. (YarnArt jeans brand yarn was used in the project) White and black sewing yarn. 3 small buttons. Colored yarns. Bowknot. Needle. Fiberfill. 8 mm eyes.

โ€” Abbreviations :

Infos :

ch- Chain stitch. sc- Single crochet. dc- Double crochet. hdc- Half double crochet. sl st- Slip stitch. inc- Single crochet increase. dec- Single crochet decrease. blo- Back loops only. flo- Front loops only.

โ€” Face seam :

Info :

Face seam

Info :

Start with brown color.

Round 1 :

15 ch, starking from 2nd ch inc, 12 sc, 3 sc in 1 stitch (work on the other side of the chain) 13 sc. (30)

Round 2 :

2 inc, 12 sc, 3 inc, 12 sc, inc. (36)

Round 3 :

(sc, inc) 2 times, 13 sc, (inc,sc) 3 times, 12 sc, inc. (42)

Round 4 :

(2 sc, inc) 2 times, 14 sc, (inc, 2 sc) 3 times,13 sc, inc. (48)

Round 5 :

BLO sc around. (48)

Round 6 :

sc around. (48)

Round 7 :

(7 sc, inc) 6 times. (54)

Round 8-14 :

sc around. (54)

Round 15 :

(7 sc, dec) 6 times. (48)

Round 16-18 :

sc around. (48)

Round 19 :

(6 sc,dec) 6 times. (42)

Round 20-22 :

sc around. (42)

Round 23 :

(5 sc, dec) 6 times. (36)

Round 24-26 :

sc around. (36)

Round 27 :

(4 sc, dec) 6 times. (30)

Round 28-30 :

sc around. (30)

Round 31 :

(4 sc, inc) 6 times. (36)

โ€” Body :

Round 32 :

(5 sc, inc) 6 times.(42)

Round 33 :

(6 sc,inc) 6 times. (48)

Round 34 :

(7 sc,inc) 6 times. (54)

Round 35 :

(8 sc,inc) 6 times. (60)

Round 36-48 :

sc around. (60)

Round 49 :

(8 sc,dec) 6 times. (54)

Round 50 :

(7 sc,dec) 6 times. (48)

Round 51 :

(6 sc,dec) 6 times.(42)

Round 52 :

(5 sc,dec) 6 times.(36)

Round 53 :

(4 sc,dec) 6 times. (30)

Round 54 :

(3 sc,dec) 6 times.(24)

Round 55 :

(2 sc,dec) 6 times. (18)

Round 56 :

(sc,dec) 6 times.(12)

Round 57 :

dec.

Info :

Attach the eyes to the 43rd and 44th rows, 9 stitches apart.

โ€” Arms :

Info :

Start with brown color.

Round 1 :

6 sc into a magic ring. (6)

Round 2 :

(inc) 6 times. (12)

Round 3 :

(sc,inc) 6 times. (18)

Round 4 :

BLO sc around. (18)

Round 5-7 :

sc around. (18)

Round 8 :

(4 sc,dec) 3 times. (15)

Round 9-11 :

sc around. (15)

Round 12 :

(3 sc,dec) (12)

Info :

Crochet the two edges together at the same time.

โ€” Assembly :

Info :

Sew arms to the body.

Info :

Attach eyes to the 43rd and 44th rows, 9 stitches apart.

Info :

Embroider the mouth and additional facial details with white and black sewing yarn as shown in photos.

Info :

Decorate the hat with colored yarn sprinkles using a needle and embroidery stitches.

Assembly Instructions

  • Attach the eyes to the 43rd and 44th rows, 9 stitches apart, before securing the area and finishing stuffing.
  • Sew arms to the body on either side at the desired height, using a ladder stitch or whipstitch and secure tightly.
  • Position and sew the hat onto the head, aligning the edge of the icing with the topmost rounds and tack it in multiple places for stability.
  • Embroider the mouth and sprinkle details using white and colored sewing yarn; refer to photos for placement and stitch type.
  • Sew buttons and bowknot to the front of the body as decoration, ensuring they are firmly attached and safe if the toy will be handled.

Important Notes

  • ๐Ÿ’กRemember to fill in the pieces as you go; stuffing progressively gives the best shape and prevents lumps.
  • ๐Ÿ’กThe finished size will vary depending on the yarn used; with the recommended yarn the approximate finished size is 15 cm.
  • ๐Ÿ’กUse stitch markers to keep track of round starts and changes, especially when working continuous rounds or complex shaping.
  • ๐Ÿ’กPin parts in place before sewing to ensure symmetry and correct positioning before final attachment.

This Gingerbread amigurumi pattern is a delightful little project that brings cozy holiday charm to your hands. ๐Ÿงถ Follow the step-by-step rounds and photo tips to create a polished finished piece full of personality. ๐ŸŽ€ Perfect for gifting or keeping on your shelf as seasonal decor โ€” happy crocheting! โœจ

You ask,

we answer.

FAQs

What size will the finished piece be?

The finished amigurumi measures approximately 15 cm tall when using the recommended YarnArt Jeans yarn and a 1.80-2.00 mm hook.

Can I use different yarn weights for this pattern?

Yes, you can use different yarn weights, but this will affect the final size; use an appropriate hook for your chosen yarn and expect different measurements.

Do I need prior crochet experience for this pattern?

This pattern is rated intermediate, so basic knowledge of single crochet, increases, decreases, and working in rounds is recommended for best results.

How long does this project typically take to complete?

Most crocheters complete this project in 5-7 hours depending on experience and how much time you spend on decorative details.

Where should I place the safety eyes?

Place the safety eyes between the 43rd and 44th rounds, 9 stitches apart, before securing and finishing stuffing the head.