🧢 Beautiful ✨ Detailed πŸ’ Adorable

Field of Daisies Crochet Blanket Pattern

Field of Daisies Crochet Blanket Pattern
4.2β˜… Rating
12-15 Hours Time Needed
3.0K Made This
βœ‚οΈ

Beginner Friendly Level

Perfect for those just starting their crochet journey, with clear instructions and simple techniques

⏱️

Multi-Day Project

A rewarding 12+ hour journeyβ€”perfect for dedicated crafters who love detailed work.

πŸ€—

Soft Hug

Gentle, plush, and full of warmth, creating a sense of comfort and coziness wherever they find a home.

About This Field of Daisies Crochet Blanket Pattern

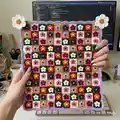
This pattern creates a vibrant crocheted blanket made from 5Β½" flower motifs joined together to form a colorful throw. You will make six colorway motif variations and join them following the included assembly diagram. The design includes clear rounds for each motif, edging instructions, and corner flower pompoms for a playful finish.

Field of Daisies Crochet Blanket Pattern crochet pattern - detailed view of completed project

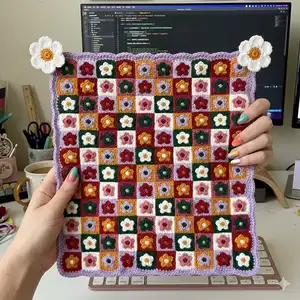
Detailed instructions include motif rounds, how-to for flower pompoms, and step-by-step edging and assembly. The finished blanket measures approximately 57" x 68" for a generous throw-size project.

Why You'll Love This Field of Daisies Crochet Blanket Pattern

I absolutely love this pattern because it turns simple rounds into a joyful field of flowers that brighten any room. I enjoy the rhythmic repetition of making motifs while experimenting with color combinations. The joining method through back loops keeps seams neat and gives a tidy finish I am proud of. Adding flower pompoms to the corners makes the blanket feel whimsical and hand-finished, which I find incredibly satisfying.

Field of Daisies Crochet Blanket Pattern step 1 - construction progress Field of Daisies Crochet Blanket Pattern step 2 - assembly progress Field of Daisies Crochet Blanket Pattern step 3 - details and accessories Field of Daisies Crochet Blanket Pattern step 4 - final assembly and finishing

Switch Things Up

I love customizing the color placement to create different vibes; try using cool tones like blues and greens for a calming throw.

I sometimes swap yarn weight and use a bulky yarn with a larger hook for a chunky, cozy blanket version.

I also like making a mini version by using a sport or fingering weight yarn and a smaller hook for a lap-sized or baby blanket.

I often change the edging β€” a scallop or shell border looks beautiful instead of the written 3rd rnd for a softer finish.

I like to vary the motif order using my own assembly grid to create chevrons, diagonals, or randomized scrappy layouts.

I add embroidered centers or French knots for extra texture when I want a more detailed flower center.

I sometimes skip the pompoms and instead add tassels to each corner for a boho look that still feels playful.

I recommend trying a monochrome palette with tonal changes for a modern take that still highlights the flower texture.

I also experiment with joining methods β€” whipstitch or flat join can change the blanket drape and seam visibility.

I encourage you to mix and match techniques, like adding a contrasting running stitch between squares to frame each motif uniquely.

Common Mistakes & How to Fix Them

βœ— Not counting stitches after each round can quickly throw off motif shape; count your stitches at the end of every round to ensure accuracy. βœ— Joining motifs through both loops instead of back loops only will change the blanket texture; sew motifs together through back loops only as instructed for a neat seam. βœ— Using inconsistent tension across motifs creates uneven squares and wavy seams; keep tension steady and match your gauge for all motifs. βœ— Overstuffing flower pompoms makes corners bulky and uneven; stuff the flowers lightly and gradually before completing the last petal to keep them neat.

Field of Daisies Crochet Blanket Pattern

Make a cheerful Field of Daisies crochet blanket using colorful flower motifs and simple joining techniques. This pattern guides you through each motif round, assembly diagram, and edging so you can create a bright, handmade throw. Perfect for gifting or adding a playful pop of color to your home.

Beginner Friendly 12-15 Hours

Materials Needed for Field of Daisies Crochet Blanket Pattern

β€” Main Fabric

  • 01
    Red Heart Super Saver (7 oz/198 g; 364 yds/333 m)
  • 02
    Contrast A Carrot (0256) - 2 balls or 545 yds/498.5 m
  • 03
    Contrast B Gold (0321) - 2 balls or 545 yds/498.5 m
  • 04
    Contrast C Paddy Green (0368) - 2 balls or 545 yds/498.5 m
  • 05
    Contrast D Pale Plum (0579) - 2 balls or 665 yds/608 m
  • 06
    Contrast E Soft White (0316) - 2 balls or 620 yds/567 m
  • 07
    Contrast F Light Raspberry (0774) - 2 balls or 545 yds/498.5 m

β€” Tools Required

  • 01
    Crochet hook size U.S. H/8 (5 mm) Susan Bates Silvalume or size needed to obtain gauge
  • 02
    Susan Bates yarn needle
  • 03
    Fiberfill stuffing for corner Flower Pompoms

Progress Tracker

0% Complete

β€” Motifs :

Motif 1 :

With A as Color 1, F as Color 2, and E as Color 3 - make 20 Motifs.

Motif 2 :

With B as Color 1, E as Color 2, and C as Color 3 - make 20 Motifs.

Motif 3 :

With C as Color 1, D as Color 2, and B as Color 3 - make 20 Motifs.

Motif 4 :

With D as Color 1, C as Color 2, and F as Color 3 - make 20 Motifs.

Motif 5 :

With E as Color 1, B as Color 2, and A as Color 3 - make 20 Motifs.

Motif 6 :

With F as Color 1, A as Color 2, and D as Color 3 - make 20 Motifs.

Infos :

See Diagram. With Color 1, ch 4. Join with sl st to first ch to form ring.

Round 1 :

Ch 3. 9 dc in ring. Join Color 2 with sl st to top of beg ch 3. Break Color 1. 10 dc.

Round 2 :

With Color 2, ch 3. 1 dc in first dc. *2 dc in next dc. Rep from * around. Join with sl st to beg of ch 3. 20 dc.

Round 3 :

Skip first dc. *(1 dc, 1 tr) in next dc. 3 tr in next dc. (1 tr, 1 dc) in next dc. Sl st in next dc. Rep from * around, ending by joining with sl st to top of ch-3. Fasten off.

Round 4 :

Join Color 3 with sl st to any centre tr of 3-tr group. Ch 1. 1 sc in same sp as sl st. *1 hdc in next tr. 1 dc in each of next 2 sts. 1 tr in same st as sl st from previous (3rd) rnd. 1 dc in each of next 2 sts. 1 hdc next tr. 1 sc in next tr. Rep from * around, omitting last sc and joining with sl st to first sc.

Round 5 :

Ch 1. 1 sc in same sp as sl st. *1 hdc in next st. 1 dc in next st. 2 dc in next st. (1 tr. Ch 1. 1 tr) in next st (corner made). 2 dc in next st. 1 dc in next st. 1 hdc in next st. 1 sc in each of next 3 sts. Rep from * around, ending with 1 sc in each of last 2 sts. Join with sl st to first sc. Fasten off.

Infos :

Notes: Ch 2 at beg of rnd does not count as st. Ch 3 at beg of rnd counts as dc.

β€” Flower "POMPOMS" :

Flowers (P1) :

With B, ch 4. Join with sl st to first ch to form ring.

Round 1 :

Ch 3. 9 dc in ring. Join E with sl st to top of beg ch 3. Break B. 10 dc.

Round 2 :

With Color 2, ch 3. 1 dc in first dc. *2 dc in next dc. Rep from * around. Join with sl st to beg of ch 3. 20 dc.

Round 3 :

Skip first dc. *(1 dc, 1 tr) in next dc. 3 tr in next dc. (1 tr, 1 dc) in next dc. Sl st in next dc. Rep from * around, ending by joining with sl st to top of ch-3. Fasten off.

Round 4 :

Join Color 3 with sl st to any centre tr of 3-tr group. Ch 1. 1 sc in same sp as sl st. *1 hdc in next tr. 1 dc in each of next 2 sts. 1 tr in same st as sl st from previous (3rd) rnd. 1 dc in each of next 2 sts. 1 hdc next tr. 1 sc in next tr. Rep from * around, omitting last sc and joining with sl st to first sc.

Round 5 :

Ch 1. 1 sc in same sp as sl st. *1 hdc in next st. 1 dc in next st. 2 dc in next st. (1 tr. ch 1. 1 tr) in next st (corner made). 2 dc in next st. 1 dc in next st. 1 hdc in next st. 1 sc in each of next 3 sts. Rep from * around, ending with 1 sc in each of last 2 sts. Join with sl st to first sc. Fasten off.

Infos :

Flowers: make 2 for each Pompom. Make 4 Flower 'POMPOMS' total (2 Flowers sewn together = 1 Pompom).

β€” Assembly :

Info :

Sew Motifs tog through back loops only as shown in Assembly diagram on page 3.

Edging 1st rnd :

(RS). Join D with sl st to any corner. Ch 2. Work 1 rnd of hdc evenly around all sides, working 3 hdc in each corner. Join with sl st to first hdc.

Edging 2nd rnd :

Ch 2. 1 hdc in each hdc around, working 3 hdc in each corner hdc. Join with sl st to first hdc. Fasten off.

Edging 3rd rnd :

Skip first dc. *(1 dc. 1 tr) in next dc. 3 tr in next dc. (1 tr. 1 dc) in next dc. Sl st in next dc. Rep from * around, ending by joining with sl st to top of ch-3. Fasten off.

Flower Pompom Assembly :

With 2 Flowers held WS tog, join with sl st anywhere around edge. 1st rnd: Working through both thicknesses and back loops only, sl st around Flowers, stuffing lightly before completing 5th petal. Fasten off. Sew one Flower Pompom to each corner of Blanket.

Assembly Instructions

  • Sew Motifs together through back loops only following the Assembly diagram on page 3 for the correct placement and order.
  • Join D for edging: join with sl st to any corner and work 1 rnd of hdc evenly around, placing 3 hdc in each corner and join to first hdc.
  • Work 2nd edging rnd in hdc evenly around, then complete the decorative 3rd rnd as written; fasten off securely.
  • Make Flower Pompoms by joining two flower pieces WS together, slip stitching through back loops only, stuffing lightly before completing final petal, then sew one pompom to each corner of the blanket.

Important Notes

  • πŸ’‘Use the recommended hook or adjust hook size to obtain the gauge of 12 sc and 15 rows = 4" (10 cm).
  • πŸ’‘Sew motifs through back loops only to match the assembly diagram and achieve the intended textured seam.
  • πŸ’‘Work flower pompoms with light stuffing only to avoid bulky corners that distort the blanket shape.
  • πŸ’‘Keep consistent tension across all motifs so that squares match in size for a neat assembly.

This Field of Daisies blanket brings a playful garden of color to your home with bright flower motifs and soft borders. The pattern includes full motif rounds, an assembly diagram, and charming corner flower pompoms for a handmade finishing touch. Make it for yourself or as a heartfelt gift that will brighten anyone's day. 🧢🌼

You ask,

we answer.

FAQs

What size will the finished piece be?

The finished blanket measures approximately 57" x 68" (145 x 173 cm) using the recommended yarn and hook size.

Can I use different yarn weights for this pattern?

Yes β€” changing yarn weight will change the final size; match your new yarn with an appropriate hook and check gauge to achieve desired dimensions.

Do I need prior crochet experience for this pattern?

This pattern is rated beginner friendly and uses basic stitches like sc, hdc, dc and tr, but familiarity with working in rounds and joins will be helpful.

How long does this project typically take to complete?

Most crocheters take around 12-15 hours to finish this blanket, depending on experience, speed, and how quickly you make each motif.