🧶 Beautiful ✨ Detailed 💝 Adorable

Gatitos Amigurumi Pattern

Gatitos Amigurumi Pattern
4.0★ Rating
2-3 Hours Time Needed
3.5K Made This
✂️

Beginner Friendly Level

Perfect for those just starting their crochet journey, with clear instructions and simple techniques

⏱️

Bite-Sized Project

Finishes in 2-4 hours—perfect for an afternoon of creative relaxation.

🧸

Cute Companion

An adorable friend to cherish, handcrafted with love to bring comfort and joy for years to come.

About This Gatitos Amigurumi Pattern

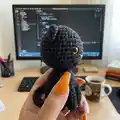
This pattern teaches you how to crochet a tiny kitten amigurumi with separate pieces for head, body, ears, legs and tail. It uses basic single crochet shaping with increases and decreases to form soft, rounded shapes. The pattern also includes detailed embroidery instructions to create an expressive face. Ideal for using scrap yarn and making multiple color variations.

Gatitos Amigurumi Pattern crochet pattern - detailed view of completed project

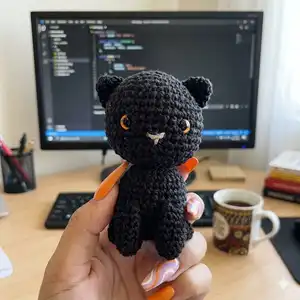
Clear round-by-round instructions make it easy to follow even if you are new to amigurumi. Photos and finishing notes help with placement of eyes, embroidery, and assembly.

Why You'll Love This Gatitos Amigurumi Pattern

I absolutely love this pattern because it turns a few simple stitches into a tiny, heartwarming companion. I designed it to be quick to make, so you can finish a whole litter of kittens in an afternoon. I enjoy adding expressive embroidered noses and eye details that give each kitten its own personality. Sharing this pattern lets me see all the creative color choices crocheters make, and that always inspires me.

Gatitos Amigurumi Pattern step 1 - construction progress Gatitos Amigurumi Pattern step 2 - assembly progress Gatitos Amigurumi Pattern step 3 - details and accessories Gatitos Amigurumi Pattern step 4 - final assembly and finishing

Switch Things Up

I love customizing these kittens by changing yarn colors to create tabby, calico, or solid-color cats; try mixing two strands for a heathered look.

To make the kitten larger or smaller, change your yarn weight and corresponding hook size; chunky yarn with a bigger hook makes a plush, cuddly version.

I often add tiny crocheted accessories like scarves, bows or little hats to give each kitten a personality and seasonal flair.

If you want a posable kitten, try inserting a thin wire into the limbs before stuffing to allow for gentle shaping and posing.

Experiment with eye styles: use safety eyes, embroidered eyes, or French knots for different expressions and safety needs.

Try embroidering whiskers with contrasting embroidery thread or thin fishing line for a realistic look that lasts.

For a different texture, use a boucle or fuzzy yarn for a fluffy kitten; just be careful with stuffing and finishing to hide fibers.

I sometimes stuff the head slightly less for a floppy look, or more firmly for a firm, upright head depending on the character I want.

Mix yarns for multi-colored faces by changing colors at specific rounds to create masks or patches on the kitten's face.

Personalize the face by adjusting eye placement and embroidery height to create sleepy, surprised, or mischievous expressions.

Common Mistakes & How to Fix Them

✗ Placing safety eyes too low or too close together will change the kitten's expression; mark and double-check eye placement before inserting eyes and always measure the spacing evenly. ✗ Skipping stuffing until the end can make shaping difficult; stuff gradually as you progress so the head and body keep a smooth, consistent shape. ✗ Cutting the finishing tail too short will make sewing pieces together hard; leave a long yarn tail for sewing and weaving so you can secure pieces neatly. ✗ Not counting stitches after increases or decreases leads to uneven shaping; count your stitches at the end of each round and use a stitch marker to mark round starts.

Gatitos Amigurumi Pattern

Make an adorable little crochet kitten with this easy-to-follow pattern. You will create a small, poseable amigurumi with clear rounds and step-by-step assembly notes. Perfect for gifting or decorating, the pattern includes embroidery tips for a charming face. Grab your yarn and needles and enjoy crafting a tiny feline friend.

Beginner Friendly 2-3 Hours

Materials Needed for Gatitos Amigurumi Pattern

— Main Fabric

  • 01
    80g fine cotton yarn (3-ply), approximate total amount
  • 02
    Colors of your choice - small amounts for accents
  • 03
    Safety eyes size 6 (6mm) - 2 pieces
  • 04
    Embroidery yarn or contrasting yarn for nose and eye details

— Tools Required

  • 01
    Darning needle (Aguja lanera)
  • 02
    Safety eyes 6mm (Ojos de seguridad del n°6)

Progress Tracker

0% Complete

— Materials :

Info :

80grs de Hilo de algodón fino o de 3 cabos. Colores a elección. Aguja lanera. Ojos de seguridad del n°6.

— Abbreviations :

Infos :

pb= Punto Bajo. aum= Aumento. dism= Disminución. pd= Punto Deslizado. cad/cads= Cadena/ Cadenas.

— Cabeza :

Round 1 :

6 pb en Anillo Mágico (6pb)

Round 2 :

6 aum seguidos *6 veces (12pb)

Round 3 :

(1 pb, aum) (18pb)

Round 4 :

(2 pb, aum) (24pb)

Round 5 :

(3 pb, aum) (30pb)

Round 6 :

(4 pb, aum) (36pb)

Round 7 :

(5 pb, aum) (42pb)

Round 8-14 :

(solo pb) (42pb)

Round 15 :

(5pb, dism) (36pb)

Round 16 :

(4pb, dism) (30pb)

Info :

*Colocar ojos, bordar detalles y rellenar*

Round 17 :

(3pb, dism) (24pb)

Round 18 :

(2pb, dism) (18pb)

Round 19 :

(1pb, dism) (12pb)

Round 20 :

(6 dism seguidas) (6pb)

Info :

Terminar con punto deslizado y cortar el hilo con suficiente longitud para pasar con una aguja de coser por los 6pb. Tirar del hilo. Hacer un nudo

— Orejas x2 :

Round 1 :

6 pb en Anillo Mágico (6pb)

Round 2 :

(solo pb) (6pb)

Round 2 :

6 aum seguidos *6 veces (12pb)

Round 3 :

(solo pb) (12pb)

Info :

Terminar con punto deslizado y cortar el hilo con suficiente longitud para usar este mismo hilo para coser la oreja a la cabeza

— Cuerpo :

Round 1 :

6 pb en Anillo Mágico (6pb)

Round 2 :

6 aum seguidos *6 veces (12pb)

Round 3 :

(1 pb, aum) (18pb)

Round 4 :

(2 pb, aum) (24pb)

Round 5 :

(3 pb, aum) (30pb)

Round 6 :

(4 pb, aum) (36pb)

Round 7-12 :

(solo pb) (36pb)

Round 13 :

(4pb, dism) (30pb)

Round 14 :

(3pb, dism) (24pb)

Info :

*Colocar ojos, bordar detalles y rellenar*

Info :

Terminar con punto deslizado y cortar el hilo con suficiente longitud para coser el cuerpo a la cabeza

— Bordado en la cara :

Infos :

1 calculamos el lugar donde va a ir nuestra nariz. 2 metemos la aguja en un punto un poco alejado de donde va a ir nuestra nariz. 3 sacamos la aguja en uno de los puntos marcados. 4 metemos la aguja en nuestro segundo punto y sacamos la aguja en el primer punto. 5 comenzamos a envolver este hilo hacemos tantas vueltas como nos parezca. 6 pasamos la aguja al centro de la nariz y bordamos una linea vertical, luego pasamos la aguja hacia donde metimos la aguja la primera vez. Hacemos un nudo con ambos hilos y los escondemos dentro del tejido.

Info :

Bordamos desde uno de los extremos de arriba (🔴) o abajo (🔴) hacia el medio (🔵) y luego desde el medio (🔵) hacia el extremo de abajo (🔴) o arriba (🔴)

— Patas de adelante :

Round 1 :

5 pb en Anillo Mágico (5pb)

Round 2 :

5 aum seguidos *5 veces (10pb)

Round 3-8 :

(solo pb) (10pb)

Info :

Terminar con punto deslizado y cortar el hilo con suficiente longitud para usar este mismo hilo para coser las patas al cuerpo

— Patas de atrás :

Round 1 :

5 pb en Anillo Mágico (5pb)

Round 2 :

5 aum seguidos *5 veces (10pb)

Round 3-4 :

(solo pb) (10pb)

Info :

Terminar con punto deslizado y cortar el hilo con suficiente longitud para usar este mismo hilo para coser las patas al cuerpo

— Cola :

Info :

Hacemos 12 cadenas. saltamos la ultima y la anteúltima cadena que realizamos y pasamos a hacer pm desde la cadena que sigue, en la cual vamos a hacer 3pm, pasamos a la cadena siguiente y hacemos 3pm después hacemos 6pm seguidos (uno en cada cadena) para que nos queden libres las ultimas 2cds donde vamos a hacer en cada una nuevamente 3pm.

Info :

Terminamos con pd, y cortamos el hilo. Con ese mismo hilo cosemos la cola al cuerpo.

Assembly Instructions

  • Attach head to body: use the yarn tail left from the head (after finishing round 20) and sew the head to the top opening of the body, pulling the yarn through the 6pb opening, tighten and knot securely.
  • Position and sew ears to the top sides of the head using the tail left on each ear; use the photos as reference to space ears symmetrically and sew firmly.
  • Place safety eyes between rounds 8-9 on the head before final stuffing; embroider nose and mouth following the embroidery steps, then hide knots inside the head.
  • Sew front and back legs to the bottom front and back of the body using the long tail left on each leg, spacing them evenly so the kitten can sit balanced.
  • Sew the tail to the lower back of the body using the tail yarn left from the tail, then weave in all ends and secure with knots hidden inside the body.

Important Notes

  • 💡Place safety eyes before closing the head and stuffing; this makes placement and embroidery much easier and more accurate.
  • 💡Embroider facial details before final assembly and after initial stuffing so features sit at the correct depth and position.
  • 💡Leave long yarn tails when finishing parts so you have enough length to sew pieces securely and weave in ends neatly.

Thanks for making these little kittens with me — I hope they brighten your day and make lovely handmade gifts. 🧶 These tiny friends are quick to make and perfect for practicing shaping and embroidery. ✨ Share your finished kittens and tag me so I can see your sweet creations! ❤️

You ask,

we answer.

FAQs

What size will the finished piece be?

The finished kitten is a small amigurumi measuring roughly 8-12 cm tall depending on yarn weight and hook size used.

Can I use different yarn weights for this pattern?

Yes, you can use different yarn weights but the finished size will change; adjust your hook accordingly and expect differences in texture and detail.

Do I need prior crochet experience for this pattern?

This pattern is beginner friendly, but basic knowledge of single crochet, increases, decreases, magic ring and simple embroidery will help you complete it more easily.

How long does this project typically take to complete?

Most crocheters finish one kitten in about 2-3 hours, though time may vary based on experience and how much detailing you add.