🧢 Beautiful ✨ Detailed πŸ’ Adorable

Fried Egg Amigurumi Pattern

Fried Egg Amigurumi Pattern
4.4β˜… Rating
1.5 Hours Time Needed
3.0K Made This
βœ‚οΈ

Beginner Friendly Level

Perfect for those just starting their crochet journey, with clear instructions and simple techniques

⏱️

Quick Make

Complete in under 2 hoursβ€”lightning fast fun for instant gratification and quick gifts.

🎁

Tiny Treasure

Small, sweet, and gift-worthy creations that fit perfectly in the palm of your hand with detailed charm.

About This Fried Egg Amigurumi Pattern

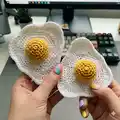
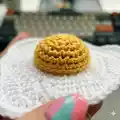
This pattern creates a cute fried egg amigurumi made of two crocheted parts: the egg white and a stuffed yolk. The yolk is slightly stuffed to give a realistic rounded look, then sewn on top of the white. It is a fast, fun make that’s perfect for practicing rounds and simple shaping.

Fried Egg Amigurumi Pattern crochet pattern - detailed view of completed project

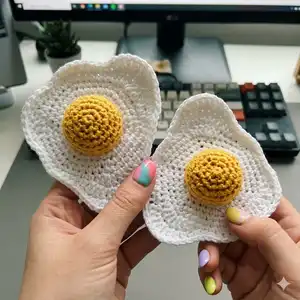
Both pieces start with a magic ring and are worked in continuous spiral rounds without slip stitch joins. The finished piece measures approximately 4 inches across and is written in US crochet terms.

Why You'll Love This Fried Egg Amigurumi Pattern

I absolutely love this pattern because it combines simple stitches into a charming, playful result that even beginners can enjoy. I enjoy the instant gratification of finishing a cute food amigurumi in a short sitting and the versatility of gifting it as a keyring, play prop, or decor. The stuffed yolk adds a satisfying 3D element that brings the little egg to life. I also love how easy it is to customize with yarn colors or size changes.

Fried Egg Amigurumi Pattern step 1 - construction progress Fried Egg Amigurumi Pattern step 2 - assembly progress Fried Egg Amigurumi Pattern step 3 - details and accessories Fried Egg Amigurumi Pattern step 4 - final assembly and finishing

Switch Things Up

I love customizing this pattern by changing yarn colors and sizes to make a whole breakfast set.

I often use pastel yarns for a cute nursery theme or bright colors for playful decor.

To make a bigger version, I switch to a bulkier yarn and a larger hook for a chunky, cuddly egg.

For a tiny keychain, I use finer yarn and a smaller hook and attach a ring for portability.

I sometimes embroider small details on the yolk or add a tiny felt heart for personality.

I like to make sets with toast, bacon, or a coffee cup using matching yarn to create a cohesive breakfast collection.

If I want the yolk to be more pronounced, I add more stuffing and slightly increase the rounds before closing.

I recommend experimenting with different seam placements for varied looks; offsetting the yolk gives a casual, fried appearance.

I also try different finishes like attaching a loop to hang it as an ornament or sewing on a button for a playful accent.

I enjoy gifting customized eggs with initial letters or themed colors to make them extra special for friends.

Common Mistakes & How to Fix Them

βœ— Skipping the magic ring start can lead to a hole in the center; always begin rounds in a magic ring and pull tight for a neat center. βœ— Forgetting to work in a spiral (instead of joining rounds) will create an obvious seam; do not join with slip stitches and use a stitch marker to mark your round start. βœ— Overstuffing the yolk will distort the shape and make sewing difficult; stuff gradually and stop when the yolk is firm but not stretched. βœ— Not counting stitches during complicated shaping rounds results in uneven or lopsided pieces; count after each round and correct immediately if you miscount. βœ— Using inconsistent tension between the white and yolk can cause uneven fit when sewing; try to maintain a steady tension so the yolk sits flat and centered.

Fried Egg Amigurumi Pattern

Make a charming fried egg amigurumi with this simple, quick crochet pattern. You will crochet two pieces (white and yolk), stuff the yolk for a realistic shape, and sew them together to create an adorable food-themed toy. The pattern is written in US terms and uses basic stitches, making it approachable and satisfying to finish in one sitting.

Beginner Friendly 1.5 Hours

Materials Needed for Fried Egg Amigurumi Pattern

β€” Main Fabric

  • 01
    DMC Natura Just Cotton - White (Ibiza) - small amount for egg white
  • 02
    DMC Natura Just Cotton - Yellow (16 Tournesol) - small amount for yolk

β€” Tools Required

  • 01
    Crochet hook size 3 mm
  • 02
    Toy stuffing (polyester fiberfill) for the yolk
  • 03
    2 stitch markers
  • 04
    Scissors
  • 05
    Yarn needle for sewing and weaving ends
  • 06
    Extra white yarn for sewing the yolk to the white (same yarn as used for the white)

Progress Tracker

0% Complete

β€” Egg white :

Info :

Note: This cute fried egg is made of two parts, which are sewn together. The yolk is additionally stuffed with some toy filling, for more realistic look. Both pieces require starting with a magic ring and crocheting in a spiral (without joining the separate rounds with a slip stitch). The finished piece measures approximately 4 inches and it takes about 1.5 hours to make. The pattern is written in US terms.

Info :

Gauge: 2'' = 12 sts x 13 rows in sc

Round 1 :

6 sc in MR (6)

Round 2 :

inc x 6 (12)

Round 3 :

(sc, inc) x 6 (18)

Round 4 :

(2 sc, inc) x 6 (24)

Round 5 :

(3 sc, inc) x 6 (30)

Round 6 :

(4 sc, inc) x 6 (36)

Round 7 :

(5 sc, inc) x 6 (42)

Round 8 :

(6 sc, inc) x 6 (48)

Round 9 :

4 sc, 2ndc, 3dc inc, hdc, 3 sc, 3 hdc, 4 sc, hdc, dc, dc inc, dc, hdc, 11 sc, hdc, dc inc, dc, dc inc, hdc, 7 sc (54)

Round 10 :

3 sc, 3 hdc, dc, 3 dc inc, dc, hdc, 28 sc, hdc, dc, 3 dc inc, dc, 3 hdc, 5 sc (60)

Round 11 :

5 sl st, 11 sc, 3 sl st, 5 sc, 2 sl st, 4 sc, inc, 3 sc, 3 sl st, 8 sc, hdc, dc, 3 dc inc, dc, hdc, 3 sc, 5 sl st (64)

Info :

Fo and weave in the ends.

β€” Yolk :

Round 1 :

6 sc in MR (6)

Round 2 :

inc x 6 (12)

Round 3 :

(sc, inc) x 6 (18)

Round 4 :

(2 sc, inc) x 6 (24)

Round 5-7 :

sc around (24)

Round 8 :

sl st around (24)

Info :

Fo and weave in the ends.

β€” Assembly :

Info :

Choose the right spot for the yolk and sew it to the egg white.

Info :

Ideally do it with your white yarn, using some hidden seam. Stuff it just before finishing the seam.

Info :

Well done! You have just made your perfect fried egg :) What are you going to cook crochet next?

Info :

For a beginner friendly photo tutorial visit : https://manyevenings.com/en/how-to-make-the-perfect-fried-egg

Assembly Instructions

  • Choose the right spot for the yolk and sew it to the egg white using matching white yarn and a hidden stitch.
  • Position the yolk in the center area of the egg white and pin or hold it in place before sewing to ensure symmetry.
  • Stuff the yolk with toy filling just before finishing the seam so it retains a rounded, realistic shape.
  • Use small whipstitches or mattress stitch with white yarn to create an invisible join between the yolk and the white.
  • Weave in all ends securely on the inside of the egg and trim any excess yarn for a neat finish.

Important Notes

  • πŸ’‘Start both the white and the yolk with a magic ring and crochet them in a continuous spiral without joining rounds.
  • πŸ’‘Stuff the yolk lightly and evenly to maintain a rounded shape; overstuffing will distort the finished egg.
  • πŸ’‘Use stitch markers to mark the start of rounds for easier counting and to avoid accidental increases or decreases.
  • πŸ’‘Work with consistent tension for both pieces so the yolk matches the size of the white when sewn together.

This little Fried Egg is a joyful, quick project that makes a wonderful handmade gift or kitchen decor piece. It’s small, adorable, and perfect for practicing basic amigurumi skills while creating something functional and fun. Thank you for crocheting along β€” may your hook stay swift and your yarn plentiful! 🧢🍳

You ask,

we answer.

FAQs

What size will the finished piece be?

The finished fried egg measures approximately 4 inches across when using the recommended DMC Natura Just Cotton and a 3 mm hook.

Can I use different yarn weights for this pattern?

Yes, you can use different yarn weights but the size will change; choose an appropriate hook for your yarn and expect a larger or smaller finished piece.

Do I need prior crochet experience for this pattern?

This pattern is beginner friendly and uses basic stitches, though familiarity with magic ring and working in continuous rounds is helpful.

How long does this project typically take to complete?

Most crocheters finish this fried egg in about 1.5 hours, though time may vary with experience and chosen yarn.