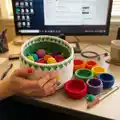
Create a delightful handmade fishing set with colorful crocheted fish, stacking bowls, a storage basket, and a rod with reel. This pattern gives you clear, photo-supported steps so you can make a playful toy set that doubles as a learning and sorting game. Perfect for gifting or adding a bright, tactile toy to your collection.
Progress Tracker
0% Complete
— Fish :
Round 1 :
MR + 6sc => 6 - work over the leftover yarn
Round 2 :
inc X 6 => 12 - pull the leftover yarn firmly (without breaking it) to close the MR
Round 3 :
(1 sc + 1 inc) X 6 => 18
Round 5 :
(2 sc + 1 inc) X 6 => 24
Round 6-11 :
sc X 24 => 24
Infos :
Place the eyes between rows 5 and 6, in the 3rd and the 6th increases. Establish a front side for the magnet and always place the magnet with that side on the exterior; The magnet goes inside the fish all the way to the mouth of the fish. To test that the magnet is in the correct position always keep a magnet close to you and check if it connects to all your fish on the same side; if your magnets are not strong enough placing two magnets inside the fish might help; Stuff your fish (don't overdo it - it will make it heavy and the magnets from the fishing rod won't help to lift it up; form the fish with your hands by pressing the thumb and the index against the eyes of the fish; continue crocheting the fish;
Round 12 :
(2 sc + 1 dec) X 6 => 18
Round 13 :
(1 sc + 1 dec) X 6 => 12
Info :
Add fiberfill to the fish until you are satisfied with the stuffing; Keep forming the fish by pressing the fingers on its eyes.
Round 17 :
(1 sc + 1 inc) X 6 => 18
Round 18 :
(2 sc + 1 inc) X 6 => 24
Round 19 :
fold the two parts of the tail together and crochet 12sc (insert the hook in every 2 stitches which are in front of each other; Cut the yarn and hide it with the hook or with a needle;
— Bowls :
Item Name (Smaller Bowl) :
Make six bowls, one for each fish. R1: MR + 6sc => 6 - work over the leftover yarn. R2: inc X 6 => 12 - pull the leftover yarn firmly (without breaking it) to close the MR. R3: (1 sc + 1 inc) X 6 => 18. R4: (2 sc + 1 inc) X 6 => 24. R5: (3 sc + 1 inc) X 6 => 30. R6: (4 sc + 1 inc) X 6 => 36. R7: (5 sc + 1 inc) X 6 => 42.
Round 8 :
BLO sc X 42 => 42
Round 9-15 :
sc X 42 => 42
Info :
Close by doing a slip stitch in the first slip stitch of row 16. Hide the thread and the bowl is finished
Item Name (Bigger Bowl) :
Make 3 bigger bowls with colors: R1: MR + 6sc => 6 - work over the leftover yarn. R2: inc X 6 => 12 - pull the leftover yarn firmly (without breaking it) to close the MR. R3: (1 sc + 1 inc) X 6 => 18. R4: (2 sc + 1 inc) X 6 => 24. R5: (3 sc + 1 inc) X 6 => 30. R6: (4 sc + 1 inc) X 6 => 36. R7: (5 sc + 1 inc) X 6 => 42. R8: (6 sc + 1 inc) X 6 => 48.
Round 9 :
BLO sc X 48 => 48
Round 10-16 :
sc X 48 => 48
Info :
Close by doing a slip stitch in the first slip stitch of row 17. Hide the thread and the bowl is finished.
— Storage Basket :
Round 1 :
MR + 6sc => 6 - work over the leftover yarn
Round 2 :
inc X 6 => 12 - pull the leftover yarn firmly (without breaking it) to close the MR
Round 3 :
(1 sc + 1 inc) X 6 => 18
Round 4 :
(2 sc + 1 inc) X 6 => 24
Round 5 :
(3 sc + 1 inc) X 6 => 30
Round 6 :
(4 sc + 1 inc) X 6 => 36
Round 7 :
(5 sc + 1 inc) X 6 => 42
Round 8 :
(6 sc + 1 inc) X 6 => 48
Round 9 :
(7 sc + 1 inc) X 6 => 54
Round 10 :
(8 sc + 1 inc) X 6 => 60
Round 11 :
(9 sc + 1 inc) X 6 => 66
Round 12 :
(10 sc + 1 inc) X 6 => 72
Round 13 :
(11 sc + 1 inc) X 6 => 78
Round 14 :
(12 sc + 1 inc) X 6 => 84
Round 15 :
(13 sc + 1 inc) X 6 => 90
Round 16 :
(14 sc + 1 inc) X 6 => 96
Round 17 :
(15 sc + 1 inc) X 6 => 102
Round 18 :
(16 sc + 1 inc) X 6 => 108
Round 19 :
(17 sc + 1 inc) X 6 => 114
Round 20 :
(18 sc + 1 inc) X 6 => 120
Round 21 :
BLO sc X 120 => 120
Round 22 - Round 31 :
sc X 120 => 120
Info :
Change yarn to white. To change the color, leave the last single crochet unfinished, then take the white yarn and pull it through to finish the sc. Cut the green yarn leaving a 5 cm tail. In the next row work over both the green and the white leftover yarn.
Round 32 :
sc X 120 => 120
Round 33 :
chain 3 + tr X 120 + sc in chain 3 in the beginning of the row: 120
Round 34 - Round 37 :
chain 3, tr X 120, sc in chain 3 from the beginning of the row => 120
Info :
Now change yarn to green.
Round 38 :
chain 3, tr X 120, sc in chain 3 from the beginning of the row => 120
Infos :
Close by doing a slip stitch in the first slip stitch of row 39. Hide the thread. To close the basket, make a string: chain 200 with the main color, cut the yarn even at ends. Insert the string in row 35 - go over 2 trebles, then under 2 trebles until you finish the row. To make this part easier you can use a needle.
— Rod :
Info :
You need to make the rod around the stick. The author used a stick 25 mm / 1 inch diameter and made 6 sc to work the way up. For length the author needed 90 rows to get to the top (27 cm / 10.6 inch): 30 rows in green (one third) and 60 rows in white (two thirds).
Round 1 :
MR + 6sc => 6 - work over the leftover yarn
Round 2 - Round 30 :
sc X 6 = 6;
Round 32 - Round 90 :
sc X 6 = 6; Make a slip stitch in the first stitch of row 90, cut the yarn leaving a tail for sewing. Take a needle and go through each front loop of the 6 sc from down to up (insert the needle with the wrong side to make sure you take only the front loop). Pull firmly and then hide the yarn inside.
Section A (The Rod) :
Start with green. R1: MR + 6sc => 6 - work over the leftover yarn. R2 - R3 - R4... - R30: sc X 6 = 6;
Info :
Switch to white: R31: BLO X 6 = 6; R32 - R33 - R34... - R90: sc X 6 = 6; Don't make more rows than needed to cover your stick tightly.
Section B (The Guides) :
Make 2; for the author's rod they needed to chain 12 so that the guides fit over the work but you might need more if you made more than 6 sc for your rod. R1: chain X 12; slip stitch in the first stitch; stop and test that you can place it over your rod. Continue in circle, working over the yarn left from the MR. R2: sc X 12; make a slip stitch in the first sc and then make one more in the middle going through sc 1 and 12; from there chain X 8 and slip stitch the last chain to the first one. Cut the yarn long enough for you to sew the guide over the rod (sew the guides to the rod at rows 65 and 85).
Section C (The Reel) - i. The sides :
make 4 (you will need to sew them 2 by 2). R1: MR + 6sc => 6 - work over the leftover yarn. R2: inc X 6 => 12 - pull the leftover yarn firmly (without breaking it) to close the MR. R3: (1 sc + 1 inc) X 6 => 18. R4: (2 sc + 1 inc) X 6 => 24. R5: (3 sc + 1 inc) X 6 => 30. Close by doing a slip stitch in the first sc of row 5. Leave at least 2 long threads for sewing. Place the sides 2 by 2. Make sure you have the front parts on the exterior and the end of the rows joined together. Sew each pair together.
Section C (The Reel) - ii. The middle part :
R1: chain X 18 => 18; continue working in circle. R2 - R3 - R4 = sc X 18 => 18; Now we need to attach the side parts. Start sewing the first side. It should fit perfectly in between rows 3 and 4 of the side part (just sew the interior part of the side so the sewing is not visible on the exterior part). Cut the yarn. Stuff the middle part and proceed in the same way with the second side. The reel should be ready. You can now sew the reel to the rod just where you change the colors (row 30).
Section D (The String) :
Chain X 60 (this is twice the author's rod length). Sew the string to the reel, on the middle part down, just where the reel meets the rod so it's less visible. Pass the string over the reel once from down up and sew again at the joining point to secure. Insert the string in each of the guides.
Section E (The Hook) :
R1: MR + 6sc => 6. Insert the string in the middle of the magic ring and make a node connecting the two. In this way we don't need to worry about sewing them together later. R2: inc X 6 => 12 - pull the leftover yarn firmly (without breaking it) to close the MR. R3: (1 sc + 1 inc) X 6 => 18. R4: sc X 18 => 18. R5: (2 sc + 1 inc) X 6 => 24. R6: sc X 14 => 24. R7: (2 sc + 1 dec) X 6 => 18. R8: sc X 18 => 18. Start stuffing. R9: (2 sc + 1 dec) X 6 => 12; sl stitch in the first sc leaving a long tail to sew the magnets. Stuff firmly, but leave enough place for the magnet. The author places 3 magnets inside because they were not strong enough; if your magnets are strong one can be enough or you can crochet over them to hide them completely. When you place the magnet(s) test with a fish that you got the right side up. Sew over the magnet a couple of times, cut the yarn and hide it.
Info :
You fishing set is now finished.
This colorful Fishing Set makes a joyful gift for little hands and curious minds. The rainbow fish and stackable bowls encourage sorting, color recognition and fine motor play. Make it in your favorite palette and enjoy the magical moment when the hook picks up a fish! 🧶🎣