🧢 Beautiful ✨ Detailed πŸ’ Adorable

Fishing Cat Amigurumi Pattern

Fishing Cat Amigurumi Pattern
4.4β˜… Rating
5-7 Hours Time Needed
1.3K Made This
βœ‚οΈ

Intermediate Level

Ideal for those with basic crochet experience, featuring slightly more advanced stitches and techniques to expand your skills.

⏱️

Weekend Treat

Takes 5-7 hours, making it an enjoyable project to finish over a couple of days.

🧸

Cute Companion

An adorable friend to cherish, handcrafted with love to bring comfort and joy for years to come.

About This Fishing Cat Amigurumi Pattern

This pattern creates a small, adorable Fishing Cat amigurumi complete with a removable outfit, tiny crocheted fish, and a little basket. It features two-color shaping on the head, simple color switches, and small accessory construction to add charming details. Clear rounds and photo references help you through shaping, stuffing, and assembly for a polished finished toy.

Fishing Cat Amigurumi Pattern crochet pattern - detailed view of completed project

Ideal for makers who enjoy small toys with tiny details, this pattern balances fun techniques with manageable sections. The accessories add personality and make this piece perfect as a gift or collectible.

Why You'll Love This Fishing Cat Amigurumi Pattern

I absolutely love this pattern because it combines sweet character design with satisfying, small-scale crochet that finishes quickly. I enjoy the colorwork on the head β€” it gives real personality with a small amount of extra attention. I also love how the tiny fish and basket elevate the finished toy into a playful scene. Making multiples of the little fish was so addictive that I made a whole handful for the cat's market.

Fishing Cat Amigurumi Pattern step 1 - construction progress Fishing Cat Amigurumi Pattern step 2 - assembly progress Fishing Cat Amigurumi Pattern step 3 - details and accessories Fishing Cat Amigurumi Pattern step 4 - final assembly and finishing

Switch Things Up

I love changing the color palette to create different personalities; try pastel hues for a softer cat or bold colors for a playful look.

I often swap the yarn weight and adjust the hook to make a pocket-sized keychain version or a larger huggable plush by using bulkier yarn.

I add embroidered features instead of safety eyes for baby-safe versions; a simple French knot or embroidered oval works well.

For variety, make the outfit in different colors or add tiny appliques like flowers or stars to the dress for seasonal themes.

I sometimes replace the basket strap with a chain of picot stitches to create a decorative woven look that still hangs nicely.

Try making sets of fish in gradient colors and display them in a tiny fabric bag for a whimsical market stall effect.

I like to experiment with eyelash or textured yarn for tiny tuft details on the ears or tail to add character and tactile contrast.

Consider adding a small loop at the top of the head to turn the cat into a hanging ornament or bag charm.

I recommend sewing pieces with embroidery floss when you want extra secure seams, especially for toys that will be handled frequently.

For an extra special gift, stitch a small name tag or embroidered heart inside the outfit pocket to personalize the amigurumi.

I sometimes insert a small rattle or bell into the stuffing for a playful sound element; make sure it is securely enclosed if intended for children.

Feel free to mix and match ear shapes or sizes to create siblings or a whole family of quirky cats with unique features.

Common Mistakes & How to Fix Them

βœ— Switching colors without carrying yarn neatly can leave loose strands; weave the unused color along the inside or cut and rejoin to keep neat color joins. βœ— Forgetting to place safety eyes at the recommended rounds causes misaligned features; attach the eyes between rounds 15-16 with 9 stitches between them as instructed. βœ— Stuffing too late or too little will distort the shape when closing; stuff the head and limbs gradually and firmly as you approach the decreases to maintain the form. βœ— Not counting stitches during increases or decreases creates uneven shaping; count after each round and use stitch markers to mark round starts to stay accurate.

Fishing Cat Amigurumi Pattern

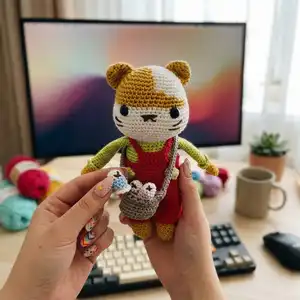
Make a charming Fishing Cat amigurumi with step-by-step instructions and photo references. This pattern guides you through color changes, tiny accessories like fish and a basket, and clear assembly steps so you can create a delightful handmade toy. You'll enjoy the detailed rounds and easy-to-follow abbreviations to help you finish a sweet companion for gifting or display.

Intermediate 5-7 Hours

Materials Needed for Fishing Cat Amigurumi Pattern

β€” Main Fabric

  • 01
    Yarn suitable for 2.5 mm hook (use a yarn weight that fits 2.5 mm hook)
  • 02
    Main Color: White (used for face and fish trims)
  • 03
    A Color: Mustard (head patches, ears, paws)
  • 04
    B Color: Light Green (arms and body details)
  • 05
    C Color: Red (outfit)
  • 06
    D Color: Lily colour (accent - optional)
  • 07
    E Color: Orange (fish accent)

β€” Tools Required

  • 01
    Crochet hook size 2.5 mm (or size that fits your yarn)
  • 02
    Safety eyes (attach between rounds 15-16 with 9 sc between them)
  • 03
    Scissors
  • 04
    Polyester stuffing
  • 05
    Tapestry/yarn needle for sewing and weaving ends
  • 06
    Stitch markers
  • 07
    Pins for assembly

Progress Tracker

0% Complete

β€” Head :

Round 1 :

6 sc in a magic ring

Round 2 :

6 Main color-3 sc inc (6 sc)A color-3 sc inc(6)12 sc.

Round 3 :

Main color-(3 times)sc into sc next inc(9)A color-(3 times)sc into sc next inc(9)18 sc.

Round 4 :

(3 times)2 sc into sc next inc(12)A color-(3 times)2 sc into sc next inc(12)24 sc.

Round 5 :

Main color-(3 times)3 sc into sc next inc(15)A color(3 times)3 sc into sc next inc(15)30 sc.

Round 6 :

Main color-(3 times)4 sc into sc next inc(18)A color (3 times)4 sc into sc next inc(18)36 sc.

Round 7 :

Main color-(3 times)5 sc into sc next inc(21)A color(3 times)5 sc into sc next inc(21)42 sc.

Round 8 :

Main color-(3 times)6 sc into sc next inc(24)A color(3 times)6 sc into sc next inc(24)48 sc.

Round 9 :

Main color-24 sc into sc A color-24 sc into sc(48 sc)

Round 10 :

21 sc into sc A color 27 sc into sc (48 sc)

Round 11 :

Main color-18 sc into sc A color 30 sc into sc(48 sc)

Round 12 :

Main color-15 sc into sc A color 33 sc into sc(48 sc)

Round 13 :

A color-48 sc into sc

Info :

Attach the safe eyes between the rings 15-16 with 9 sc between them.

Round 14-16 :

(3 ring)sc into sc (48 sc)

Round 17 :

12 sc into sc(9 sc inc)6 sc into sc(9 sc inc)12 sc into sc(66 sc)

Round 18-21 :

(4 ring)sc into sc(66 sc)

Round 22 :

(6 times)9 sc into sc next dec(60 sc)

Round 23 :

(6 times)8 sc into sc next dec(54 sc)

Round 24 :

(6 times)7 sc into sc next dec(48 sc)

Round 25 :

(6 times)6 sc into sc next dec(42 sc)

Round 26 :

(6 times)5 sc into sc next dec(36 sc)

Round 27 :

(6 times)4 sc into sc next dec(30 sc)

Info :

Stuff the head tightly. Keep filling as you go.

Round 28 :

(6 times)3 sc into sc next dec(24 sc)

Round 29 :

sc into sc(24 sc) FO.

Info :

Leave a long thread end to sew.

β€” Ears :

Info :

(Make 2)

Round 1 :

A color-6 sc in a magic ring

Round 2 :

6 sc inc(12 sc)

Round 3 :

sc into sc(12 sc)

Round 4 :

(6 times)1 sc into sc next inc(18 sc)

Round 5 :

sc into sc(18 sc)

Round 6-8 :

(3 ring)sc into sc(18 sc)fo.

Info :

Leave a long thread end for sewing.

β€” Arms :

Info :

(Make 2) Main Color

Round 1 :

6 sc in a magic ring

Round 2 :

6 sc inc(12 sc)

Round 3-7 :

(5 ring)sc into sc(12 sc)

Info :

B color-

Round 8 :

only in flo sc into sc (12 sc)

Round 9 :

(2 times)5 sc into sc next inc(14 sc)

Round 10-22 :

(13 ring)sc into sc(14 sc)fo.

Info :

Leave a long thread end for sewing.

Item Name (Arm Detail) :

Round-6- only in blo sc into sc fo.

β€” Legs :

Info :

(Make 2) A Color

Round 1 :

6 sc in a magic ring

Round 2 :

6 sc inc(12 sc)

Round 3 :

sc into sc (12 sc)

Round 4 :

Only in flo sc into sc(12 sc)

Round 5-9 :

(5 ring)sc into sc (12 sc)

Info :

Main Color

Round 10 :

(2 times)5 sc into sc next inc(14 sc)

Round 11-19 :

(9 ring)sc into sc(14 sc)

Section Title :

Joining of Legs - Body

Round 20 :

14 sc into sc 5 ch 14 sc into sc

Round 21 :

5 ch into 5 sc 14 sc into sc. to the unworked rings of ch 5 sc 14 sc(38 sc)

Round 22-31 :

(10 ring)sc into sc(38 sc)

Info :

B Color

Round 32-38 :

(7 ring)sc into sc(38 sc)

Round 39 :

(6 times)4 sc into sc next dec(32 sc)

Round 40 :

(6 times)3 sc into sc next dec((26 sc)

Round 41 :

(6 times)2 sc into sc next dec(20 sc)fo.

β€” Cat's Outfit :

Info :

C COLOR - MAKE 2

Round 1 :

20 ch.

Round 2 :

20 ch into 20 sc

Round 3-6 :

(4 ring)sc into sc(20 sc)

Round 7 :

Fold it. Dip the needle into both layers. (sc into sc(20 sc)

Round 8-11 :

(4 ring)sc into sc(20 sc)

Round 12 :

Bring the legs together. sc into sc (40 sc)

Round 13-17 :

(5 ring)sc into sc(40 sc)

Round 18 :

34 sc into sc 6 ch. Skip 6 sc

Round 19-26 :

(8 ring)sc into sc(40 sc)fo.

Round 27 :

Mark the middle of the outfit. 8 sc into sc

Round 28 :

Turn 8 sc into sc.18 ch. Turn 18 ch into 18 sc fo.

Info :

Leave a long thread end to sew.

β€” Basket :

Round 1 :

6 sc in a magic ring

Round 2 :

6 sc inc(12 sc)

Round 3 :

1 sc into sc next inc(18 sc)

Round 4 :

2 sc into sc next inc(24 sc)

Round 5 :

3 sc into sc next inc(30 sc)

Round 6 :

Only in flo sc into sc(30 sc)

Round 7-10 :

(4 ring)sc into sc(30 sc)

Round 11 :

1 ch 1 sc atla 1 sc into 2 hdc (15 ch)(15 hdc)

Round 12 :

40 ch. Straighten the basket. Insert the needle fully across. 40 ch into 40 sc fo.

β€” Fish :

Info :

MAIN COLOR - MAKE 4

Round 1 :

6 sc in a magic ring

Round 2 :

( 2 times)1 sc inc 2 sc into sc(8 sc)

Round 3 :

sc into sc(8 sc)

Round 4 :

C-color 3 sc into sc next inc 4 sc into sc(9 sc)

Round 5 :

6 (2 ring)sc into sc (9 sc)

Round 7 :

3 sc into sc next dec 4 sc into sc(8 sc)

Info :

Do not stuff the fish too tightly.

Round 8 :

(2 times)2 sc into sc next dec(6 sc)

Round 9 :

Main color 6 sc inc (12 sc) fo.

Assembly Instructions

  • Attach the safety eyes between rounds 15-16 with 9 single crochets between them before stuffing the head.
  • Sew the ears to the top of the head at the mustard/white color join, using the long tail to secure and stitch neatly from the inside.
  • Position and sew the arms on either side of the body between rounds where the arm seam matches the outfit edge, ensuring even spacing and secure stitching.
  • Sew the legs to the bottom of the outfit when the legs are joined to the body (after Round 21 joining); align evenly and reinforce with multiple passes for stability.
  • Attach the basket to the body by sewing the strap across the shoulder area and secure the bottom of the basket to the cat's side so it hangs naturally.

Important Notes

  • πŸ’‘Use stitch markers to mark the beginning of each round and especially during increases and decreases for accurate shaping.
  • πŸ’‘Stuff parts gradually and firmly as you go; overstuffing can distort shape while understuffing leaves gaps in decreases.
  • πŸ’‘Leave long thread ends when finishing pieces so you have enough length for sewing parts together and securing seams.
  • πŸ’‘When changing color for the head patch, follow the color notes precisely to achieve the same look; carry or weave ends neatly.

This Fishing Cat amigurumi pattern combines tiny accessories with sweet character details to create a charming handmade companion. The little fish and basket make it extra playful and gift-ready, perfect for crafters who love small, detailed projects. Enjoy the process of stitching, stuffing, and assembling this adorable cat friend! 🧢🐟

You ask,

we answer.

FAQs

What size will the finished piece be?

The finished amigurumi measures approximately 20 cm in circumference and about 10 cm in length when using the recommended 2.5 mm hook and similar yarn.

Can I use a different hook or yarn weight?

Yes, you can use different yarn weights and hook sizes, but this will change the final size and stitch density; adjust stuffing and accessories to match your chosen gauge.

Do I need advanced crochet skills for this pattern?

This pattern is rated intermediate; you should be comfortable with single crochet, increases, decreases, and basic color changes, plus sewing pieces together.

How long does it typically take to complete?

Most crocheters finish this project in about 5-7 hours, depending on experience and how many accessories you make.