🧢 Beautiful ✨ Detailed πŸ’ Adorable

Crochet Skull Collar Pattern

Crochet Skull Collar Pattern
4.1β˜… Rating
5-7 Hours Time Needed
2.1K Made This
βœ‚οΈ

Intermediate Level

Ideal for those with basic crochet experience, featuring slightly more advanced stitches and techniques to expand your skills.

⏱️

Weekend Treat

Takes 5-7 hours, making it an enjoyable project to finish over a couple of days.

✨

Stylish Touch

An elegant detail to elevate any look, combining traditional techniques with contemporary design sensibilities.

About This Crochet Skull Collar Pattern

This pattern creates a delicate crochet skull collar with a fitted choker and laced closure. It uses sport-weight thread and fine stitches to form lacy skull motifs and scalloped edges. The design is tailored to be adjustable with a corset-style lace insertion for a flattering fit.

Crochet Skull Collar Pattern crochet pattern - detailed view of completed project

Includes full row-by-row instructions for the collar and choker parts, plus guidance for making the laces. Suitable for intermediate crocheters who enjoy lacework and decorative accessories.

Why You'll Love This Crochet Skull Collar Pattern

I absolutely love this pattern because it combines delicate lacework with a bold skull motif that feels both elegant and edgy. I enjoy how the fine sport-weight thread creates a lightweight, wearable piece that drapes beautifully. The corset-style lacing makes the collar adjustable and personalizable, which I always find satisfying. I also appreciate that the pattern is modular β€” you can make the collar wider or narrower to fit your style or body. Creating this piece feels like crafting a small wearable work of art every time.

Crochet Skull Collar Pattern step 1 - construction progress Crochet Skull Collar Pattern step 2 - assembly progress Crochet Skull Collar Pattern step 3 - details and accessories Crochet Skull Collar Pattern step 4 - final assembly and finishing

Switch Things Up

I love customizing this collar by changing the thread color β€” try deep burgundy, navy, or classic white for different moods.

You can use a thinner thread and smaller hook to make a delicate mini version, perfect as a decorative neckline accent.

If you prefer a chunkier look, I sometimes use a heavier cotton yarn with a larger hook for a bold, textured version.

I often add tiny beads or sequins to the shell centers to give the collar a subtle sparkle for evening wear.

Experiment with shorter or longer laces; a shorter lace gives a neat choker look while longer laces create a more corseted effect.

Try replacing the laces with a ribbon threaded through the loops for a softer, romantic finish.

For a festive twist, use variegated thread so the skull motifs subtly shift in color across the collar.

I also enjoy adding embroidered accents on the choker section to personalize the piece with initials or motifs.

To make the collar stiffer for costume wear, lightly starch and block the finished piece so it holds its shape better.

Combine two collars by making a matching set and layering them for a dramatic, multi-tiered neckline.

Don’t be afraid to mix fibers β€” a metallic thread accent or a silk blend can elevate the collar and make it unique.

Common Mistakes & How to Fix Them

βœ— Skipping the chain count when starting the collar will throw off your spacing; always crochet a chain of 76 + 2 and count carefully before continuing. βœ— Ignoring the shell placement can lead to uneven skull motifs; mark the beginning and end stitches and space shells evenly across the row. βœ— Pulling chains or stitches too tight will distort the lacy look of the collar; keep a consistent, relaxed tension especially on long chain sections. βœ— Forgetting to fasten off or weave ends neatly will make the back look untidy; cut thread and fasten off securely, then weave in ends before wearing. βœ— Not checking the collar width before the choker step can create an uncomfortable fit; try the collar and narrow it by skipping dc of pr if necessary.

Crochet Skull Collar Pattern

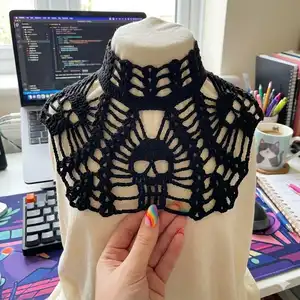
Make a dramatic lace skull collar that adds gothic elegance to any outfit. This intermediate crochet pattern guides you through a delicate collar with skull motifs, a fitted choker and laces for corset-style closure. The pattern uses sport weight thread and a 2 mm hook for fine, lacy stitches. Perfect for statement outfits, costumes, or handmade gifts.

Intermediate 5-7 Hours

Materials Needed for Crochet Skull Collar Pattern

β€” Main Fabric

  • 01
    Sport weight thread suitable for 2 mm crochet hooks, approximately half a ball (recommendation: Garnstudio Drops Safran or similar)
  • 02
    Black (or color of your choice) sport-weight cotton or cotton-blend thread, half a ball

β€” Tools Required

  • 01
    Crochet hook size 2 mm
  • 02
    Scissors
  • 03
    Yarn needle for weaving in ends
  • 04
    Measuring tape (to check collar width)
  • 05
    Optional: pins to hold pieces while checking fit

Progress Tracker

0% Complete

β€” Collar Part :

Info :

You will start at the collar part. Start: crochet a chain of 76 + 2 (counts as the 1st dc).

Row 1 :

Dc in the 3rd from the hook and continue crocheting dc until the end of the row. Ch 1, turn.

Row 2 :

Sshell, ch14, sk 7 st, shell, *ch7, sk 8 st, shell, ch14, sk 7 st, shell (from * repeat 3 times more), ch1, turn.

Row 3 :

Sl st to shell sp, sshell, ch5, sk 5 ch, 4sc in each of the following ch, ch5, shell in the shell sp, *ch7, sk ch, shell in the shell sp, ch5, sk 5 ch, 4sc in each of the following ch, ch5, shell in the shell sp (from * repeat 3 times more), ch1, turn.

Row 4 :

Sl st to shell sp, sshell, ch4, sc on ch, 4sc in each of the following ch, sc on ch, (6 sc in total), ch4, shell in the shell sp, *ch5, sk ch, shell in the shell sp, ch4, sc on ch, 4sc in each of the following ch, sc on ch, ch4, shell in the shell sp (from * repeat 3 times more), ch1, turn.

Row 5 :

Sl st to shell sp, sshell, ch3, sc on ch, 6sc in each of the following ch, sc on ch, (8 sc in total), ch3, shell in the shell sp, *ch3, sk ch, shell in the shell sp, ch3, sc on ch, 6sc in each of the following ch, sc on ch, ch3, shell in the shell sp (from * repeat 3 times more), ch1, turn.

Row 6 :

Sl st to shell sp, sshell, ch3, sc on ch, 8sc in each of the following ch, sc on ch, (10 sc in total), ch3, shell in the shell sp, *ch1, sk ch, shell in the shell sp, ch3, sc on ch, 8sc in each of the following ch, sc on ch, ch3, shell in the shell sp (from * repeat 3 times more), ch1, turn.

Row 7 :

Sl st to shell sp, sshell, ch3, sc on ch, 10sc in each of the following ch, sc on ch, (12 sc in total), ch3, shell in the shell sp, *sk ch, shell in the shell sp, ch3, sc on ch, 10sc in each of the following ch, sc on ch, ch3, shell in the shell sp (from * repeat 3 times more), ch1, turn.

Row 8 (here you will be making the eyes and the nose of the skull) :

Sl st to shell sp, sshell, ch5, sk ch, dc2tog in the 1st sc of pr, ch6, sk 4 st, sc, ch6, sk 5 st, dc2tog, ch5, sk ch, shell in the shell sp, *ch3, shell in the shell sp, ch5, sk ch, dc2tog in the 1st sc of pr, ch6, sk 4 st, sc, ch6, sk 5 st, dc2tog, ch5, sk ch, shell in the shell sp (from * repeat 3 times more), ch1, turn.

Row 9 :

Sl st to shell sp, sshell, ch6, sk ch, sc in dc2tog, 3 sc on ch, ch3, 3 sc on ch, sc in dc2tog, ch6, sk ch, shell in the shell sp, *ch5, shell in the shell sp, ch6, sk ch, sc in dc2tog, 3 sc on ch, ch3, 3 sc on ch, sc in dc2tog, ch6, sk ch, shell in the shell sp (from * repeat 3 times more), ch1, turn.

Row 10 :

Sl st to shell sp, sshell, ch7, sk ch and 1 sc, 3 sc in each of the following st, 3 sc on ch, 3 sc in each of the following st (9 sc in total), ch7, sk 1 sc and ch, shell in the shell sp, *ch3, sk 2 ch, shell in the 3rd ch, ch3, shell in the shell sp, ch7, sk ch and 1 sc, 3 sc in each of the following st, 3 sc on ch, 3 sc in each of the following st (9 sc in total), ch7, sk 1 sc and ch, shell in the shell sp (from * repeat 3 times more), ch1, turn.

Row 11 :

Sl st to shell sp, sshell, ch7, sk ch and 1 sc, dc2tog, ch1, sk st, dc, ch1, sk st, dc, ch1, sk st, dc2tog, sk st and ch, ch7, shell in the shell sp, *ch3, 2 dc in the shell sp, ch2, 2 dc in the same shell sp, ch2, 2 dc in the same shell sp, ch3, sk ch, shell in the next shell sp, ch7, sk ch and 1 sc, dc2tog, ch1, sk st, dc, ch1, sk st, dc, ch1, sk st, dc2tog, sk st and ch, ch7, shell in the shell sp (from * repeat 3 times more), ch1, turn.

Row 12 :

Sl st to shell sp, sshell, ch7, sk ch, dc2tog, ch1, sk st, dc, ch1, sk st, dc, ch1, sk st, dc2tog, sk ch, ch7, shell in the shell sp, *ch3, sk ch and 2 dc, shell in the ch sp, ch3, sk 2 dc, shell in the next ch sp, ch3, shell in the shell sp, ch7, sk ch, dc2tog, ch1, sk st, dc, ch1, sk st, dc, ch1, sk st, dc2tog, sk ch, ch7, shell in the shell sp (from * repeat 3 times more).

Info :

Cut thread, fasten off.

β€” Choker Part :

Info :

Before working at the choker part, please check if the collar is not too wide for you.

Row 1 :

Join thread to the 1st dc of the pr and work a row in sc. If the collar is too wide for your neck, make it narrower by skipping some dc of pr instead of crocheting sc in each dc until you feel comfortable. Turn.

Rows 2-4 :

Ch5 (counts as 1st dc and ch2), sk 2 st, dc, ch4, sk 7 st, shell in the next st, *ch4, sk 7 st, shell in the next st (from * repeat 8 times more), dc, ch2, sk 2 st, dc. Fasten off.

Info :

NOTE: If you had to narrow your collar part, counting of Rows 2-4 may not be accurate for you. The key is to crochet your shells as evenly spaced as possible. In addition, you must not forget to crochet stitches marked in blue at the beginning and at the end of your rows. These stitches mark loops where you will have to insert your laces.

β€” Laces :

Info :

Ch300 (longer or shorter) and insert it into loops in a corset-like manner.

Assembly Instructions

  • Try the collar on before starting the choker to make sure the width is comfortable; narrow the collar by skipping some dc of the previous row if needed.
  • Join the choker thread to the 1st dc of the previous row and crochet the choker rows, then fasten off and weave in ends securely.
  • Insert the long chain (Ch300 or desired length) through the loops marked by the shell stitches and lace the collar like a corset to secure it.
  • Cut the thread and fasten off at the end of the collar section, then sew or weave in any loose ends with a yarn needle.
  • Pin and adjust shells and loops so they sit evenly before inserting laces for a neat final appearance.

Important Notes

  • πŸ’‘Check the collar width on your neck before making the choker portion so you can adjust the pattern for a better fit.
  • πŸ’‘Keep tension consistent on long chain sections to ensure shells and motifs line up correctly across the collar.
  • πŸ’‘When narrowing the collar, space shells evenly and pay attention to the marked beginning and end stitches for lace loops.
  • πŸ’‘Fasten off and weave in ends neatly to prevent unraveling and to keep the back of the collar tidy.

This crochet skull collar pattern brings gothic charm and delicate lacework together for a standout accessory. Handcrafted lace skulls and scallops add drama to any outfit, from costume to evening wear. Make one for yourself or as a unique handmade gift β€” enjoy the creative process and wear it with pride! πŸ–€πŸ§Ά

You ask,

we answer.

FAQs

What size will the finished piece be?

The final collar width and fit depend on your tension and whether you narrow the collar; try it on before crocheting the choker and adjust by skipping dc if needed.

What yarn or thread should I use for this pattern?

Use a sport weight thread suitable for a 2 mm hook; the pattern recommends Garnstudio Drops Safran or a similar sport-weight cotton blend, approximately half a ball.

Can I change the size of the collar?

Yes β€” you can make the collar narrower by skipping double crochets in the previous row or change the overall scale by using a different yarn weight with a corresponding hook size.

Do I need advanced crochet skills to complete this pattern?

This pattern is rated intermediate; you should be comfortable with shells, chains, working into chain spaces, and reading row-by-row lace instructions.

How do I finish and attach the laces?

Make a chain of around 300 (longer or shorter as you prefer) and thread it through the loops in a corset-like manner; trim and secure ends or add beads if desired.