๐Ÿงถ Beautiful โœจ Detailed ๐Ÿ’ Adorable

Feather Locklear the Chick Amigurumi Pattern

Feather Locklear the Chick Amigurumi Pattern
4.8โ˜… Rating
5-7 Hours Time Needed
3.2K Made This
โœ‚๏ธ

Intermediate Level

Ideal for those with basic crochet experience, featuring slightly more advanced stitches and techniques to expand your skills.

โฑ๏ธ

Weekend Treat

Takes 5-7 hours, making it an enjoyable project to finish over a couple of days.

๐Ÿฅ

Charming Critter

Delightful animal designs with sweet details that capture the essence of your favorite woodland and farmyard friends.

About This Feather Locklear the Chick Amigurumi Pattern

This pattern creates a sweet little chick worked from the top of the head down to the body using worsted weight yarn. It includes full round-by-round instructions for the head, body, wings, feet, tail, beak, and optional hair detail. The pattern features clear notes on eye placement and step-by-step assembly guidance so your chick looks neat and polished.

Feather Locklear the Chick Amigurumi Pattern crochet pattern - detailed view of completed project

Intermediate-level techniques like shaping, sewn-on parts, and optional surface embroidery are included. Helpful photos and a link to a video walkthrough are provided to assist with tricky steps.

Why You'll Love This Feather Locklear the Chick Amigurumi Pattern

I absolutely love this pattern because it captures a warm, friendly personality in a very small package. I enjoy the shaping process from head to body โ€” it feels like sculpting with yarn. The eye placement technique gives so much character, and I love teaching that trick in the pattern. Sewing the little wings and feet in place and adding the tiny beak always makes me smile when the chick becomes a finished friend.
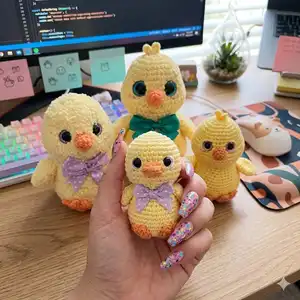
Feather Locklear the Chick Amigurumi Pattern step 1 - construction progress Feather Locklear the Chick Amigurumi Pattern step 2 - assembly progress Feather Locklear the Chick Amigurumi Pattern step 3 - details and accessories Feather Locklear the Chick Amigurumi Pattern step 4 - final assembly and finishing

Switch Things Up

I love experimenting with yarn to change the whole look of this chick: use fluffy chenille yarn or double-strand Parfait yarn for a soft, textured version.

I sometimes swap the yellow for pastel shades to make a spring collection of chicks in different colors.

If you want a much smaller or larger chick, change your yarn weight and hook size โ€” heavier yarn and a larger hook makes a chunky, cuddly chick; finer yarn makes a tiny keychain version.

I add embroidered eyelashes or different eyelid shapes to completely change the expression and personality of each chick.

Try different eye sizes: smaller eyes give a cuter, more doll-like look, while larger eyes give a wide-eyed character; just adjust placement as needed.

For a posable version, I sometimes add thin wire into the wings or legs, which lets you pose the chick for photos and display.

I also like making a matching set: create a mama and baby by changing proportions, or make seasonal outfits like tiny hats, scarves, or a felt bow tie.

Consider using safety eyes with colorful washers, or embroidered eyes for a baby-safe toy for very young children.

You can embellish with tiny crocheted props like a flower, carrot, or mini basket to give your chick a story and make it gift-ready.

I often change the beak color or try a slightly different beak shape to suit the character I want โ€” a small stitched beak can be very expressive.

Common Mistakes & How to Fix Them

โœ— Placing the safety eyes too close or too far apart distorts the face; place a stitch marker and count carefully, leaving the exact number of stitches or holes recommended between eyes. โœ— Overstuffing the head and body makes shaping difficult and lumpy later; stuff gradually and check shape frequently, removing or adding stuffing as needed. โœ— Skipping stitch markers during increase rounds can lead to miscounted rounds; mark increases (for example the 6th and 7th increase) as instructed to ensure correct eye placement and shaping. โœ— Forgetting to remove stuffing when adding eye washers can stretch the fabric and prevent secure placement; remove most stuffing, add washers, then re-stuff to the desired firmness. โœ— Pulling yarn too tightly when stitching the eyes to create a sunken look can create visible tension marks; gently adjust tension and practice the back-and-forth method a few times to achieve the desired look.

Feather Locklear the Chick Amigurumi Pattern

Make an adorable hand-crocheted chick with this detailed intermediate amigurumi pattern. You will work the piece from the top of the head down to the body, adding cute details like a beak, wings, feet, and optional hair. Clear step-by-step rounds, helpful photos, and assembly instructions guide you through eye placement and finishing touches. Perfect for gifting, seasonal decor, or adding to your handmade toy collection.

Intermediate 5-7 Hours

Materials Needed for Feather Locklear the Chick Amigurumi Pattern

โ€” Main Fabric

  • 01
    Worsted weight yarn (#4), approximately 50g main color (Color A: Yellow)
  • 02
    Worsted weight yarn (#4), approximately 20g accent color (Color B: Orange)
  • 03
    Exact yarns used (examples): Yellow - Red Heart With Love Daffodil; Orange - Carrot
  • 04
    Fluffy version: Little Bunny Yellow and Parfait Mango (double strands for chenille style), Chenille or fluffy yarn options
  • 05
    Chenille/Double-strand option: Parfait Yellow, Parfait Mango, Flecks yarn loops and Thread Sunshine (double-stranded for texture)

โ€” Tools Required

  • 01
    Crochet hook size D / 3.25 mm (recommended)
  • 02
    Alternative hooks for different versions: F hook for chenille/fluffy variations (see Helpful Tips)
  • 03
    Safety eyes: 18 mm recommended (author used 23 mm for fluffy chick and 28 mm for chenille chick in examples)
  • 04
    Scissors
  • 05
    Yarn needle for sewing and embroidery
  • 06
    Stitch markers
  • 07
    Polyester fiberfill stuffing
  • 08
    Pins for assembly and placement
  • 09
    Optional: small washers for safety eyes if using the sunken look

Progress Tracker

0% Complete

โ€” Head and Body :

Info :

Crocheted from top of head to bottom. With Color A.

Round 1 :

Make 12 sc into a magic ring = 12

Round 2 :

Increase in each st around = 24

Round 3 :

(3 sc, inc) x 6 = 30

Round 4 :

sc in each st around

Round 5 :

(4 sc, inc) x 6 = 36

Round 6-8 :

sc in each st around

Info :

Mark the 6th and 7th inc with a st marker on round 9 for placement of eyes.

Round 9 :

inc x 6, 6 sc, inc x 6, 18 sc = 48

Round 10-12 :

sc in each st around

Round 13 :

dec x 6, 6 sc, dec x 6, 18 sc = 36

Round 14 :

sc in each st around

Round 15 :

(dec, 4 sc) x 6 = 30

Info :

Place eyes between rounds 8 and 9, leaving 9 holes between them. With the eyes facing you, the left eye will be placed before the stitch marker between rounds 8 and 9. The right eye will be placed after the stitch marker. If you want the sunken eye look, do not place the backs of the eyes on until round 29.

Round 16 :

(dec, 3 sc) x 6 = 24

Round 17 :

sc in each st around

Info :

Now for the eyes. Stuff the head well. Cut a long piece of yarn and remove the eyes. Place the needle in the hole where the first eye was and insert the needle into a hole next to the eye hole. Go back and forth between each eye hole repeating the process from the first eye. Pull slightly on the yarn after going through each hole. Do this about 3 times on each side until you reach the look you want. Follow the pictures on pg. 5 for help. There is also a youtube video I have for extra help on this process. https://www.youtube.com/watch?v=9XoBnTY6k70&t=55s

Info :

To place the backs of the eyes you will need to remove most of the stuffing to place the washers on the eyes, then re stuff it.

Round 18 :

(inc, 3 sc) x 6 = 30

Round 19 :

(inc, 4 sc) x 6 = 36

Round 20 :

sc in each st around

Info :

Stuff the body as you work.

Round 21 :

(inc, 11 sc) x 3 = 39

Round 22 :

sc in each st around

Round 23 :

(inc, 12 sc) x 3 = 42

Round 24 :

sc in each st around

Round 25 :

(6 sc, inc) x 6 = 48

Round 26 :

(7 sc, inc) x 6 = 54

Round 27-29 :

sc in each st around

Round 30 :

(7 sc, dec) x 6 = 48

Round 31 :

(6 sc, dec) x 6 = 42

Round 32 :

(5 sc, dec) x 6 = 36

Round 33 :

(4 sc, dec) x 6 = 30

Round 34 :

(3 sc, dec) x 6 = 24

Round 35 :

(2 sc, dec) x 6 = 18

Round 36 :

(sc, dec) x 6 = 12

Round 37 :

dec x 6 = 6

Info :

F/O and sew the hole closed.

โ€” Beak :

Round 1 :

Make 6 sc into a magic ring = 6

Round 2 :

(sc, inc) x 3 = 9

Info :

F/O and leave a long tail for sewing.

โ€” Wings (Make 2) :

Round 1 :

Make 6 sc into a magic ring = 6

Round 2 :

(sc, inc) x 3 = 9

Round 3 :

(2 sc, inc) x 3 = 12

Round 4 :

sc in each st around

Info :

Do not stuff the wings.

Round 5 :

(sc, inc) x 6 = 18

Round 6 :

sc in each st around

Round 7 :

(sc, dec) x 6 = 12

Round 8 :

(2 sc, dec) x 3 = 9

Round 9 :

(sc, dec) x 3 = 6

Info :

Fold the wings in half and sc the opening closed. F/O and leave a long tail for sewing.

โ€” Feet (Make 2) :

Round 1 :

Make 6 sc into a magic ring = 6

Round 2 :

Increase in each st around = 12

Round 3 :

(sc, inc) x 6 = 18

Round 4 :

(ch 3, sl st in 2nd ch from hook, sl st in next ch, sl st in next 2 sts on circle) x 3

Info :

F/O and leave a long tail for sewing.

โ€” Tail :

Round 1 :

Make 6 sc into a magic ring = 6

Round 2 :

(sc, inc) x 3 = 9

Round 3 :

Inc x 3, 6 sc = 12

Info :

F/O and leave a long tail for sewing.

โ€” Hair on Head (optional) :

Info :

With Color A: Attach yarn in the magic ring with a sl st. (Ch 4, sl st in 2nd ch from hook and across) x 2. F/O and weave in the tail end.

Assembly Instructions

  • Face: Use a long strand of white yarn threaded onto a needle to create eye highlights. Insert the needle into a hole between the eyes, bring the needle to the lower corner of the eye and wrap the needle around the outside of the eye. Insert the needle into a hole on the top of the eye and pull a little tightly to create a highlight; repeat for the second eye.
  • Optional eyelid: Use a long strand of yellow yarn to insert the needle into a hole on the head and bring it up to a corner on the eye, wrap the needle in front of the eye to make an eyelid and repeat once more on each eye; weave in ends.
  • Beak: Pin the beak onto the front of the face in between the eyes and sew in place; the pattern author did not stuff the beak.
  • Wings: Pin the wings onto either side of the body approximately between rounds 18 and 19, then sew the wings securely in place.
  • Feet: Pin each foot onto the front bottom of the body and sew them on symmetrically so the chick sits evenly.
  • Tail: Pin the tail onto the back of the body and sew it securely in place.

Important Notes

  • ๐Ÿ’กDo not join rounds unless stated; work in a continuous spiral for smoother amigurumi shaping.
  • ๐Ÿ’กUse a stitch marker to mark the beginning of each round and to mark important increases for eye placement.
  • ๐Ÿ’กAll stitches are worked in both loops unless stated otherwise in the pattern.
  • ๐Ÿ’กWhen placing eye washers you may need to remove most stuffing, add the washer, then re-stuff to maintain shape.
  • ๐Ÿ’กWeave in ends and secure sewn pieces firmly to prevent loosening during handling.

You have finished your little chick! ๐Ÿฅ This pattern was made to bring a tiny handmade smile to your day and yours will be unique with every color choice. ๐Ÿงถ Share your finished chick and enjoy the warm feeling of a handcrafted friend. โœจ

You ask,

we answer.

FAQs

What size will the finished piece be?

The finished amigurumi measures approximately 6 inches from bottom to top of head when using worsted weight (#4) yarn and a 3.25 mm (D) hook.

Can I use different yarn weights for this pattern?

Yes, you can use different yarn weights, but this will change the final size; adjust your hook size accordingly and remember eye placements may need changing.

Do I need prior crochet experience for this pattern?

This pattern is rated intermediate, so basic knowledge of crochet stitches, increases, decreases, and sewing pieces together is recommended for best results.

How long does this project typically take to complete?

Most crocheters complete this project in 5-7 hours, though time may vary depending on experience level, yarn choice, and how many details you add.