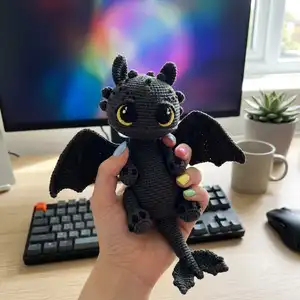
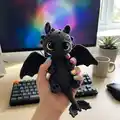
Create an adorable Toothless-inspired dragon amigurumi with this detailed crochet pattern. You will work with fine cotton, build an internal wire frame for poseable wings and tail, and choose between plastic joints or cotter pins for secure limbs. The pattern is richly illustrated and guides you through every piece so you can assemble a 30 cm lovable dragon.
Progress Tracker
0% Complete
— Head :
Info :
Crochet with dark gray yarn, hook size 2 mm. The marker of the beginning of the round passes exactly in the middle of the back. If necessary, crochet extra stitches. Stuff as you go.
Round 3 :
(1sc, inc)*6 (18)
Round 4 :
1sc, inc, (2sc, inc)*5, 1sc (24)
Round 5 :
(3sc, inc)*6 (30)
Round 6 :
2sc, inc, (4sc, inc)*5, 2sc (36)
Round 7 :
(5sc, inc)*6 (42)
Round 8 :
3sc, inc, (6sc, inc)*5, 3sc (48)
Round 9 :
(7sc, inc)*6 (54)
Round 10 :
4sc, inc, (8sc, inc)*5, 4sc (60)
Round 11 :
(9sc, inc)*6 (66)
Round 13 :
5sc, inc, (10sc, inc)*5, 5sc (72)
Round 14-21 :
72sc (8 rounds)
Round 22 :
18sc, (BLO 36sc), 18sc (72)
Round 23 :
5sc, dec, (10sc, dec)*5, 5sc (66)
Round 24 :
(9sc, dec)*6 (60)
Round 25 :
4sc, dec, (8sc, dec)*5, 4sc (54)
Round 26 :
(7sc, dec)*6 (48)
Round 27 :
2sc, dec, (4sc, dec)*7, ch3
Round 28 :
skip 2 stitches before marker and 2 stitches after marker, next crochet 1sc, dec, (3sc, dec)*6, 3sc, 1sc on the chain (32)
Round 29 :
2sc on the chain, dec, (2sc, dec)*7 (24)
Round 30 :
(2sc, dec)*6 (18)
Round 31 :
(1sc, dec)*6 (12)
Info :
Cut the yarn, fasten off, tighten the hole.
Info :
We will use the hole in round 27-28 to bring the wire frame from the body into the head.
Info :
Attach the dark gray yarn to the first unused front loop of round 21 (keep the hole away from you) and crochet: 17sc, 2hdcinc, 17sc. Cut the yarn, fasten off, hide the ends inside.
— Eyes (make 2) :
Info :
Crochet with 1ply yarn Alpina Lena of yellow color, hook size 1.25mm.
Round 3 :
(1sc, inc)*6 (18)
Round 4 :
(inc, 2sc)*6 (24)
Round 5 :
3sc, 2hdcinc, 2sc (short round)
Info :
Cut the yarn, fasten off, weave in the ends (bring all the ends to the front side). We will attach the eyes to the head with the wrong side out, as it is less relief than the front.
Info :
On the wrong side of the eye, draw a pupil with black textile paint and a glare with white paint. HDC increases in round 5 are located in the upper inner corner of the eyes (marked in the photo).
Info :
PS. If desired, eyes, pupils and glare can be cut out of felt and glued together. Leave the eyes on the head fixed with sewing pins. We will sew and glue all the pieces at the very end, when we assemble all the other pieces and place them in the places we like.
— Eyelids (make 2) :
Info :
Crochet with dark gray yarn, hook size 2 mm. Ch9, start in the second chain from the hook: sl st, 6sc, sl st. Cut the yarn, leaving a long end for sewing pieces. The mood of the dragon depends on the location of the eyelids. You can make him angry or a little sad. Try several options for the location of the eyelids and choose what you like best.
— Ears (make 2) :
Info :
Crochet with dark gray yarn, hook size 2 mm. The marker of the beginning of the round passes on the side in the middle. If necessary, crochet extra stitches. Do not stuff.
Round 2 :
(1sc, inc)*3 (9)
Round 3 :
4sc, inc, 4sc (10)
Round 4 :
4sc, inc, 5sc (11)
Round 5 :
5sc, inc, 5sc (12)
Round 6 :
(inc, 5sc)*2 (14)
Round 7-8 :
14sc (2 rounds)
Round 9 :
6sc, dec, 6sc (13)
Round 10 :
5sc, dec, 6sc (12)
Info :
Fold in half and crochet through both sides 6sc. Cut the yarn, leaving a long end for sewing pieces.
— Spines 1 (make 2) :
Info :
Crochet with dark gray yarn, hook size 2 mm.
Info :
Cut the yarn, leaving a long end for sewing pieces. Fix with sewing pins to the head (see the location in the photo).
— Spines 2 (make 2) :
Info :
Crochet with dark gray yarn, hook size 2 mm. Do not stuff.
Round 2 :
(2sc, inc)*2 (8)
Info :
Fold in half and crochet through both sides 4sc. Cut the yarn, leaving a long end for sewing pieces. Fix with sewing pins to the head (see the location in the photo).
— Spines 3 (make 2) :
Info :
Crochet with dark gray yarn, hook size 2 mm. Do not stuff.
Round 3 :
(1sc, dec)*2 (4)
Info :
Cut the yarn, leaving a long end for sewing pieces. Fix with sewing pins to the head (see the location in the photo).
— Hind Legs :
Info :
Crochet with dark gray yarn, hook size 2 mm. Ch8, start on the second chain from the hook:
Round 1 :
6sc, 4sc in the last chain, on the other side of the chain: 5sc, inc (17)
Round 2 :
inc, 5sc, 4inc, 5sc, 2inc (24)
Round 3 :
1sc, inc, 5sc, (1hdc, hdcinc)*4, 5sc, (1sc, inc)*2 (31)
Round 4 :
9sc, (3-dc Bobble st in black, 2sc in dark gray)*4, 9sc - short round (you may have a different number of stitches)
Info :
Move the marker. It should pass at the back, in the center of the heel. Guideline - a straight line of the foundation chain. Align it in the process by crocheting extra stitches.
Round 6 :
(4sc, dec)*2, 7sc, (dec, 4sc)*2 (27)
Round 7 :
6sc, dec, 5sc, dec, 4sc, dec, 6sc (24)
Round 8 :
6sc, 6dec, 6sc (18)
Round 9-13 :
18sc (5 rounds)
Info :
Begin to gradually stuff the leg with fiberfill. While stuffing tightly only the lower part (foot).
Round 14 :
(5sc, inc)*3 (21)
Round 15-16 :
21sc (2 rounds)
Info :
Left hind leg options shown for fastening:
Round 17 (plastic joints left) :
13sc, ch2, skip 2sc, 6sc (21)
Round 18 (plastic joints left) :
13sc, 2sc on the chain, 6sc (21)
Round 19 (plastic joints left) :
21sc (21)
Round 17-19 (cotter pins left) :
21sc (3 rounds)
Info :
Right hind leg plastic joints option (mirrored):
Round 17 (plastic joints right) :
6sc, ch2, skip 2sc, 13sc (21)
Round 18 (plastic joints right) :
6sc, 2sc on the chain, 13sc (21)
Round 19 (plastic joints right) :
21sc (21)
Round 17-19 (cotter pins right) :
21sc (3 rounds)
Info :
Select the diameter of the fastening: fold the leg in half and select a disk/joint that occupies the entire internal space of the leg (disk/joint D25mm is suitable). When using a cotter pin, move 2 rounds down and away from the marker. 7sc to the left (for the right hind leg), 7sc to the right (for the left hind leg) and insert the disc with the cotter pin. Continue to gradually stuff the leg with fiberfill. Stuff the upper part slightly.
Round 20 :
(5sc, dec)*3 (18)
Round 21 :
(1sc, dec)*6 (12)
Info :
Cut the yarn. Tighten the hole and hide the ends inside.
— Forelegs :
Info :
Crochet with dark gray yarn, hook size 2 mm. The marker of the beginning of the round should pass at the back, in the center. If necessary, crochet extra stitches.
Round 3 :
(1sc, inc)*6 (18)
Round 4 :
5sc, (3-dc Bobble st in black, 2sc in dark gray)*3, 4sc
Round 5-7 :
18sc (3 rounds)
Round 8 :
8sc, dec, 8sc (17)
Round 10 :
5sc, dec, 3sc, dec, 5sc (15)
Round 12 :
6sc, dec, 7sc (14)
Round 13 :
6sc, 2inc, 6sc (16)
Round 14 :
dec, 12sc, dec (14)
Round 15 :
6sc, 2inc, 6sc (16)
Round 16 :
dec, 12sc, dec (14)
Info :
Begin to gradually stuff the leg with fiberfill. While stuffing tightly only the lower part (foot).
Info :
Left foreleg plastic joints option:
Round 17 (plastic joints left) :
6sc, 2inc, 1sc, ch2, skip 2sc, 3sc (16)
Round 18 (plastic joints left) :
dec, 9sc, 2sc on the chain, 1sc, dec (14)
Round 17 (cotter pins left) :
6sc, 2inc, 6sc (16)
Round 18 (cotter pins left) :
dec, 12sc, dec (14)
Info :
Right foreleg plastic joints option:
Round 17 (plastic joints right) :
3sc, ch2, skip 2sc, 1sc, 2inc, 6sc (16)
Round 18 (plastic joints right) :
dec, 1sc, 2sc on the chain, 9sc, dec (14)
Round 17 (cotter pins right) :
6sc, 2inc, 6sc (16)
Round 18 (cotter pins right) :
dec, 12sc, dec (14)
Info :
Further, the right and left forelegs are crocheted in the same way.
Round 19 :
(5sc, dec)*2 (12)
Info :
Cut the yarn. Tighten the hole and hide the ends inside.
— Wings (make 2) :
Info :
Take dark gray yarn, hook size 2 mm, wire with a diameter of 0.9mm (23cm-2pcs., 19cm-4pcs., 13cm-2pcs.). Bend the end of each wire as shown in the photo. In the process be careful, work in rows. There will be rows where we will make t-ch and turn and rows where we will skip 1 stitch.
Info :
Ch28, start from the second chain on the hook, working around the wire 23cm long (start from the bend end).
Round 1 :
27sc (27), turn. After that do not work with the wire.
Round 2 :
from the 2nd stitch: 8sc, dec, 12sc, dec (22), turn.
Round 3 :
from the 2nd stitch: 11sc, dec, 6sc (18), turn.
Round 4 :
from the 2nd stitch: 16sc (16), turn.
Round 5 :
from the 2nd stitch: 13sc (13), turn.
Round 6 :
from the 2nd stitch: 12sc (12), turn.
Round 7 :
from the 2nd stitch: 9sc (9), turn.
Round 8 :
from the 2nd stitch: 8sc (8), turn.
Round 9 :
from the 2nd stitch: 4sc (4), turn.
Round 10 :
from the 2nd stitch: 3sc (3), ch3, turn.
Info :
Next, crochet with a wire 19cm long (start from the bend end).
Round 11 :
from the 2nd chain: 2sc, 3sc, +1sc into the corner, 3sc along stitches of the previous row, +1sc into the corner, 2sc along stitches of the previous row, +1sc into the corner, 2sc along stitches of the previous row, +1sc into the corner, 2sc along stitches of the previous row (18), turn.
Round 12 :
from the 2nd stitch: 15sc, dec (16), turn.
Round 13 :
from the 2nd stitch: 7sc (7), turn.
Round 14 :
from the 2nd stitch: 6sc (6), turn.
Round 15 :
from the 2nd stitch: 5sc, +1sc into the corner, 4sc along stitches of the previous row (10), turn.
Round 16 :
from the 2nd stitch: 9sc (9), t-ch, turn.
Round 17 :
from the 2nd stitch: 9sc, +1sc into the corner, 3sc along stitches of the previous row (13), turn (1 stitch of the previous row remains unused!)
Round 18 :
from the 2nd stitch: 12sc (12), t-ch, turn.
Round 19 :
from the 2nd stitch: 9sc (9), turn.
Round 20 :
from the 2nd stitch: 8sc (8), t-ch, turn.
Round 21 :
from the 2nd stitch: 5sc (5), turn.
Round 22 :
from the 2nd stitch: 3sc, inc (5), 3ch, turn.
Info :
Next, crochet with a wire 13cm long (start from the bend end).
Round 23 :
from the 2nd chain: 2sc, 5sc, +1sc into the corner, 3sc along stitches of the previous row, +1sc into the corner, 3sc along stitches of the previous row, +1sc into the corner, 1sc along stitch of the previous row, + 2sc into the corners of the previous rows (19), turn.
Round 24 :
from the 2nd stitch: 18sc (18), turn.
Round 25 :
from the 2nd stitch: 17sc (17), turn.
Round 26 :
from the 2nd stitch: 16sc (16), turn.
Round 27 :
from the 2nd stitch: 14sc (14), turn.
Round 28 :
from the 2nd stitch: 13sc (13), t-ch, turn.
Round 29 :
from the 2nd stitch: 11sc (11), turn.
Round 30 :
from the 2nd stitch: 9sc, inc (11), t-ch, turn.
Round 31 :
from the 2nd stitch: 9sc (9), turn.
Round 32 :
from the 2nd stitch: 7sc, inc (9), 3ch, turn.
Round 33 :
from the 2nd chain: 2sc, 8sc (8), turn.
Round 34 :
from the 2nd stitch: 4sc (4), turn.
Round 35 :
from the 2nd stitch: 3sc (3), turn.
Round 36 :
from the 2nd stitch: 2sc, +1sc into the corner, 4sc along stitches of the previous row (7), turn.
Round 37 :
from the 2nd stitch: 4sc, dec (5), t-ch, turn.
Round 38 :
from the 2nd stitch: 5sc (5), t-ch, turn.
Round 39 :
from the 2nd stitch: 5sc (5)
Info :
Cut the yarn, leaving a long end for sewing pieces. Bend the wire frame along the upper side of the wing. Make an edging along the frame. Attach the dark gray yarn to the marked points in the photo (the exit point of the first wire) and crochet sc along the upper side of the wing. The green arrow shows the direction of crocheting. See photos for positioning and edging.
— Tail :
Info :
Crochet with dark gray yarn, hook size 2 mm. The marker of the beginning of the round should pass at the back, in the center. If necessary, crochet extra stitches.
Round 2-4 :
4sc (3 rounds)
Round 5 :
(1sc, inc)*2 (6)
Round 6-8 :
6sc (3 rounds)
Round 9 :
(2sc, inc)*2 (8)
Round 10-11 :
8sc (2 rounds)
Round 12 :
(3sc, inc)*2 (10)
Round 14 :
2sc, inc, 4sc, inc, 2sc (12)
Round 16 :
(5sc, inc)*2 (14)
Round 18 :
3sc, inc, 6sc, inc, 3sc (16)
Round 20 :
(7sc, inc)*2 (18)
Round 21-22 :
18sc (2 rounds)
Round 23 :
4sc, inc, 8sc, inc, 4sc (20)
Round 24-26 :
20sc (3 rounds)
Round 27 :
(9sc, inc)*2 (22)
Round 28-30 :
22sc (3 rounds)
Round 31 :
5sc, inc, 10sc, inc, 5sc (24)
Round 32-33 :
24sc (2 rounds)
Round 34 :
(11sc, inc)*2 (26)
Round 35-36 :
26sc (2 rounds)
Round 37 :
6sc, inc, 12sc, inc, 6sc (28)
Round 39 :
(13sc, inc)*2 (30)
Info :
Do not cut the yarn. We will crochet the body. Prepare a wire frame. We need a wire with a diameter of 1.6mm and 45cm long. Bend one end, as shown in the photo. Insert the frame into the tail and stuff it.
— Body :
Info :
Continue crocheting from the tail. The marker of the beginning of the round passes in the back in the middle. If necessary, crochet extra stitches. Start counting rounds from the beginning for convenience. Focus on 4 inc in round 1.
Round 1 :
11sc, inc, 1sc, 4inc, 1sc, inc, 11sc (36)
Round 2 :
6sc, inc, 22sc, inc, 6sc (38)
Round 3 :
14sc, inc, 8sc, inc, 14sc (40)
Round 4 :
10sc, inc, 18sc, inc, 10sc (42)
Round 5 :
3sc, inc, (6sc, inc)*5, 3sc (48)
Round 7 :
(7sc, inc)*6 (54)
Round 8-9 :
54sc (2 rounds)
Info :
In round 10 crochet the holes for the hind legs joints fastening and mark the place for the cotter pins fastening.
Round 10 (plastic joints) :
13sc, ch2, skip 2sc, 24sc, ch2, skip 2sc, 13sc (54)
Round 11 (plastic joints) :
13sc, 2sc on the chain, 24sc, 2sc on the chain, 13sc (54)
Round 10 (cotter pins) :
54sc (mark space between stitches 14 and 15 and stitches 40 and 41 with a thread in a contrasting color for convenience) (54)
Round 12-16 :
54sc (5 rounds)
Round 17 :
8sc, dec, (16sc, dec)*2, 8sc (51)
Round 18 :
20sc, dec, 7sc, dec, 20sc (49)
Info :
Insert the cotter pins / joints of the hind legs into the marked points / holes of ch2 in the body and twist / secure.
Round 20 :
20sc, dec, 5sc, dec, 20sc (47)
Round 22 :
21sc, dec, 1sc, dec, 21sc (45)
Round 23 :
(13sc, dec)*3 (42)
Round 25 :
6sc, dec, (12sc, dec)*2, 6sc (39)
Round 27 :
(11sc, dec)*3 (36)
Info :
In round 28 crochet the holes for the wings frames, forelegs joints fastening and mark the place for the cotter pins fastening.
Round 28 (plastic joints) :
3sc, ch1, skip 1sc, 4sc, ch2, skip 2sc, 16sc, ch2, skip 2sc, 4sc, ch1, skip 1sc, 3sc (36) - don't confuse! Ch1 - for the wings frames, ch2 - for the plastic joints.
Round 29 (plastic joints) :
3sc, 1sc on the chain, 4sc, 2sc on the chain, 16sc, 2sc on the chain, 4sc, 1sc on the chain, 3sc (36)
Round 28 (cotter pins) :
3sc, ch1, skip 1sc, 28sc, ch1, skip 1sc, 3sc (36) (mark space between stitches 9 and 10 and stitches 27 and 28 with a thread in a contrasting color)
Round 29 (cotter pins) :
3sc, 1sc on the chain, 28sc, 1sc on the chain, 3sc (36)
Round 30 :
8sc, dec, 16sc, dec, 8sc (34)
Round 32 :
(15sc, dec)*2 (32)
Info :
Insert the cotter pins / joints of the forelegs into the marked points / holes of ch2 in the body and twist / secure (in the same way as for the hind legs).
Round 34 :
7sc, dec, 14sc, dec, 7sc (30)
Info :
Insert the wire frame of the wings into the holes in round 28, connect it with the body frame, wrap it with insulating tape. Sew the wings to the back.
Round 35 :
4sc, dec, (8sc, dec)*2, 4sc (27)
Round 36 :
(7sc, dec)*3 (24)
Info :
It is not necessary to stuff the neck tightly.
Info :
Cut the yarn, leaving a long end for sewing pieces. Pass the wire frame into the hole on the head in rounds 27-28, and sew the head to the body, as shown in the photo.
— Tail Fin (make 2) :
Info :
Crochet with dark gray yarn, hook size 2 mm. Ch13, start from the second chain on the hook, work in rows in back loops:
Round 1 :
12sc (12), ch3, turn
Round 2 :
from the 2nd chain: 2sc, 11sc (13), turn.
Round 3 :
from the 2nd stitch: 12sc (12), ch3, turn
Round 4 :
from the 2nd chain: 2sc, 11sc (13), turn.
Round 5 :
from the 2nd stitch: 12sc (12), ch3, turn
Round 6 :
from the 2nd chain: 2sc, 11sc (13)
Info :
Cut the yarn, leaving a long end for sewing pieces. Fix the tail fins to the tip of the tail (see photo) and sew.
— Spines (make 16) :
Info :
Crochet with dark gray yarn, hook size 2 mm - 4sc in a MR. Pull the ring. Cut the yarn, leaving a long end for sewing pieces. Attach the spines to the tail, body and head (see photo) and sew.
Info :
Sew on seed beads if desired. Tint the wings and tail fins with black dry pastel.
This Toothless-inspired dragon is designed to become a treasured handmade companion, full of character and poseable charm. Whether you gift it or keep it, the wire-framed wings and detailed features make it a standout project. Enjoy assembling each piece and adding your own finishing touches to make it uniquely yours. 🐉🧶