🧢 Beautiful ✨ Detailed πŸ’ Adorable

Dip Edge Crochet Basket Pattern

Dip Edge Crochet Basket Pattern
4.4β˜… Rating
5-7 Hours Time Needed
3.5K Made This
βœ‚οΈ

Beginner Friendly Level

Perfect for those just starting their crochet journey, with clear instructions and simple techniques

⏱️

Weekend Treat

Takes 5-7 hours, making it an enjoyable project to finish over a couple of days.

🏑

Cozy Accent

A warm touch for your space that transforms ordinary corners into inviting nooks filled with handmade charm.

About This Dip Edge Crochet Basket Pattern

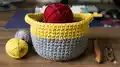
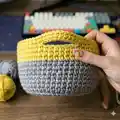
This pattern makes a chunky dip-edge crochet basket using Bernat Blanket yarn held double for a dense, durable fabric. The finished basket measures approximately 14" diameter by 9Β½" high and features built-in handle openings. The simple single crochet rounds and clear shaping make this an approachable project for beginners ready to try working into back loops and creating handle openings.

Dip Edge Crochet Basket Pattern crochet pattern - detailed view of completed project

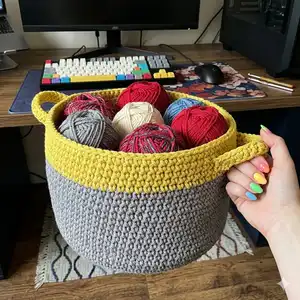
The pattern includes full round-by-round instructions, gauge, materials and a step-by-step handles section. The bold contrast edge gives your basket a modern, decorative finish that looks great in any room.

Why You'll Love This Dip Edge Crochet Basket Pattern

I absolutely love this pattern because it transforms super-bulky yarn into a useful, beautiful home accessory that works up quickly. I enjoy how the dip-edge adds a pop of color and personality without complicating the construction. The handle openings are cleverly worked into the rounds which keeps shaping clean and sturdy. I also appreciate that the pattern uses basic stitches so I can relax and enjoy rhythmical crocheting while still producing a very functional piece.

Dip Edge Crochet Basket Pattern step 1 - construction progress Dip Edge Crochet Basket Pattern step 2 - assembly progress Dip Edge Crochet Basket Pattern step 3 - details and accessories Dip Edge Crochet Basket Pattern step 4 - final assembly and finishing

Switch Things Up

I love customizing this basket by swapping colors; try a neutral base with a bright dip edge for a modern look.

I sometimes use different yarns held together to create a marled effect; experiment with texture by mixing solids and variegated skeins.

If you want a larger basket, I change to a bigger hook and add a few increase rounds to the base for extra diameter.

To make a smaller version, I use a smaller hook or fewer rounds and reduce the handle spacing proportionally.

I often add a fabric liner for a neater interior and to protect delicate items; use a coordinating fabric and baste or whipstitch it in place.

For a more refined look, I replace the crocheted handles with leather straps, securing them with rivets or sturdy stitching through the handle openings.

I like adding decorative trims to the dip edge such as a surface slip stitch or a round of single crochet in a contrasting color to highlight the edge.

To make it extra sturdy, I double the base by crocheting a second round of fabric and sewing it together, which provides extra reinforcement for heavy use.

I sometimes embroider a small motif on the basket body before finishing to personalize it for gifts or decor.

For a seasonal spin, I change the dip-edge color to match holidays or room palettes; it instantly refreshes the basket's appearance.

Common Mistakes & How to Fix Them

βœ— Skipping the stitch marker when joining rounds can cause you to lose the start of each round; place a marker at the end of each round to track your beginning and keep rounds even. βœ— Failing to hold two strands together consistently will change the fabric density and final size; always use both strands held together as instructed for correct gauge and structure. βœ— Not counting increases during the initial rounds leads to an uneven base; count your stitches after each increase round until the indicated stitch counts are reached. βœ— Working into both loops when the pattern specifies back loops only will change the texture; pay attention to 'working into back loops only' instructions to achieve the correct dip-edge effect. βœ— Cutting yarn too short when changing colors for the edge makes joining difficult; leave longer tails when adding Contrast B so you can easily weave in ends or join securely.

Dip Edge Crochet Basket Pattern

Create a stylish, sturdy storage basket with this easy crochet pattern that uses Bernat Blanket yarn held double for a chunky, modern finish. Youll love the bold dip-edge detail and practical handles that make this basket both decorative and functional. Follow the clear round-by-round instructions to make a 14" diameter by 9Β½" high basket perfect for yarn, toys, or home organization.

Beginner Friendly 5-7 Hours

Materials Needed for Dip Edge Crochet Basket Pattern

β€” Main Fabric

  • 01
    Bernat Blanket (10.5 oz/300 g; 220 yds/201 m)
  • 02
    Contrast A Dark Gray (10044) - 3 balls or 500 yds/455 m
  • 03
    Contrast B Moss (10803) - 1 ball or 140 yds/128 m
  • 04
    Use 2 strands of yarn held together throughout (unless directed otherwise)

β€” Tools Required

  • 01
    Size U.S. M/13 (9 mm) crochet hook or size needed to obtain gauge
  • 02
    1 stitch marker

Progress Tracker

0% Complete

β€” Measurements :

Info :

Approx 14" [35.5 cm] diameter x 9" [24.5 cm] high.

β€” Gauge :

Info :

7 sc and 7 rows = 4" [10 cm] with 2 strands of yarn held tog.

β€” Materials :

Info :

Bernat Blanket (10.5 oz/300 g; 220 yds/201 m) Contrast A Dark Gray (10044) 3 balls or 500 yds/455 m Contrast B Moss (10803) 1 ball or 140 yds/128 m Size U.S. M/13 (9 mm) crochet hook or size needed to obtain gauge. 1 stitch marker.

β€” Abbreviations :

Info :

Approx = Approximately(ly) Ch = Chain(s) Cont = Continue Inc = Increase(ing) Rep = Repeat Rnd(s) = Round(s) Sc = Single crochet Sl st = Slip stitch Sp(s) = Space(s) St(s) = Stitch(es) Tog = Together

β€” Instructions :

Info :

Note: Join all rnds with sl st to first sc.

Info :

With 2 strands of A held tog, ch 2.

Round 1 :

8 sc in 2nd ch from hook. Join. (8)

Round 2 :

Ch 1. 2 sc in each sc around. Join. (16)

Round 3 :

Ch 1. *2 sc in next sc. 1 sc in next sc. Rep from * around. Join. (24)

Round 4 :

Ch 1. *2 sc in next sc. 1 sc in each of next 2 sc. Rep from * around. Join. (32)

Round 5 :

Ch 1. *2 sc in next sc. 1 sc in each of next 3 sc. Rep from * around. Join. (40)

Round 6 :

Ch 1. *2 sc in next sc. 1 sc in each of next 4 sc. Rep from * around. Join. (48)

Round 7 :

Ch 1. *2 sc in next sc. 1 sc in each of next 5 sc. Rep from * around. Join. (56)

Round 8 :

Ch 1. *2 sc in next sc. 1 sc in each of next 6 sc. Rep from * around. Join. (64)

Round 9 :

Cont in this manner, inc 8 sc evenly around next 5 rnds (as established). (104)

Next rnd :

Ch 1. Working into back loops only, 1 sc in each sc around. Join. Place marker at end of rnd.

Next rnd :

Ch 1. Working into both loops, 1 sc in each sc around. Join. Rep last rnd until work from marked rnd measures 8" [20.5 cm]. Join 2 strands of B at end of last rnd.

Info :

With 2 strands of B held tog, rep last rnd twice more. Do not fasten off.

Next rnd (Handle openings) :

Ch 1. 1 sc in each of next 21 sc. Ch 1. Skip next sc. 1 sc in each of next 8 sc. Ch 1. Skip next sc. 1 sc in each of next 42 sc. Ch 1. Skip next sc. 1 sc in each of next 8 sc. Ch 1. Skip next sc. 1 sc in each sc to end of rnd. Join.

Next rnd :

Ch 1. 1 sc in each sc and ch-1 sp around. Join.

Next rnd :

Ch 1. 1 sc in each sc around. Join. Fasten off.

Handles :

With 2 strands of B held tog, ch 26. Thread chain through first ch-1 sp of Handle opening rnd and back out through second ch-1 sp of same rnd. Join with sl st to first ch to form ring, being careful not to twist.

Next rnd :

Ch 1. 1 sc in each ch around, rotating chain through Handle opening for ease of working. Join. Fasten off. Rep for second Handle.

Assembly Instructions

  • Join all rounds with a slip stitch to the first single crochet as noted; use a stitch marker at the end of the marked round for reference.
  • When the body height reaches 8" [20.5 cm] from the marked round, join Contrast B and work two more rounds with two strands of B held together; do not fasten off.
  • Work the Handle openings round exactly as written, skipping the specified stitches to create openings and then join the round as instructed.
  • Make each handle by chaining 26 with 2 strands of B held together, threading the chain through the two ch-1 spaces of the handle opening, joining with a slip stitch, then sc around the chain and join. Repeat for the second handle.
  • Weave in all ends securely on the inside of the basket to keep the exterior neat and block lightly if needed to even the shape.

Important Notes

  • πŸ’‘Join all rounds with a slip stitch to the first single crochet so your joins are neat and consistent.
  • πŸ’‘Place a stitch marker at the end of the designated round before starting the back loop rounds to track where to begin measuring height.
  • πŸ’‘Work the rounds with two strands held together throughout to maintain the correct gauge and sturdy fabric.
  • πŸ’‘When working the handle chain, take care not to twist the chain before joining to form the handle ring.

This dip-edge crochet basket is a quick and satisfying project that adds usable, modern style to any room. The chunky fabric made with Bernat Blanket yarn creates a structured basket perfect for storage and display. Make it in contrasting colors to showcase the bold edge and enjoy a tidy, handmade addition to your home. 🧢🏠

You ask,

we answer.

FAQs

What size will the finished piece be?

The finished basket measures approximately 14" [35.5 cm] diameter x 9" [24.5 cm] high when using the recommended yarn and hook size.

Can I use a different yarn weight for this pattern?

You can substitute yarn, but because the pattern uses two strands held together of Bernat Blanket, using a different weight will change the size and fabric; adjust hook size and gauge accordingly.

Do I need advanced crochet skills to make this basket?

No, this is an easy pattern suitable for beginners who are comfortable with single crochet, working in rounds, and basic increases.

How long does this project typically take to complete?

Most crocheters complete this basket in about 5-7 hours, depending on experience and working speed.

How are the handles attached?

Handle openings are created by skipping stitches on the designated round; the handles are then crocheted separately and threaded through the ch-1 spaces and joined to form secure rings.