🧢 Beautiful ✨ Detailed πŸ’ Adorable

Christmas Hoop Embroidery Pattern

Christmas Hoop Embroidery Pattern
4.2β˜… Rating
2-3 Hours Time Needed
3.3K Made This
βœ‚οΈ

Beginner Friendly Level

Perfect for those just starting their crochet journey, with clear instructions and simple techniques

⏱️

Bite-Sized Project

Finishes in 2-4 hoursβ€”perfect for an afternoon of creative relaxation.

🏑

Cozy Accent

A warm touch for your space that transforms ordinary corners into inviting nooks filled with handmade charm.

About This Christmas Hoop Embroidery Pattern

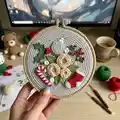
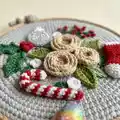
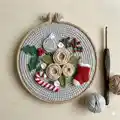
This pattern creates a delightful 15 cm Christmas embroidery hoop with holly, candy cane, bauble, small stocking and woven wheel flowers. It uses simple, well-explained embroidery stitches and DMC cotton threads for crisp, seasonal colors. You will learn satin stitch, fishbone stitch, chain stitch, backstitch, French knots and woven wheel flowers for a textured, layered look.

Christmas Hoop Embroidery Pattern crochet pattern - detailed view of completed project

Includes a printable transfer sheet and step-by-step stitch instructions with photos and finishing notes. Ideal for gifting or decorating your holiday home.

Why You'll Love This Christmas Hoop Embroidery Pattern

I absolutely love this pattern because it brings together simple embroidery techniques to create a polished, festive piece that feels special. I enjoy how the woven wheel flowers add texture and the fishbone leaves give natural movement to the design. The stitches are accessible for beginners yet satisfying for more experienced stitchers, so the project always feels rewarding. Making this hoop is a calm, focused activity that results in a lovely handmade decor item.

Christmas Hoop Embroidery Pattern step 1 - construction progress Christmas Hoop Embroidery Pattern step 2 - assembly progress Christmas Hoop Embroidery Pattern step 3 - details and accessories Christmas Hoop Embroidery Pattern step 4 - final assembly and finishing

Switch Things Up

I love how flexible this design is for customization; you can change thread colors to fit your home decor or gift recipient.

Try pastel shades for a soft, modern twist or jewel tones for a rich, traditional holiday look.

Make the hoop larger by printing the pattern at a bigger scale for a statement piece, or scale down to create mini hoops for ornaments or gifts.

Swap woven wheel flowers for small bullion knots or layered French knots if you prefer a different texture.

I sometimes add metallic or variegated threads for highlights on the bauble or candy cane stripes to give a little sparkle.

Experiment with background fabric color β€” a dark grey or navy will make the bright stitches pop and give a contemporary feel.

You can also add beading to the center of the woven wheels or the berries for an extra dimensional accent.

Try mixing stitch counts or using 2 strands instead of 3 for finer details and 4-6 strands for bolder filling areas.

I often create a small series in complementary colorways to give as bundled gifts or a matching set for holiday decor.

Don’t be afraid to reposition elements slightly when transferring the pattern to personalize the composition and balance for your hoop.

Common Mistakes & How to Fix Them
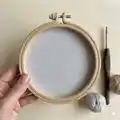
βœ— Using the wrong fabric can make stitches sink or look uneven; choose a sturdy natural fabric like 100% cotton or linen canvas and use two layers if needed. βœ— Pulling satin stitch threads too tight will pucker the fabric and distort shapes; keep the thread flat and maintain even tension while filling the shape. βœ— Skipping practice for woven wheel flowers causes uneven weaving; practice making 5 spokes and weaving evenly under and over those spokes before filling the final motif. βœ— Forgetting to secure knots at the back will cause loose stitches later; always secure your starting and ending threads neatly and hide ends under nearby stitches. βœ— Not transferring the pattern accurately leads to misplaced elements; use carbon paper or a window transfer and fix the paper with tape to prevent shifting during tracing.

Christmas Hoop Embroidery Pattern

Create a charming Christmas hoop using classic embroidery stitches and DMC cotton threads. This pattern guides you step-by-step through satin stitch, fishbone, woven wheel and more so you can craft a festive hoop to display or gift. Perfect for beginners and makers who enjoy slow, meditative stitching and beautiful seasonal decor.

Beginner Friendly 2-3 Hours

Materials Needed for Christmas Hoop Embroidery Pattern

β€” Main Fabric

  • 01
    Embroidery hoop 15 cm (wood, plastic or bamboo - wooden preferred)
  • 02
    100% cotton embroidery floss (DMC recommended) - colors used include DMC 666, DMC BLANC (white), DMC 700, DMC 3841, DMC 353, DMC 352, DMC 954, DMC 702
  • 03
    Fabric: 100% cotton or linen canvas (I used cotton canvas, two layers)
  • 04
    Felt or craft cardboard for finishing the back of the hoop

β€” Tools Required

  • 01
    Embroidery hoop 15 cm (wood/plastic/bamboo)
  • 02
    Embroidery needles (appropriate sizes for stranded cotton)
  • 03
    DMC embroidery floss in specified colors (see materials)
  • 04
    Marker or simple pen for transferring the pattern
  • 05
    Carbon (transfer) paper for pattern transfer
  • 06
    Scissors for handmade and thread trimming
  • 07
    Felt or craft cardboard for finishing the hoop backing
  • 08
    Scotch tape for fixing the pattern to the window (optional)
  • 09
    Pins for assembly
  • 10
    Needle for overstitching the fabric when finishing

Progress Tracker

0% Complete

β€” Materials :

Info :

15 cm hoop (You can choose wood, plastic or bamboo hoop) I prefer to use wooden hoop because its natural and aesthetic. Needle for embroidery. Threads: I recommend you to choose 100% cotton threads. For this hoop I use DMC threads. Fabric: I recommend you to choose natural fabrics 100 % Cotton or linen canvas. For this pattern I used cotton canvas. (I used two layers). Marker or simple pen for transferring the pattern. Felt or craft cardboard for finished the hoop. (I used felt for my hoop.) But it's not obligatory. Scissors for handmade. You can use any scissors that you have at home. Carbon Paper for transfer pattern. And finally you need my PDF pattern.

β€” Pattern for printing :

Info :

Pattern for printing: Use the provided printable pattern sheet to transfer the design onto your fabric. Print the scheme at the correct scale for a 15 cm hoop.

β€” Color and Stitch guide :

Infos :

Color and Stitch guide labels: Satin Stitch DMC 666. Satin Stitch DMC BLANC. Satin Stitch DMC 700. Chain Stitch DMC 3841. Back Stitch DMC 700. French Knot Stitch DMC BLANC. Woven wheel stitch DMC BLANC. Fishbone Stitch DMC 954. Satin Stitch DMC 666. Fishbone stitch DMC 700. Woven wheel stitch DMC 353. French knot Stitch DMC 352. Fishbone Stitch DMC 702. Use these thread colors and stitch choices as a guide for each element in the design.

β€” Stitch Instructions :

1. Back Stitch :

Backstitch : The Backstitch is a simple stitch that can be used to create straight lines of any length or direction. Bring your needle up through the fabric. (1) Bring it down a small way behind this to create a small straight stitch (2). Bring your needle up with a gap ahead of the previous stitch taking it back down where the previous stitch started. Continue along the length of the line.

2. Satin Stitch :

Satin Stitch: The satin stitch is a filler stitch that can be used to create a smooth surface and add large areas of color to your embroidery. Bring your needle up through the fabric at a point on the outer edge of the shape you wish to fill (1). Insert the needle again at the point opposite the entry point on the other side of the shape (2). Repeat this stitch again, this time bringing your needle up beside the first stitch. Continue this repetition until the shape is filled.

3. Fishbone Stitch :

The fishbone stitch, made up of slanted diagonal stitches, is a filling stitch that is often used for making leaves or feathers. One of the most classic embroidery stitches. Up from the back to start (1). Down on the (2) opposite side to make a stitch. Up from the point (3) underside coming up next to the original starting point. Back down again (4) making another stitch and ready to continue in this fashion.

4. Chain Stitch :

1: Stitch up through the fabric where you want your chain to start – point A. 2: Stitch back down into the exact same hole you stitched up through. Do not pull your thread all the way through. 3: Stitch up at point B, making sure the needle goes through the loop. 4: Tighten the thread neatly, so that there’s no loose thread but so that the chain loop is still a loop. 5: Stitch down at point B, continuing the same stitch up and down through the same hole, catching each loop of thread process. The back of the work will be a line of straight stitches.

5. French Knot Stitch :

French knot: Pull the needle up through the fabric. Wind the thread to make a knot. Wrap the thread around the needle two times and put the needle back at the same hole it just came through near. Pull through to form the knot and secure at the back.

6. Woven wheel embroidery stitch :

Draw a circle and make 5 straight stitches evenly spaced out around the circle. Come up through the fabric just to the side of where the stitches meet in the center. Begin weaving your needle and thread under and over the spokes of the stitches until you have filled in the entire circle. To end the stitch, simply bring your thread to the back and secure it.

7. And I use Woven wheel stitch + French Knot stitch for making flowers :

At first you need to print the scheme and transfer it to the fabric. You can do using carbon paper. Also you can transfer image using your window, smartphone or tablet. Just put the scheme onto your window and then put the fabric. It’ll be better if you fix it on the window with scotch tape. And then transfer the image with pen or pencil. And now you can start embroidery!

β€” How to Finish :

Step 1 :

Cut a felt or craft cardboard circle according to the size of inner hoop. Pin felt to gathered fabric.

Step 2 :

Overstitch the two fabrics together. Pass the needle through the gathered fabric. Then through the felt and back out. Bring the needle back to the top of the hoop. Leaving a small gap, pass the needle back through both layers of fabric. Bring the needle out. Repeat.

Info :

Congratulations! You have now finished your embroidery. Secure all threads at the back, trim excess fabric if desired and enjoy your finished hoop.

Assembly Instructions

  • Transfer the printed scheme to your fabric using carbon paper, a window method, or tablet, fixing the paper with scotch tape to keep it from moving.
  • Hoop the fabric tightly in a 15 cm hoop, ensuring the design is centered and the fabric is smooth before stitching begins.
  • After completing stitches, cut a felt or craft cardboard circle to the size of the inner hoop and pin it to the gathered fabric to cover and tidy the back.
  • Overstitch through the gathered fabric and felt to secure the backing: pass the needle through gathered fabric, then felt, bring the needle back to the top, and repeat around the hoop.
  • Weave in and secure all thread ends at the back, trim excess fabric, and press gently if needed to finish your hoop for display.

Important Notes

  • πŸ’‘Use carbon paper or a window transfer and scotch tape to ensure your printed pattern does not shift during tracing.
  • πŸ’‘Work with two layers of fabric or a stabilizer if your fabric is lightweight to prevent puckering during dense satin stitch fills.
  • πŸ’‘Practice woven wheel and fishbone stitches on a scrap before working them on the final piece to ensure even tension and appearance.
  • πŸ’‘Secure the backing with felt or craft cardboard and overstitch neatly to present a clean finished hoop ready for display.

This festive hoop pattern is a lovely way to spend an afternoon making something handmade and meaningful. It combines classic embroidery stitches with pretty DMC colors to create a cheerful Christmas accent you can hang or gift. Enjoy the slow, relaxing process and celebrate the season with handmade charm. πŸŽ„πŸ§΅βœ¨

You ask,

we answer.

FAQs

What size will the finished piece be?

The finished hoop fits a 15 cm (approx. 6 inch) hoop when using the recommended fabric and hoop size.

Can I use different thread brands or colors?

Yes, you can use any stranded cotton threads; DMC is recommended in the pattern but alternatives will work fineβ€”just match thickness and color saturation.

Do I need prior embroidery experience for this pattern?

This pattern is beginner friendly and includes clear stitch instructions, but basic familiarity with threading a needle and simple stitches will help you get started.

How long does this project typically take to complete?

Most stitchers finish this hoop in 2-3 hours depending on experience and the level of detail in the woven wheel flowers.