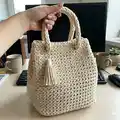
Make a stylish, sustainable Dew Drop handbag using polyester rope and simple single crochet techniques. This pattern guides you step-by-step through the round base, tall sides worked in back loops, I-cord handles and a neat joining method for a professional finish. You will love how sturdy and washable this bag is — perfect for everyday use or as a thoughtful handmade gift.
Progress Tracker
0% Complete
— Materials :
Info :
YOU WILL NEED: 1. ~160 meters polyester rope 5-6 mm (color used – light beige). 2. 7 mm crochet hook. 3. Scissors. 4. Lighter (for hiding ends). 5. Accessories: label (sewn with needle) and favorite tassel.
— Finished Bag Size :
Info :
- Round bottom diameter ~25 cm. - Height ~ 25 cm. - Handles ~45 cm.
— Stitches Used :
Info :
Magic loop. Chain stitch – ch. Single crochet - sc. Single crochet back loops only – sc blo. Slip stitch – sl.
— Crochet the Bag Body :
Info :
Pattern is worked as one piece in the round, so there’s no turning. Work in a spiral and use a stitch marker (or a scrap yarn) to help keep your place. Here is a link to my YouTube channel with full video, which will help you: https://www.youtube.com/watch?v=UBXUsHbX8UQ&t=8s
— Make the Base :
Round 1 :
6 sc into the magic loop, 1 sl, 1 ch (6)
Round 2 :
*2 sc blo into next stitch*, repeat * * 6 times (12)
Round 3 :
*1 sc blo, 2 sc blo into next stitch*, repeat * * 7 times (21)
Round 4 :
*2 sc blo, 2 sc blo into next stitch*, repeat * * 7 times (28)
Round 5 :
*3 sc blo, 2 sc blo into next stitch*, repeat * * 7 times (35)
Round 6 :
*4 sc blo, 2 sc blo into next stitch*, repeat * * 7 times (42)
Round 7 :
*5 sc blo, 2 sc blo into next stitch*, repeat * * 7 times (49)
Round 8 :
*6 sc blo, 2 sc blo into next stitch*, repeat * * 7 times (56)
Round 9 :
*7 sc blo, 2 sc blo into next stitch*, repeat * * 4 times (60)
Info :
I use scrap yarn to mark the last single stitch of the base – it will let you easy count rows for the further crocheting.
— Make the Sides :
Info :
The sides are super easy to make, just crochet all the stitches until the bag is as tall as you like.
Round 10 - 29 :
sc blo all stitches for 19 row (or till side is ~25 cm tall). Slip 2 last stitches and weave in end*
Info :
*I always try to hide ends, that it would not be noticeable. So I will show you very easy way to finish this end nicely. But you can skip this tip, if you feel you don’t need it.
— Perfect Ending :
Step 1 :
First, insert hook, catch the yarn end and pull it under and through the stitch as it's shown in 3 pictures on the left.
Step 2 :
Second, put the hook in the same crochet stitch back loop, catch the yarn and pull it through the loop as it's shown in 3 pictures on your right.
Info :
This yarn is 100% polyester, so it's perfect for hiding ends with lighter, because it can melt. Hide the yarn end a little bit further on your crocheting and cut the rest of the yarn, leaving only very short ending. Then heat this short ending for a few seconds with a lighter and quickly hide it by pushing it under the nearest yarn with a hook.
Info :
That’s it! The sides are done.
— Crochet the Handles :
Info :
Handles are made by crocheting I-Cord. Knowing how to make I-Cord is helpful in so many ways! It can be used as a lanyard, drawstrings or any other rope or cord. So follow the tutorial below how to make I-Cord.
— I-Cord Tutorial :
Row 1 :
Chain 3. Insert hook into 2nd chain, pull up a loop. Insert hook into 3rd chain, pull up a loop (3 loops on hook). Follow 1 - 5 pictures below.
Row 2 :
desired length: catch the yarn and pull up a loop, then remove it from hook, being careful not to lose it (picture 6-8). I like to pinch the cord with my thumb and finger and it helps me not to lose them. Then yarn over and pull a loop through the second loop, carefully remove it from the hook too (picture 9-10). Yarn over and pull up a loop catch the yarn and pull a loop (picture 11-12). To start next row - insert hook into two next (empty) loops (3 loops on a hook).
Info :
Continue crocheting rows in this manner until the cord is ~90 cm length. Then pull off the hook, cut the yarn (leaving ~30 cm ending) and leave it all. Later we will join the ends.
— Assembling the Bag :
Info :
The crochet fabric is very strong, so there is not chance the bag will tears away or brake.
Info :
You may get a little stretching in the stitch gap like this (see the photo on the left) and pull the I-Cord throughout it (picture 1).
Info :
Weave the I-Cord you've just crochet in and out of stitches, about two rows down (follow 2 – 8 pictures).
— Join the Ends :
Info :
After you waved the I-Cord, you need to join its endings. This part you can do by ending I-cord (yarn over and pull through all three loops on hook) and tie up both endings together. But I suggest you join the ends nicely, by giving some tips.
Step 1 :
Take the I-Cord end and insert hook into the first loop (picture 1-2). Catch the yarn and pull it all throughout (picture 3 – 4).
Step 2 :
Take the other I-Cord end and insert hook like in picture 5. Then catch the yarn and pull it all throughout (picture 6 – 8).
Step 3 :
Insert hook in the loop like in picture 9. Catch the yarn and pull it all throughout (picture 10).
Info :
The first nice joint is done. Two more lose loops are left, so continue joining them in this manner (picture 12-25).
Info :
When finished joining, simply make a double knot and hide the ends into the I-Cord and cut the leftovers, leaving very short ends. Then melt it with a lighter and hide into the I-Cord, pushing with fingers.
Info :
That’s it! Now you need to pull handle 1 and handle 2 (see picture below), put your favorite tassel, sew on a label and it’s ready to wear.
This Dew Drop handbag is designed to be both beautiful and practical — a stylish everyday bag you can make at home. The sturdy polyester rope keeps form and color after washing, while the I-cord handles add a professional finish. Add a tassel and a label to make it uniquely yours! 👜🧶