🧢 Beautiful ✨ Detailed πŸ’ Adorable

Building Blocks Crochet Cardigan Pattern

Building Blocks Crochet Cardigan Pattern
4.3β˜… Rating
12-15 Hours Time Needed
2.8K Made This
βœ‚οΈ

Beginner Friendly Level

Perfect for those just starting their crochet journey, with clear instructions and simple techniques

⏱️

Multi-Day Project

A rewarding 12+ hour journeyβ€”perfect for dedicated crafters who love detailed work.

🧢

Snug Essential

Everyday comfort with practical charm, designed for both functionality and style through changing seasons.

About This Building Blocks Crochet Cardigan Pattern

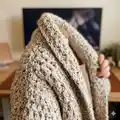
This pattern creates a cozy, oversized crochet cardigan worked in a simple single crochet/chain-1 pattern using super bulky Bernat Forever Fleece Tweeds yarn. The design includes a back, two fronts with a neck extension, and two sleeves, all seamed together for a warm, reversible finish. Perfect for beginners, the stitch pattern is textured yet easy to follow and sews together cleanly using mattress stitch.

Building Blocks Crochet Cardigan Pattern crochet pattern - detailed view of completed project

Worked flat in pieces and assembled, the cardigan is great for practicing even tension and seaming techniques. The fabric is reversible and forgiving, making it an ideal first garment project.

Why You'll Love This Building Blocks Crochet Cardigan Pattern

I absolutely love this pattern because it turns a super bulky yarn into a plush, wearable cardigan that feels luxurious and cozy. I enjoy how forgiving the single crochet/chain-1 pattern is β€” it's easy to keep even tension and the texture looks professional without complicated stitches. Sewing the pieces together with mattress stitch gives a clean finish that makes the garment look store-bought. I also love that the fabric is reversible, so whichever side you choose to show becomes part of the design. Finally, the pattern is beginner-friendly but still rewarding, making it perfect for introducing new crocheters to garment-making.

Building Blocks Crochet Cardigan Pattern step 1 - construction progress Building Blocks Crochet Cardigan Pattern step 2 - assembly progress Building Blocks Crochet Cardigan Pattern step 3 - details and accessories Building Blocks Crochet Cardigan Pattern step 4 - final assembly and finishing

Switch Things Up

I love customizing this cardigan by changing the yarn color to create different moods β€” try deep jewel tones for fall or soft pastels for spring.

You can make a shorter or longer cardigan by adjusting the number of rows for the back and fronts; measure against a favorite sweater as you go.

To make a snugger fit, choose a smaller hook or a yarn with less loft and check the gauge frequently while working.

For a more oversized look, use a bulkier yarn or go up one hook size and add extra length to the sleeves and body.

I sometimes add pockets by crocheting small rectangles in the same Sc/Ch-1 pattern and sewing them to the lower fronts for a practical detail.

Try adding decorative buttons or a belt loop to change the closure style β€” button bands can be added by picking up stitches along the front edge.

If you want exposed seams as a design feature, use a contrasting color for mattress stitch to make the seams pop.

Embellish the collar by crocheting a slightly wider neck extension or adding a folded trim for extra structure and warmth.

Want it child-sized or mini? Use a lighter weight yarn and appropriate hook, then scale down chain counts proportionally while keeping the Sc/Ch-1 repeat.

I often swap the yarn to a tweed or heathered shade to hide wear and make the fabric look rich and textured without extra effort.

Common Mistakes & How to Fix Them

βœ— Skipping stitch markers for shoulder placement can lead to uneven shoulders; place markers 16 (20-22-24-26) sts in from each side as instructed to align shoulder seams correctly. βœ— Working into the chain instead of the ch-1 space will distort the fabric; insert your hook under the space created right under the ch-1 and work single crochet into that space. βœ— Forgetting to count sc and ch-1 spaces as stitches causes incorrect stitch counts; always count both single crochets and chain-1 spaces (sps) when checking your stitch total. βœ— Not leaving long tails for seaming makes assembly difficult later; fasten off leaving a 16" [40.5 cm] end for seams at the end of each piece so you can mattress stitch easily. βœ— Inconsistent tension between pieces leads to poor fit when assembled; maintain consistent tension and check gauge (9 sts and 8 rows = 4" [10 cm]) before starting to ensure pieces match the provided measurements.

Building Blocks Crochet Cardigan Pattern

Create a cozy, textured cardigan using super bulky Bernat Forever Fleece Tweeds yarn. This beginner-friendly pattern guides you through making back, fronts, sleeves and finishing with clear step-by-step instructions so you can sew the pieces together with confidence. The reversible fabric and simple single crochet/chain-1 pattern make this a relaxing, satisfying project you'll love to wear or gift.

Beginner Friendly 12-15 Hours

Materials Needed for Building Blocks Crochet Cardigan Pattern

β€” Main Fabric

  • 01
    Bernat Forever Fleece Tweeds (super bulky #6) 8.8 oz/250 g; 158 yds/145 m per ball
  • 02
    Balsam Tweed (79001) - XS/S: 6 balls (approx total yards shown 930/846)
  • 03
    Balsam Tweed (79001) - M/L: 7 balls (approx total yards shown 1050/956)
  • 04
    Balsam Tweed (79001) - XL: 8 balls (approx total yards shown 1200/1092)
  • 05
    Balsam Tweed (79001) - 2/3XL: 9 balls (approx total yards shown 1320/1201)
  • 06
    Balsam Tweed (79001) - 4/5XL: 10 balls (approx total yards shown 1450/1320)

β€” Tools Required

  • 01
    Crochet hook size U.S. N/15 (10 mm) Susan Bates or size needed to obtain gauge
  • 02
    Susan Bates stitch markers
  • 03
    Susan Bates yarn needle
  • 04
    Tape measure
  • 05
    Scissors

Progress Tracker

0% Complete

β€” Instructions :

Info :

The instructions are written for XS/S size. If changes are necessary, the instructions will be written XS/S (M/L-XL-2/3XL-4/5XL). Numbers for each size are shown in the same color throughout the pattern. When only one number is given in black, it applies to all sizes.

β€” Back :

Chain :

Chain (Ch) 50 (58-64-68-74).

1st row :

[Right Side (RS)]. 1 single crochet (sc) in 2nd ch from hook. *Ch 1. Skip next ch. 1 sc in next ch. Repeat (Rep) from * to end of chain. Turn. 49 (57-63-67-73) stitches (sts) – count sc and ch-1 spaces (sps) as sts.

2nd row :

Ch 1. 1 sc in first sc. *Ch 1. Skip next sc. 1 sc in next ch-1 sp. Rep from * to last 2 sts. 1 sc in next ch-1 sp. 1 sc in last sc. Turn.

Info :

*1 sc in next ch-1 space (sp). Ch 1. Skip next sc. Rep from * to last 2 sts. 1 sc in next ch-1 sp. 1 sc in last sc. Turn.

Note :

Insert hook into the space created right under the ch-1 when working sc. Do not work sc into the actual chain.

3rd row :

Ch 1. 1 sc in first sc. *Ch 1. Skip next sc. 1 sc in next ch-1 sp. Rep from * to last 2 sts. Ch 1. Skip next sc. 1 sc in last sc. Turn.

Repeat :

Rep last 2 rows for Sc/Ch-1 pattern (pat) until piece measures 25 (25-26-26-27)" [63.5 (63.5-66-66-68.5) cm], ending on a RS row.

Info :

Fasten off leaving a 16" [40.5 cm] end for seams.

Info :

Place markers 16 (20-22-24-26) sts in from each side for shoulders.

β€” Fronts :

Info :

Make 2 pieces alike, noting RS and WS will reverse to create Left and Right Front. Fabric is reversible.

Chain :

Ch 32 (36-38-40-42).

1st row :

(RS). 1 sc in 2nd ch from hook. *Ch 1. Skip next ch. 1 sc in next ch. Rep from * to end of chain. Turn. 31 (35-37-39-41) sts – count sc and ch-1 spaces (sps) as sts.

2nd row :

Ch 1. 1 sc in first sc. *1 sc in next ch-1 sp. Ch 1. Skip next sc. Rep from * to last 2 sts. 1 sc in next ch-1 sp. 1 sc in last sc. Turn.

3rd row :

Ch 1. 1 sc in first sc. *Ch 1. Skip next sc. 1 sc in next ch-1 sp. Rep from * to last 2 sts. Ch 1. Skip next sc. 1 sc in last sc. Turn.

Repeat :

Rep last 2 rows for Sc/Ch-1 pat until piece measures same length as Back, ending on a RS row.

Shape Neck Extension - Next row :

Ch 1. 1 sc in first sc. (1 sc in next ch-1 sp. Ch 1. Skip next sc) 6 times. 1 sc in next ch-1 sp. 1 sc in next sc. Turn. Leave remaining (rem) sts unworked for shoulder.

Continue :

Continue working across 15 sts in Sc/Ch-1 pat as follows:

Next row :

Ch 1. 1 sc in first sc. (Ch 1. Skip next sc. 1 sc in next ch-1 sp) 6 times. Ch 1. Skip next sc. 1 sc in last sc. Turn.

Next row :

Ch 1. 1 sc in first sc. (1 sc in next ch-1 sp. Ch 1. Skip next sc) 6 times. 1 sc in next ch-1 sp. 1 sc in next sc. Turn.

Repeat :

Rep last 2 rows until Neck Extension measures 3ΒΎ (3ΒΎ-4ΒΌ-4ΒΌ-4ΒΌ)" [9.5 (9.5-11-11-11) cm].

Info :

Fasten off leaving a 16" [40.5 cm] end for seams.

β€” Sleeves :

Chain :

Ch 40 (42-42-44-46).

1st row :

(RS). 1 sc in 2nd ch from hook. *Ch 1. Skip next ch. 1 sc in next ch. Rep from * to end of chain. Turn. 39 (41-41-43-45) sts – count sc and ch-1 spaces (sps) as sts.

2nd row :

Ch 1. 1 sc in first sc. *1 sc in next ch-1 sp. Ch 1. Skip next sc. Rep from * to last 2 sts. 1 sc in next ch-1 sp. 1 sc in last sc. Turn.

3rd row :

Ch 1. 1 sc in first sc. *Ch 1. Skip next sc. 1 sc in next ch-1 sp. Rep from * to last 2 sts. Ch 1. Skip next sc. 1 sc in last sc. Turn.

Repeat :

Rep last 2 rows for Sc/Ch-1 pat until Sleeve measures 17 (18-18-17-16)" [43 (45.5-45.5-43-40.5) cm], ending on a RS row.

Info :

Fasten off leaving a 16" [40.5 cm] end for seams.

β€” Finishing :

Note :

Sew all seams using mattress stitch technique.

Info :

Use fasten off yarn ends where applicable to sew seams. Sew shoulder seams to markers using mattress stitch.

Info :

With Wrong Side (WS) facing, sew center back seam of neck extension.

Info :

With RS facing, sew sides of neck extensions to back neck edge, having neck extension seam at center back.

Info :

Place markers on side edges of Body pieces 8Β½ (9-9-9Β½-10)" [21.5 (23-23-24.5-25.5) cm] down from shoulders.

Info :

Sew top of Sleeves to Body pieces between markers. Sew side and sleeve seams. Weave in ends. Fold back Sleeve cuffs as desired.

Assembly Instructions

  • Sew shoulder seams to markers using mattress stitch, aligning markers placed 16 (20-22-24-26) sts in from each side to ensure correct shoulder placement.
  • With WS facing, sew center back seam of neck extension so the neck extension seam sits at center back of the garment.
  • With RS facing, sew sides of neck extensions to the back neck edge, matching the neck extension seam to the center back seam for a neat collar.
  • Place markers on body side edges 8Β½ (9-9-9Β½-10)" [21.5 (23-23-24.5-25.5) cm] down from shoulders then sew top of sleeves to body pieces between those markers for correct sleeve placement.
  • Sew side seams and sleeve seams using mattress stitch, then weave in ends and fold back sleeve cuffs as desired for the finished look.

Important Notes

  • πŸ’‘Use stitch markers to mark shoulder and sleeve placement to ensure accurate assembly and symmetry.
  • πŸ’‘Maintain consistent tension and check the gauge of 9 sts and 8 rows = 4" [10 cm] in Sc/Ch-1 pattern before making pieces to ensure proper fit.
  • πŸ’‘Fasten off leaving a 16" [40.5 cm] tail for seams on each piece to make mattress stitch seaming easier and stronger.
  • πŸ’‘Work single crochet into the ch-1 spaces by inserting the hook under the space created right under the ch-1, not into the chain itself.

This cozy Building Blocks Crochet Cardigan pairs super bulky tweed yarn with a simple textured stitch for a plush wearable you will reach for all season. The reversible fabric, comfy fit, and easy seaming make this a relaxing project you can finish over a few sessions. Whether you keep it or gift it, your handmade cardigan will bring warmth and smiles. 🧡🧢

You ask,

we answer.

FAQs

What size will the finished piece be?

Finished chest measurements are given in the Measurements table: XS/S finished chest 44" [112 cm], M/L 50" [101.5 cm], XL 56" [119.5 cm], 2/3XL 60" [137 cm], 4/5XL 64" [155 cm].

Can I use a different yarn weight?

You can substitute yarn, but this will change the gauge and finished size; choose a yarn with similar gauge (super bulky) and adjust hook size to obtain the stated gauge of 9 sts and 8 rows = 4" [10 cm].

Do I need to know special stitches?

No special stitches are required; the pattern uses basic single crochet and chain stitches worked in a Sc/Ch-1 pattern, making it suitable for beginners.

How long does assembly take and what seam is recommended?

Assembly time varies, but allow extra time for seaming; the pattern recommends mattress stitch for neat, durable seams and advises leaving 16" [40.5 cm] tails for sewing.