๐Ÿงถ Beautiful โœจ Detailed ๐Ÿ’ Adorable

Crochet Sunflower Pattern

Crochet Sunflower Pattern
4.6โ˜… Rating
5-7 Hours Time Needed
1.9K Made This
โœ‚๏ธ

Intermediate Level

Ideal for those with basic crochet experience, featuring slightly more advanced stitches and techniques to expand your skills.

โฑ๏ธ

Weekend Treat

Takes 5-7 hours, making it an enjoyable project to finish over a couple of days.

๐Ÿก

Cozy Accent

A warm touch for your space that transforms ordinary corners into inviting nooks filled with handmade charm.

About This Crochet Sunflower Pattern

This pattern creates a realistic crochet sunflower with a textured seed center, two layers of petals, a wired leaf and a wrapped floral stem. It includes clear round-by-round instructions for the heart, seeds, petals, torus base and leaf. The pattern uses 4-ply cotton yarn and a 2.5mm hook to achieve crisp petal shaping and sturdy structure.

Crochet Sunflower Pattern crochet pattern - detailed view of completed project

Youll learn techniques like working in half-side stitches, creating picot edges, and inserting wire for shaped petals and leaves. Full assembly steps show how to insert the stem, stuff and secure all parts for display.

Why You'll Love This Crochet Sunflower Pattern

I absolutely love this pattern because it brings the charm of real sunflowers to a handmade, lasting piece you can display proudly. I enjoy the textured seed rows and the way the two petal layers stack to create depth and realism. I also appreciate how the wired petals and leaf make the flower poseable and durable. Working this pattern always feels rewarding because the details come together beautifully and the finished sunflower makes a lovely gift or home accent.

Crochet Sunflower Pattern step 1 - construction progress Crochet Sunflower Pattern step 2 - assembly progress Crochet Sunflower Pattern step 3 - details and accessories Crochet Sunflower Pattern step 4 - final assembly and finishing

Switch Things Up

I love experimenting with colors, so I often change the petal color to soft pastels or ombre shades to give the sunflower a different mood.

I sometimes substitute the 4-ply cotton with a sport weight yarn and a slightly larger hook to create a larger, airier sunflower.

For a miniature version perfect for keychains, I use fingering weight yarn and a smaller hook, and reduce petal repeats to suit the scale.

I add embroidered details to the seed center or use a contrasting yarn for a stitched spiral to make the heart pop visually.

Try adding beads instead of some picots for sparkly seed highlights, especially for decorative arrangements or party decor.

If you want a more realistic stem, wrap floral tape over the yarn-wrapped stems before adding leaves for a professional finish.

I sometimes create mixed bouquets by making sunflowers in different sizes and clustering them in a vase for a dynamic display.

To make the petals extra sturdy, braid a thin wire into the edge of petals before closing so you can shape them with ease.

Consider making the leaf asymmetrical or larger to create an artful, dramatic silhouette on your stem.

I encourage you to try different picot sizes, wire gauges and yarn textures to discover your favorite combination for unique sunflowers.

Common Mistakes & How to Fix Them

โœ— Skipping the turning chain at the start of each round causes misaligned stitches and shaping; always chain 1 at the start of rounds as instructed to keep row height consistent. โœ— Closing rounds incorrectly can distort the piece and cause uneven edges; finish each round with a slip stitch through the first stitch to maintain a smooth circumference. โœ— Not working in the specified half-side stitches for layers will misplace seeds or petals; locate and use the left or facing half-side stitches exactly when the instruction specifies. โœ— Inserting the wire after finishing petals can be difficult and may damage stitches; insert the craft wire as instructed before completing certain petal rounds so the wire sits cleanly inside. โœ— Overstuffing the torus or heart makes the flower look puffy and unnatural; stuff gradually and only to firmness that supports shape without distorting stitches.

Crochet Sunflower Pattern

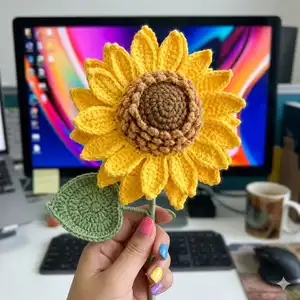
Create a bright, lifelike crochet sunflower you can display or gift. This pattern walks you through the heart, seeds, two petal layers, torus base and a wired leaf so your flower holds its shape. Youll enjoy shaping petals and adding textured seed rows to make a realistic center. Follow step-by-step rounds and assembly tips to build a charming floral accent for home or gifts.

Intermediate 5-7 Hours

Materials Needed for Crochet Sunflower Pattern

โ€” Main Fabric

  • 01
    4-ply milk cotton yarn - #67 Corn yellow (petals) approx 30g per flower
  • 02
    4-ply milk cotton yarn - #26 Dark brown (flower heart and seeds) approx 20-30g per flower
  • 03
    4-ply milk cotton yarn - #25 Willow green (leaf and stem wrapping) approx 15-25g per flower

โ€” Tools Required

  • 01
    Floral stem: green metal stem 2mm x 40cm (use 3 pieces per stem for strength)
  • 02
    Craft wire 0.5mm (for inserting into petals and leaf)
  • 03
    Glue gun (for securing the torus end and stems)
  • 04
    Fillings (polyester stuffing) for the flower heart/torus
  • 05
    Crochet hook size 2.5mm
  • 06
    Scissors
  • 07
    Yarn needle for sewing and weaving tails
  • 08
    Stitch marker (optional) to mark rounds
  • 09
    Pliers or wire cutters for cutting craft wire

Progress Tracker

0% Complete

โ€” Flower heart :

Infos :

*Every time start a new round, chain 1 as the turning chain (do not count as a stitch); *Every time close a round, work a slip stitch through the 1st stitch;

Round 1 :

6sc in a magic ring---6

Round 2 :

6 inc--- 12

Round 3 :

(sc, inc)*6 ---18

Round 4 :

(2sc, inc)*6---24

Round 5 :

(3sc, inc)*6---30

Info :

From R6: work only in the half-side stitches that are far away from us.

Info :

every time close a round, still work a normal slst(through a whole stitch, not just half side), still chain 1 to strat every round; *The left half stitches of R5-8 will be the place to work flower seeds;

Round 6 :

(2sc, inc, 2sc)*6---36

Round 7 :

(5sc, inc)*6---42

Round 8 :

(3sc, inc, 3sc)*6---48

Round 9 :

(7sc, inc)*6---54

Round 10 :

54 sc--- 54, FO, cut off the yarn

โ€” Flower seeds :

Infos :

*work 4 rows of flower seeds at the left half stitches of R5-8. *seeds numbers at each round: R5-15, R6-18, R7-21, R8-24.

Round 5 (seeds) :

Reconnect yarn to the 1st stitch of R5, chian 3, work a slst through the current space on the flower heart, 1skip (see pic), 2slst, repeat until the end. Work a slst through the 1st space to close R5.

Round 6-8 :

move yarn to the next round by working a slst through the 1st space of the new round, repeat the same process to finish all seeds. FO, move the tail to the back.

โ€” Flower petals :

Round 1 :

Reconnect yarn to the 1st stitch of R9, chian 8, from the 2nd stitch from the hook, work 7sc, 1skip, 2slst, chain 8 ... repeat 18 times. Finally work a slst through the 1st stich of this round to close. Keep the yarn.

Round 2 :

insert the wire, for each flower petal, work: sc, hdc, 3dc, sc, [sc, 1ch picot, sc], hdc, 3dc, hdc, sc, 1skip, 1slst (see pic). Repeat to work 18 petals. After finishing the last, work a slst through the 1st stitch to close round, FO. Cut off the yarn and wire.

Round 3 :

work the second layer of petals only in half-side stitches that are facing us. Reconnect the yarn, chain 10; from the 2nd stitch from the hook, work 9sc, 1skip, 2slst, chain 8 ... repeat 18 times. Finally work a slst through the 1st stich of this round to close. Keep the yarn.

Round 4 :

insert the wire, for each flower petal work: sc, hdc, 5dc, sc, [sc, 1ch picot, sc], hdc, 5dc, hdc, sc, 1skip, 2slst. Repeat to work 18 petals. After finishing the last, work a slst through the 1st stitch to close round, FO. Cut off the yarn and wire.

โ€” Flowers torus :

Infos :

* Every time start a new round, chain 1 as the turning chain (do not count as a stitch); *Every time close a round, work a slip stitch through the 1st stitch;

Round 1 :

6sc in a magic ring---6

Round 2-3 :

6sc --- 6

Round 4 :

6inc --- 12

Round 5 :

(sc, inc)*6 ---18

Round 6 :

(2sc, inc)*6---24

Round 7 :

(3sc, inc)*6---30

Round 8 :

(2sc, inc, 2sc)*6---36

Round 9 :

(5sc, inc)*6---42

Round 10 :

(3sc, inc, 3sc)*6---48

Round 11 :

(7sc, inc)*6---54

Round 12 :

work only in the half-side stitch that is facing us (see pic). 1ch, [1ldc inc, 3ch picot, 1ldc inc], [1slst, 1ch], 1skip (see pic), repeat until the end. Finally, a slst throught the 1st space to close round, FO, cut off the yarn

โ€” Leaf :

Round 1 :

7sc in a magic ring;

Round 2 :

2ch as the turning chain, do not count as a stitch; [3dc], [dc inc]*2, [3tr], [dc inc]*2, [3dc, 2ch], 1slst through the 1st stitch of R1;

Round 3 :

2ch as the turning chain, do not count as a stitch; insert the wire (about 15cm long); [sc, hdc], [3dc], [dc inc]*6, [3dc], [dc inc]*6, [3dc], [hdc, sc, 1ch], 1slst through the 1st stitch of R2 (pic);

Round 4 :

1ch as the turning chain, do not count as a stitch; sc, hdc, [dc inc]*5, 11dc, [dc, tr, 2ch picot, tr, dc], 11dc, [dc inc]*5, hdc, sc, 1ch, 1slst through the 1st stitch of R3; FO, wrap the craft wires with the tail.

โ€” Assemble all parts :

Step 1 :

Find 3 pieces of floral stem (to make the stem stronger than just using 1 piece; 40cm long, 2mm wide), wrap one end (about 5cm long) together with yarn, fold as shown on pic.

Step 2 :

Sew the flower with the torus together with a yarn needle. Stop when finishing 3/4 to insert the floral stem we prepared and the filling.

Step 3 :

Continue sewing the flower with the torus. Hide the tail.

Step 4 :

Apply some glue at the end of the floral torus to prevent it from moving.

Step 5 :

Wrap the floral stem with a long piece of green yarn, attach the leaf as well; Apply glue at the end of stems to fix. Done!

Assembly Instructions

  • Find 3 pieces of floral stem (40cm long, 2mm wide) and wrap one end (about 5cm) together with yarn, folding them as shown to create a stronger stem core.
  • Sew the flower to the torus with a yarn needle, stopping when approximately 3/4 finished so you can insert the prepared floral stem and some filling before closing.
  • Continue sewing the flower and torus together, then hide and weave in the tail to finish the join neatly.
  • Apply a small amount of glue at the end of the floral torus where the stem sits to prevent the torus from moving or slipping.
  • Wrap the exposed floral stem with a long piece of green yarn and attach the leaf; secure with glue at the stem ends to fix everything firmly.

Important Notes

  • ๐Ÿ’กAlways start a new round with chain 1 (it does not count as a stitch) and close each round with a slip stitch through the first stitch for consistent shaping.
  • ๐Ÿ’กWhen instructed to work in half-side stitches, be sure to identify left or facing half stitches accurately to position seeds and petals correctly.
  • ๐Ÿ’กInsert craft wire into petals and leaves before closing those rounds so the wire sits inside cleanly and makes shaping easier.
  • ๐Ÿ’กUse small amounts of stuffing gradually to avoid overfilling the torus or heart and distorting the finished shape.

Thank you for making this sunny crochet sunflower! Your handmade flower will brighten any space and last for years with care. Enjoy arranging your bouquet and sharing the warmth of handmade blooms. ๐ŸŒป๐Ÿงถ

You ask,

we answer.

FAQs

What size will the finished piece be?

The finished sunflower measures approximately 20-25 cm tall with the floral stem in place, depending on yarn tension and how much stem you leave exposed.

Can I use different yarn weights for this pattern?

Yes, you can use different yarn weights but this will change the finished size and look; if you choose a different weight, adjust your hook accordingly and expect fewer or more petals to maintain proportions.

Do I need prior crochet experience for this pattern?

This pattern is rated intermediate and assumes you know basic stitches like sc, hdc, dc, picot and how to work in rounds; some experience with inserting wire and assembly is helpful.

How long does this project typically take to complete?

Most crocheters complete this project in 5-7 hours, though time may vary based on experience level, customization and how many sunflowers you make.

How do I care for the finished sunflower?

Spot clean gently with a damp cloth; avoid soaking because of internal wire and glue. For dusty pieces, use a soft brush or low-power hairdryer to remove dust.