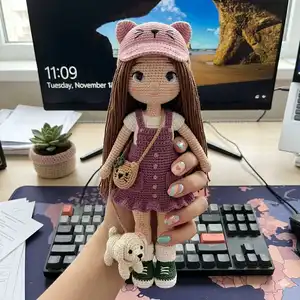
Create a charming Mimosa Baby doll with this detailed amigurumi pattern. You will follow step-by-step instructions for the head, eyes, nose, lips, arms, legs, feet and finishing touches. The pattern includes clear material lists, stitch explanations and photo-guided eye and lip embroidery techniques to help you achieve professional results. Perfect for crafters who love making handmade dolls with personality and sweet details.
Progress Tracker
0% Complete
— Head :
Round 1 :
6x into the magic ring
Info :
Go to eye processing. After the eye embroidery is finished, the head will continue to be knitted.
— Eye Processing :
Info :
Identifying eye locations: Align with the third increment loop of the head in the 12th row and place a marker between the 21st and 22nd rows with a pin. This is the midpoint between the two eyes. Make a mark with a pin by counting 6 sc to the right of the pin and 5 to the left of the pin. Remove the pins by placing dots in the designated places with the flying pen. Pupils will be embroidered on the marked places.
Info :
There are 11 sc between the points we marked to process the pupils. Eye distance can be zoomed in and out optionally.
Info :
The concept of tour will be used when processing the eye. The tour consists of two stages. In the first stage, basting is done by sinking into the folds of the frequent needles. In the second stage, the round is completed by going through all the basting stitches.
Info :
Eye Processing YouTube link: https://youtu.be/UUQV31Uj2nk
Info :
1- Draw a circle with a flying pencil so that the diameter of the pupils corresponds to two single needles. Attach a single layer of black domino thread to the needle. Complete the first step by basting the circumference of the circle from the multiples of the frequent needles. In the second stage, complete the tour as in the image by passing from the outside to the inside under each of the stitches you have worked on.
Info :
2- Remove the needle from the upper part of the eye and pass under the opposite stitches to fill the pupil. Process horizontally all the way down, taking care not to overlap the threads while embroidering.
Info :
3- Draw the iris of the eye in a circle, leaving a single needle around the pupil. Starting from the upper part of the eye with dark blue thread, embroider around the iris by basting from the fold of the loops. Complete the round as in the image by passing under each of the stitches you have embroidered from the outside to the inside.
Info :
4- Process one more round into the iris.
Info :
5- Embroider the upper half of the iris with another round of dark blue thread. The remaining half will be embroidered with light blue thread.
Info :
6- With a double layer of light blue thread, embroider the half part under the pupil.
Info :
The width and length of the iris is 4 sc. Process the other iris in the same way. If there are gaps in the processed areas, retouch the gaps by sinking into the head.
Info :
7- To embroider the white part of the eye, draw a circle starting from the bottom row of the inner part of the eye and ending at the highest point of the outer part of the eye, as in the image. The part of the circle on the nose side of the eye should be the width of a single needle, expand a little more towards the outer part, and taper a little more towards the top.
Info :
8- Complete the first step by basting around the circle you have drawn, starting from the top. At the end of the first stage, remove the needle from the starting point and complete the tour by doing the second stage.
Info :
9- Do one more round in the same way.
Info :
10- Since the upper white part of the eye is full, start the new round from the untreated area and process one more round. If there are 3 rounds of processing on the white part, but there are still empty spaces, one more round can be made or the empty spaces can be retouched.
Info :
11- A round will be made with the same technique between the blue and white part of the eye with the black rope. Process the other eye in the same way.
Info :
Lash bottom line: Sink into the second row from the bottom of the outer part of the eye. Baste up to the corner of the eye. Complete the tour by sinking in from the eye spring and leaving the starting point and embroidering over the basting stitches.
Info :
Do one more round, starting from the top row of the lower lash line and up to the corner of the eye.
Info :
Eyelash: Come out from the upper row of the lower line of the eyelash as in the image and sink into the root of the eyelash. Repeat the same action on the same eyelash.
Info :
Determine the places of the other eyelashes as in the image. First, a small eyelash will be processed by sinking further than the point you have determined. Then, insert the needle under the small eyelash and exit from the point you have determined and sink into the root of the eyelash. Complete the other eyelashes with this technique.
Info :
Eye shimmer: Attach two layers of white thread to the quilt needle. Process both eyes in the same way as in the pictures.
Info :
Eye processing is finished. The head will continue to be knitted.
Round 31 :
2x, a, (10x,a)*5, 8x (66)
Round 32 :
5x, a, (9x,a)*5, 4x (60)
Round 34 :
2x, a, (7x,a)*5, 5x (48)
Round 35 :
5x, a, (6x,a)*5, x (42)
Round 38 :
2x, a, (5x,a)*5, 3x (36)
Info :
You fill the head. While filling the head, fill it as round as possible without disturbing its form. If you fill to the sides after the filling process is finished, the head will be more rounded.
Round 41 :
(x,a)*8, sl st (16)
Info :
Head done, cut the rope.
— Nose :
Info :
It will be embroidered by leaving two single needles spaced, two rows below the eye, coinciding with the middle level of the two eyes. Separate the yarn into layers. Process the nose by sinking in and out 4-5 times as in the image.
— Eyebrow :
Info :
Embroider the eyebrows one row above the lashes, leaving 9 single needles with a width of 5 sc between the two eyebrows. Follow the images.
— Lips :
Info :
Determine the place of the lip with pins, leaving 3 single needles down the nose, and 3 frequent needles. Attach the thread to the needle in two layers. To embroider the lip, the triangle shape will be created. Enter through the neck space and exit from the designated point on the left. Dive into the middle of the lip in the upper row and exit from the determined point on the right. To form the other side of the triangle, sink to the upper point and exit the neck space. Enter from the left of the lip and enter from the right and exit the neck cavity.
Info :
LIP PROCESSING YOUTUBE LINK: https://youtu.be/Q3ZyjkKUoHQ
Info :
1st round: Lip shaping will be created by wrapping the triangle. Insert the needle under the thread and exit from the top to embroider. Starting from the top left edge, loop the rope 5 times. Take care not to overlap the yarn and to keep it regularly side by side. Do the same to the right side of the upper lip. Complete the round by wrapping the bottom edge 6-7 times.
Info :
2nd round: In the second round, if you make 3-4 loops on the outer lips and the loops on the lips towards the middle part, it will stop. Intensity of 4 to the lower lip, middle of the lower lip. Lip fullness can be increased upon request.
Info :
Lip line: Make the lip line by following the images. Submerge by skipping one single needle on the sides.
— Arm :
Round 1 :
6x into the magic ring
Round 2 :
2v, x, 2v, x (10)
Round 3 :
2x, v, 4x, v, 2x (12)
Round 4 :
3x, v, 5x, v, 2x (14)
Round 6-8 :
3 rows:15x (15)
Round 9 :
4x, a, 6x, a, x (13)
Round 11-36 :
26 rows:12x, sl st, done break the thread. The arms will not be filled with fibers. Knit the other arm in the same way.
— Foot Recipe :
Info :
Start with tan yarn. The two feet will be knitted with the same recipe and the right and left legs will be continued with separate recipes.
Round 1 :
9ch check. Starting from 2ch, into the first loop 2x, 6x, into the same loop 3x, 7x (18)
Round 2 :
v, 8x, v, 8x (20)
Round 11 :
3x, 7ch and skip 9x, 8x
Round 12 :
3x, 7x on 7 chain, 8x (18)
Round 14 :
6a, the heel is over, leave a long rope to collect the heel and break the rope.
Info :
Gather the needle and 6 sc needles from the flo loops, tighten them well, knot the thread inside the foot and hide it. The foot is over, the leg will be passed. Knit the other foot in the same way.
— Leg Recipe (Left leg) :
Info :
Right and left leg nomenclature: represents the right and left legs of the baby. The recipe is the same until the knee cap on the right and left legs; the calf direction depends on filling. Fill carefully to get the visual shape.
Round 1 :
We turn the back of the foot and pull the 7th loop, attach the thread to the 4th loop, 4x on the chain, one sc in the gap between the front part and the sole, 9x in the front, one sc in the gap between the front part and the sole, 3x on the chain (18)
Round 2 :
4x, a, float 7x, a, 3x (16)
Info :
Fill the wrist. When we turn the toe to ourselves, the left part of the right leg will be the calf (blue arrow side) and this side will be protruded. Add more filling to the protruding part. Proceed by making filling in 4-5 rows.
Round 11 :
2x, v, 15x (19)
Round 12 :
3x, v, 15x (20)
Round 14 :
4x, v, 15x (21)
Round 16 :
5x, v, 15x (22)
Round 18 :
6x, v, 15x (23)
Round 24 :
5x, a, x, a, 13x (21)
Round 26 :
4x, a, x, a, 12x (19)
Round 27 :
5x, a, 5x, 4v, 3x (22)
Info :
The 27th row is the 4v kneecap. If there is a shift in the raises due to the hand difference, you can scroll the knee raises. Change the head of the line accordingly and continue with the recipe.
Round 29 :
11x, 4a, 3x (18)
Round 30 :
4x, v, x, v, 11x (20)
Round 32 :
6x, v, 13x (21)
Round 34 :
7x, v, x, v, 11x (23)
Round 36 :
8x, v, 14x (24)
Round 38 :
9x, v, 14x (25)
Round 40 :
10x, v, 14x (26)
Round 42 :
11x, v, 14x (27)
Round 44 :
12x, v, 14x (28)
Round 45 :
4x with tan, 24x with white thread (28)
Info :
White rope is used for the leg part of the shorts.
Round 47 :
4x, sl st, finish, break the thread. Left leg done.
— Right leg recipe :
Info :
When filling, the right foot and leg should always be filled to the right of the leg to create a protruding image on the calf. The right leg is knitted with the same recipe as the left leg until the 26th row. The difference in appearance in the two lower legs is all about filling.
Info :
The right leg follows the same row sequence as the left leg with the filling mirrored to the right side. Continue rows following the left leg recipe and mirror the protrusion side when stuffing.
This adorable Mimosa Baby amigurumi pattern guides you through every detail from head shaping to eye embroidery and outfit finishing. It combines precise crochet shaping with delicate embroidery techniques, giving you a delightful doll to treasure or gift. Enjoy crafting this personalized little friend — happy crocheting! 🧶🧵