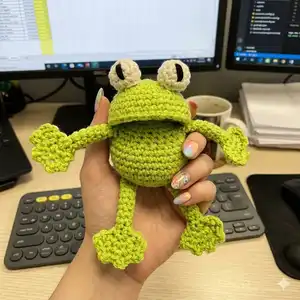
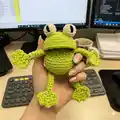
Make a cute hand-crocheted frog with this clear, photo-supported pattern by Annemarie. You'll work a small beak-shaped body, add expressive eyes and four splayed legs for a playful finish. Perfect for gifting or decorating, the pattern walks you through each round so you can crochet with confidence and make your own adorable frog.
Progress Tracker
0% Complete
— Materials & Abbreviations :
Info :
Materials: Fyberfill stuffing. Green, white and black yarn for crochet hook size 4mm. If you want the inside of the beak to be pink, you'll need pink as well. Crochet hook, size 4mm. Sewing needle. A pair of scissors.
Info :
Abbreviations: CH: chain. SC: single crochet. SL ST: slip stitch. DEC: decrease.
— Body :
Round 1 :
Make a magic ring. Chain 6 in the ring. (6) (If you don't know how to make a magic ring, do the following: chain 2, SC6 in 2nd chain from hook.)
Round 2 :
SC2 in every SC. (12)
Round 3 :
SC2 in next SC, SC1 in next. Repeat around. (18)
Round 4 :
SC2 in next SC, SC1 in next 2 stitches. Repeat around. (24)
Round 5 :
SC2 in next SC, SC1 in next 3 stitches. Repeat around. (30)
Round 7 :
Chain 1. (If you want the inside of the beak to be pink, change to pink here.)
Round 8 :
Go back in the direction you came from and SC15. Chain 1. (15)
Round 9 :
SC1, skip one stitch, SC3, skip one stitch, SC3, skip one stitch, SC3, skip one stitch, SC1. Chain one. (11)
Round 10 :
SC2, skip one stitch, SC2, skip one stitch, SC2, skip one stitch, SC2. Chain one. (8)
Round 11 :
SC2, skip one stitch, SC2, skip one stitch, SC2. Chain one. (6)
Round 12 :
SC1, skip one stitch, SC2, skip one stitch, SC1. (4)
Round 13 :
SC4. Chain one. (4)
Round 14 :
SC2 in next stitch, SC2, SC2 in next stitch. Chain one. (6)
Round 15 :
SC1, SC2 in next stitch, SC2, SC2 in next stitch, SC1. Chain one. (8)
Round 16 :
SC1, SC2 in next stitch, SC2, SC2 in next stitch, 1SC, SC2 in next stitch, SC1. Chain one. (11)
Round 17 :
SC1, SC2 in next stitch, SC2, SC2 in next stitch, SC1, SC2 in next stitch, SC2, SC2 in next stitch, SC1. Chain one. (15) (If you made the inside of the beak pink, change here to green again.)
Info :
Now close the side of the beak by going up with SL ST. Go around the back of the beak with SL ST as well and go down on the other side with SL ST.
Info :
You have now closed the beak and you will start making the bottom of the body. Before starting row 18, count 30 stitches around so you know where the 30 stitches are.
Info :
After finishing row 20 you have to attach the eyes to the head. The head is the part you have finished already. After attaching the eyes, follow the rest of the pattern.
Round 21 :
DEC 1 stitch, SC3. Repeat around. (24)
Round 22 :
DEC 1 stitch, SC2. Repeat around. (18)
Round 23 :
DEC 1 stitch, SC1. Repeat around. (12)
Info :
Now stuff both parts of the beak and the body. Don't use too much stuffing.
Round 24 :
DEC 1 stitch, SC1. Repeat around. (8)
Info :
Fasten off and leave a tail. Close the body.
— Eyes (make 2) :
Round 1 :
Make a magic ring. Chain 8 in the ring. (8) (If you don't know how to make a magic ring, do the following: chain 2, SC8 in 2nd chain from hook.)
Round 2 :
SC2 in every second stitch. (12)
Round 4 :
DEC 6 by crocheting every 2SC together. (6)
Round 5 :
Fasten off and leave tail for sewing the eye to the head.
Round 6 :
Make the black part of the eyes (embroider or crochet a small black pupil).
Info :
If you prefer safety eyes, you can push the safety eye through the middle of the white part. It's best to push the back of the eye through the body so the washer is on the inside of the body.
— Hind-legs (make 2) :
Round 1 :
Chain 4. Close the ring with a SL ST.
Round 2 :
SC1 in every chain. (4)
Round 11 :
SC2 on the top of the leg. Chain 1. (Just push your crochet hook through the top of the leg.)
Round 12 :
SC2 in every SC. Chain 1. (4)
Round 13 :
SC2 in the first stitch, SC2, SC2 in the last stitch. (6)
Round 15 :
Skip the first stitch. SC1 in the next.
Round 17 :
SC1 in the next stitch.
Round 18 :
Repeat 3 more times until you have 5 toes.
— Front-legs (make 2) :
Round 1 :
Chain 4. Close the ring with a SL ST.
Round 2 :
SC1 in every chain. (4)
Round 7 :
Chain 1. (If you need help by making this part of the leg, look at rows 10 and 11 of the hind-legs.)
Round 8 :
SC2 on the top of the leg. Chain 1. (2)
Round 9 :
SC2 in every SC. Chain 1. (4)
Round 10 :
SC2 in the first stitch, SC2, SC2 in the last stitch. (6)
Round 12 :
Skip the first stitch. SC1 in the next.
Round 14 :
SC1 in the next stitch.
Round 15 :
Repeat 3 more times until you have 5 toes.
Info :
After you've finished all four legs, sew them onto the body in positions shown in the top picture of this pattern.
— Last but not least :
Info :
Designing crochet patterns is time-consuming. Make frogs for yourself or as gifts but do not copy, distribute, or sell this pattern as your own. If you post your frog online, please refer to the designer's shop or blog.
This charming frog pattern is a quick, joyful make that adds handcrafted personality to any shelf or gift box. It is ideal for practicing shaping and small-assembly techniques while creating a delightful finished toy. Enjoy the process and share your finished frogs online with pride — they brighten up any day! 🐸🧶