🧢 Beautiful ✨ Detailed πŸ’ Adorable

Bunny's House Amigurumi Pattern

Bunny's House Amigurumi Pattern
4.0β˜… Rating
12-15 Hours Time Needed
2.8K Made This
βœ‚οΈ

Intermediate Level

Ideal for those with basic crochet experience, featuring slightly more advanced stitches and techniques to expand your skills.

⏱️

Multi-Day Project

A rewarding 12+ hour journeyβ€”perfect for dedicated crafters who love detailed work.

🧸

Cute Companion

An adorable friend to cherish, handcrafted with love to bring comfort and joy for years to come.

About This Bunny's House Amigurumi Pattern

This pattern creates a full Bunny's House set: tiny bunnies (standing, sitting and baby), a cabbage bed and a newborn envelope. Each piece is worked in fine lace-weight yarn on a 1 mm hook to achieve a delicate miniature scale. The instructions include every round and finishing details so you can follow along precisely.

Bunny's House Amigurumi Pattern crochet pattern - detailed view of completed project

Perfect for collectors, miniature toy lovers, or as a thoughtful handmade gift set. The pattern includes assembly and embroidery instructions to bring your bunnies to life.

Why You'll Love This Bunny's House Amigurumi Pattern

I absolutely love this pattern because it combines tiny, detailed amigurumi techniques with playful accessories that make each scene feel complete. The miniature scale is so satisfying and allows for creative finishing like painted cheeks and embroidered features. I enjoy how each small piece β€” from the cabbage bed to the newborn envelope β€” adds personality and storytelling to the set. Working with lace-weight yarn and a very small hook is a delightful challenge that yields charming, delicate results.

Bunny's House Amigurumi Pattern step 1 - construction progress Bunny's House Amigurumi Pattern step 2 - assembly progress Bunny's House Amigurumi Pattern step 3 - details and accessories Bunny's House Amigurumi Pattern step 4 - final assembly and finishing

Switch Things Up

I love how easy it is to customize this set by changing yarn colors; try soft pastels for a nursery feel or bright hues for a playful twist.

You can make the bunnies larger or smaller by switching yarn weight and hook size β€” thicker yarn and a bigger hook creates a cuddly version while thinner yarn makes delicate minis.

I often add tiny accessories like crocheted scarves, tiny hats, or miniature carrots to personalize each bunny and add storytelling elements.

Consider embroidering different facial expressions by adjusting the placement and shape of the mouth and eyebrows to give each bunny its own personality.

Swap the glue eyes for embroidered eyes for a fully handmade look, which is also safer for toys for small children.

Try adding wire inside limbs for posability if you want bunnies that can sit or pose on display.

Create a whole scene by making multiple cabbage leaves in slightly different greens and layering them for a fuller bed.

Use beads or tiny buttons as additional embellishments on the envelope edge instead of the 3dc decorative border for variety.

I like to vary the stuffing density to change posture β€” firmer stuffing keeps shapes upright while softer stuffing creates a relaxed, floppy look.

For gifting, present the set in a small handmade box or clear bag with a ribbon and a tiny tag β€” handmade presentation makes a lovely impression.

Common Mistakes & How to Fix Them

βœ— Skipping placement of the row marker can lead to losing the start of the round; place a marker at the end of round 1 and move it each round to maintain correct stitch counts. βœ— Forgetting to change colors exactly where instructed will alter the look of tiny details; change color neatly at the end of the designated round and secure the tails before continuing. βœ— Not stuffing while shaping causes flattened or misshapen limbs; stuff gradually during the process to maintain smooth, even shaping and avoid lumps. βœ— Using inconsistent tension on 1-ply yarn can make pieces uneven in size; keep a steady, firm tension throughout and practice a few sample rounds if needed. βœ— Cutting yarn too short at the end prevents secure sewing of parts; leave long tails for sewing and fastening off so you can attach pieces securely.

Bunny's House Amigurumi Pattern

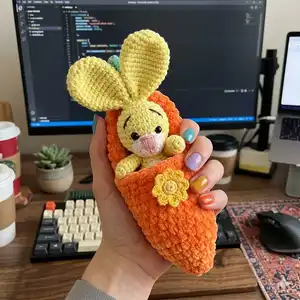
Create an enchanting miniature bunny scene with this detailed amigurumi pattern. You will make tiny standing, sitting and baby bunnies plus a cabbage bed and newborn envelope β€” perfect for gifting or play. Clear step-by-step rounds and helpful photos guide you through each small piece. This pattern is designed to help you build confidence with tiny-hook techniques and charming finishing touches.

Intermediate 12-15 Hours

Materials Needed for Bunny's House Amigurumi Pattern

β€” Main Fabric

  • 01
    Lace weight / 1ply yarn Vita Pelican (50g / 330m) - N3854 pink (small amounts for cheeks and details)
  • 02
    Lace weight / 1ply yarn Vita Pelican (50g / 330m) - N3951 white (main color for many bunnies)
  • 03
    Lace weight / 1ply yarn Vita Pelican (50g / 330m) - N3952 black (details and eyelining)
  • 04
    Lace weight / 1ply yarn Vita Pelican (50g / 330m) - N3954 light brown (alternate bunny color)
  • 05
    Lace weight / 1ply yarn Vita Pelican (50g / 330m) - N3966 orange (carrot house and accents)
  • 06
    Lace weight / 1ply yarn Vita Pelican (50g / 330m) - N3976 beige (sitting bunny color)
  • 07
    Lace weight / 1ply yarn Vita Pelican (50g / 330m) - N3995 green (cabbage bed and leaves)
  • 08
    Lace weight / 1ply yarn Vita Pelican (50g / 330m) - N3973 brown (details)
  • 09
    Lace weight / 1ply yarn Vita Pelican (50g / 330m) - N4011 gray (baby bunny color)
  • 10
    Lace weight / 1ply yarn Vita Pelican (50g / 330m) - N4002 purple (accent)
  • 11
    Lace weight / 1ply yarn Vita Pelican (50g / 330m) - N4335 light green (leaf accents)

β€” Tools Required

  • 01
    Crochet hook size 1.0 mm
  • 02
    Stuffing material, fiberfill
  • 03
    Needle for sewing pieces together
  • 04
    Glue eyes 4mm (2 pairs)
  • 05
    Super glue
  • 06
    Pink pastel for toning cheeks and ears
  • 07
    Black acrylic paint for eye details
  • 08
    Scissors
  • 09
    Stitch markers
  • 10
    Yarn needle for weaving in ends

Progress Tracker

0% Complete

β€” Standing bunny Body-Head :

Round 1 :

6sc in MR

Info :

Place row marker here.

Round 2 :

6inc (12)

Round 3 :

(1sc, inc) *6 (18)

Round 4 :

(2sc, inc) *6 (24)

Round 5 :

(3sc, inc) *6 (30)

Rounds 6-8 :

30sc (3 rounds) (30)

Round 9 :

(1sc, dec) *6, 12sc (24)

Rounds 10-14 :

24sc (5 rounds) (24)

Round 15 :

(2sc, dec) *6 (18)

Round 16 :

18sc (18)

Info :

Stuff with fiberfill in the process.

Round 17 :

18inc (36)

Round 18 :

(5sc, inc) *6 (42)

Rounds 19-23 :

42sc (5 rounds) (42)

Round 24 :

(5sc, dec) *6 (36)

Round 25 :

(4sc, dec) *6 (30)

Rounds 26-29 :

30sc (4 rounds) (30)

Round 30 :

(3sc, dec) *6 (24)

Info :

Stuff the head with fiberfill.

Round 31 :

(2sc, dec) *6 (18)

Round 32 :

(1sc, dec) *6 (12)

Round 33 :

6dec

Info :

Fasten off, cut the yarn, weave in the yarn ends.

β€” Hind legs (make 2) :

Round 1 :

Chain 6. Start in the second chain from the hook: inc, 3sc, 3sc in the last chain, 4sc (12)

Round 2 :

Change color to White. 2inc, 3sc, 3inc, 3sc, inc (18)

Round 3 :

8sc, (4-dc Bobble st, sc) *3, 4sc (18)

Info :

Stuff with fiberfill in the process.

Round 4 :

4sc, 6dec, 2sc (12)

Round 5 :

(2sc, dec) *3 (9)

Round 6 :

(1sc, dec) *3 (6)

Rounds 7-10 :

6sc (4 rounds) (6)

Info :

Fasten off, cut the yarn, weave in the yarn ends.

β€” Ears (make 2) :

Round 1 :

6sc in MR

Info :

Place row marker here.

Round 2 :

(1sc, inc) *3 (9)

Round 3 :

9sc (9)

Round 4 :

(2sc, inc) *3 (12)

Round 5 :

12sc (12)

Round 6 :

(1sc, inc) *6 (18)

Rounds 7-10 :

18sc (4 rounds) (18)

Round 11 :

(1sc, dec) *6 (12)

Rounds 12-16 :

12sc (5 rounds) (12)

Round 17 :

6dec (6)

Round 18 :

6sc. Do not stuff.

Info :

Leave a long tail for sewing.

β€” Front legs (make 2) :

Round 1 :

6sc in MR

Info :

Place row marker here.

Rounds 2-3 :

6sc (2 rounds) (6)

Info :

Stuff with fiberfill in the process.

Round 4 :

inc, 5sc (7)

Rounds 5-8 :

7sc (4 rounds) (7)

Round 9 :

3sc, dec, 2sc (6)

Info :

Fasten off, cut the yarn, weave in the yarn ends.

β€” Tail :

Round 1 :

6sc in MR

Info :

Place row marker here.

Round 2 :

6inc (12)

Round 3 :

12sc (12)

Round 4 :

6dec

Info :

Stuff with fiberfill. Leave a long tail for sewing.

β€” Standing bunny Assembly & Finishing :

Info :

Tighten cheeks following the pictures below. Glue the eyes between rounds 23-24 at a distance of 6-8 sc.

Info :

Fasten the legs and arms with a thread mount. Attach the legs and arms using a long needle and thread and sew the tail to the body.

Info :

Sew the ears to the head. Embroider a nose with pink thread and outlines of nose, mouth and eyebrows with black thread. Use pink pastel to paint cheeks and inside of ears.

β€” Sitting rabbit Ears (make 2) :

Round 1 :

6sc in MR

Info :

Place row marker here.

Round 2 :

(1sc, inc) *3 (9)

Round 3 :

9sc (9)

Round 4 :

(2sc, inc) *3 (12)

Round 5 :

12sc (12)

Round 6 :

(1sc, inc) *6 (18)

Rounds 7-9 :

18sc (3 rounds) (18)

Round 10 :

(1sc, dec) *6 (12)

Rounds 11-14 :

12sc (4 rounds) (12)

Round 15 :

6dec (6)

Info :

Do not stuff. Leave a long tail for sewing.

β€” Sitting rabbit Body :

Round 1 :

6sc in MR

Info :

Place row marker here.

Round 2 :

6inc (12)

Round 3 :

(1sc, inc) *6 (18)

Round 4 :

(2sc, inc) *6 (24)

Round 5 :

(3sc, inc) *6 (30)

Rounds 6-8 :

30sc (3 rounds) (30)

Round 9 :

(1sc, dec) *6, 12sc (24)

Rounds 10-14 :

24sc (5 rounds) (24)

Info :

Stuff with fiberfill in the process.

Round 15 :

(2sc, dec) *6 (18)

Round 16 :

(1sc, dec) *6 (12)

Round 17 :

6dec

β€” Sitting rabbit Head :

Round 1 :

6sc in MR

Info :

Place row marker here.

Round 2 :

6inc (12)

Round 3 :

(1sc, inc) *6 (18)

Round 4 :

(2sc, inc) *6 (24)

Round 5 :

(3sc, inc) *6 (30)

Round 6 :

(4sc, inc) *6 (36)

Round 7 :

(5sc, inc) *6 (42)

Rounds 8-10 :

42sc (3 rounds) (42)

Round 11 :

(5sc, dec) *6 (36)

Round 12 :

(4sc, dec) *6 (30)

Rounds 13-16 :

30sc (4 rounds) (30)

Round 17 :

(3sc, dec) *6 (24)

Info :

Stuff the head with fiberfill.

Round 18 :

(2sc, dec) *6 (18)

Round 19 :

(1sc, dec) *6 (12)

Round 20 :

6dec

Info :

Fasten off, cut the yarn, weave in the yarn ends.

β€” Sitting rabbit Front legs (make 2) :

Round 1 :

6sc in MR

Info :

Place row marker here.

Rounds 2-3 :

6sc (2 rounds) (6)

Info :

Stuff with fiberfill in the process.

Round 4 :

inc, 5sc (7)

Rounds 5-8 :

7sc (4 rounds) (7)

Round 9 :

3sc, dec, 2sc (6)

Info :

Fasten off, cut the yarn, weave in the yarn ends.

β€” Sitting rabbit Hind legs (make 2) :

Round 1 :

Chain 6. Start in the second chain from the hook: inc, 3sc, 3sc in the last chain, 4sc (12)

Round 2 :

Change color to Beige. 2inc, 3sc, 3inc, 3sc, inc (18)

Round 3 :

8sc, (4-dc Bobble st , sc) *3, 4sc (18)

Info :

Stuff with fiberfill in the process.

Round 4 :

4sc, 6dec, 2sc (12)

Round 5 :

(2sc, dec) *3 (9)

Round 6 :

(1sc, dec) *3 (6)

Rounds 7-9 :

6sc (3 rounds) (6)

Info :

Fasten off, cut the yarn, weave in the yarn ends.

β€” Sitting rabbit Tail :

Round 1 :

6sc in MR

Info :

Place row marker here.

Round 2 :

6inc (12)

Round 3 :

12sc (12)

Round 4 :

6dec

Info :

Stuff with fiberfill. Leave a long tail for sewing.

β€” Baby Bunny Ears (make 2) :

Round 1 :

6sc in MR

Info :

Place row marker here.

Round 2 :

6sc (6)

Round 3 :

(1sc, inc) *3 (9)

Round 4 :

9sc (9)

Round 5 :

(2sc, inc) *3 (12)

Rounds 6-7 :

12sc (2 rounds) (12)

Round 8 :

6dec (6)

Info :

Do not stuff. Leave a long tail for sewing.

β€” Baby Bunny Hind legs (make 2) :

Round 1 :

8sc in MR

Info :

Place row marker here.

Round 2 :

Change color to Gray. 8sc (8)

Round 3 :

2sc, 2dec, 2sc (6)

Info :

Stuff with fiberfill in the process.

Rounds 4-7 :

6sc (4 rounds)

Info :

Fasten off, cut the yarn, weave in the yarn ends.

β€” Baby Bunny Front legs (make 2) :

Round 1 :

6sc in MR

Info :

Place row marker here.

Rounds 2-6 :

6sc (5 rounds) (6)

Info :

Stuff with fiberfill in the process. Fasten off, cut the yarn, weave in the yarn ends.

β€” Baby Bunny Body-Head :

Body Round 1 :

6sc in MR

Info :

Place row marker here.

Body Round 2 :

6inc (12)

Body Round 3 :

(1sc, inc) *6 (18)

Body Rounds 4-7 :

18sc (4 rounds) (18)

Body Round 8 :

(1sc, dec) *6 (12)

Body Rounds 9-11 :

12sc (3 rounds)

Info :

Stuff with fiberfill in the process.

Head Round 12 :

12inc (24)

Head Rounds 13-15 :

24sc (3 rounds) (24)

Round 16 :

(2sc, dec) *6 (18)

Rounds 17-19 :

18sc (3 rounds)

Round 20 :

(1sc, dec) *6 (12)

Info :

Stuff the head with fiberfill.

Round 21 :

6dec. Fasten off, cut the yarn, weave in the yarn ends.

β€” Baby Bunny Tail :

Round 1 :

6sc in MR

Info :

Place row marker here.

Round 2 :

(1sc, inc) *3 (9)

Round 3 :

9sc (9)

Round 4 :

(1sc, dec) *3 (6)

Info :

Stuff with fiberfill. Leave a long tail for sewing.

β€” Assembly & Finishing Notes :

Info :

Sew the tail to the body. Sew the ears to the head. Embroider a nose with pink thread and embroider mouth and eyes with black thread. Use pink pastels to paint cheeks and inside of ears.

Info :

Glue eyes between the recommended rounds (see each section) at a distance of 6-8 sc as indicated in photos and tighten cheeks using a needle thread method as pictured.

β€” Newborn envelope :

Info :

With White yarn. Work in rows.

Row 1 :

Chain 13. From the second chain on the hook: 12sc, turn (12)

Rows 2-36 :

ch1, 12sc, turn (35 rows) (12)

Row 37 :

ch1, dec, 8sc, dec, turn (10)

Row 38 :

ch1, 10sc, turn (10)

Row 39 :

ch1, dec, 6sc, dec, turn (8)

Row 40 :

ch1, 8sc, turn (8)

Row 41 :

ch1, dec, 4sc, dec, turn (6)

Row 42 :

ch1, 6sc

Info :

Fasten off, cut the yarn, weave in the yarn ends. Fold the envelope in half and crochet around with pink yarn connecting the sides: ch1, (sc, 3dc in one stitch) *26. Cut yarn and fasten off. Put the bunny into the envelope.

β€” Cabbage bed :

Round 1 :

6sc in MR

Info :

Place row marker here.

Round 2 :

6inc (12)

Round 3 :

(1sc, inc) *6 (18)

Round 4 :

(2sc, inc) *6 (24)

Round 5 :

(3sc, inc) *6 (30)

Round 6 :

(4sc, inc) *6 (36)

Round 7 :

(5sc, inc) *6 (42)

Round 8 :

(6sc, inc) *6 (48)

Rounds 9-11 :

48sc (3 rounds) (48)

Round 12 :

(7sc, inc) *6 (54)

Rounds 13-19 :

54sc (7 rounds) (54)

Info :

Fasten off, cut the yarn, weave in the yarn ends.

β€” Inner (small) leaves (make 4) :

Row 1 :

5sc in MR, turn

Row 2 :

ch1, 2sc, 3sc inc, 2sc, turn (7)

Row 3 :

ch1, sc, inc, sc, 3sc inc, sc, inc, sc, turn (11)

Row 4 :

ch1, 2sc, inc, 2sc, 3sc inc, 2sc, inc, 2sc, turn (15)

Row 5 :

ch1, 3sc, inc, 3sc, 3sc inc, 3sc, inc, 3sc, turn (19)

Assembly Instructions

  • Glue the eyes between rounds 23-24 at a distance of 6-8 single crochet, following the photos for correct placement.
  • Fasten the legs and arms with a thread mount; attach front and hind legs using a long needle and thread, moving the thread through the body to secure root points.
  • Sew the ears to the head using the long tails left from the ears, positioning them symmetrically and securing with small whipstitches.
  • Sew the tail to the lower back of the body using the tail left after finishing the tail; make several passes to secure it firmly.
  • Tighten cheeks by gathering stitches as shown in the pictures, then embroider nose, mouth and eyebrows, and apply pink pastel to cheeks and inner ears for finishing.

Important Notes

  • πŸ’‘Use a 1.0 mm hook and lace-weight (1ply) yarn to achieve the miniature scale and correct sizing for all pieces.
  • πŸ’‘Work with consistent tension and stuff gradually during shaping; overstuffing or under-stuffing will distort the miniature shapes.
  • πŸ’‘Leave long yarn tails on small parts (ears, tails, legs) for easier sewing and secure attachment during assembly.
  • πŸ’‘Place a stitch marker at the beginning of each round to keep track of rounds and avoid skipped or added stitches.
  • πŸ’‘Weave in ends as you go and secure small pieces firmly to avoid loosening during play or handling.

This tiny Bunny's House set brings a little world of charm to your hands β€” bunnies, cabbage bed and newborn envelope all in miniature! Perfect for gifting or collecting, the set combines delicate stitching with playful finishing touches. Enjoy every tiny stitch and make a keepsake full of heart and detail. 🧢🐰✨

You ask,

we answer.

FAQs

What size will the finished pieces be?

When using the indicated lace-weight yarn and a 1.0 mm hook, the standing bunny height is approximately 7-8 cm (3 inches) and the Flower Meadow diameter is about 20 cm (7-8 inches).

Can I use a different yarn weight for this pattern?

Yes, but changing yarn weight will affect final size and proportions; use an appropriate hook to match the yarn and make a gauge test to estimate the finished dimensions.

Do I need prior crochet experience for this pattern?

This pattern is rated intermediate; basic experience with amigurumi techniques, increases, decreases and small-hook work is recommended for best results.

How long does this project typically take to complete?

This full set is a multi-piece project and typically takes 12-15 hours depending on experience and assembly time.

What tools do I need for assembly and finishing?

You will need a yarn needle for sewing parts, glue eyes (4mm), pink pastel for cheek toning, black acrylic paint for eye details, and a long needle for threading limbs during mounting.