🧢 Beautiful ✨ Detailed πŸ’ Adorable

Crochet Bunny Pumpkin Amigurumi Pattern

Crochet Bunny Pumpkin Amigurumi Pattern
4.6β˜… Rating
5-7 Hours Time Needed
1.4K Made This
βœ‚οΈ

Intermediate Level

Ideal for those with basic crochet experience, featuring slightly more advanced stitches and techniques to expand your skills.

⏱️

Weekend Treat

Takes 5-7 hours, making it an enjoyable project to finish over a couple of days.

🧸

Cute Companion

An adorable friend to cherish, handcrafted with love to bring comfort and joy for years to come.

About This Crochet Bunny Pumpkin Amigurumi Pattern

This pattern creates a sweet bunny amigurumi whose body is styled like a pumpkin, complete with a little hat and stem. It uses chenille yarn for a plush, cuddly texture and felt or embroidery for pumpkin features. The design combines simple shaping with bobble and loop techniques for a fun seasonal look.

Crochet Bunny Pumpkin Amigurumi Pattern crochet pattern - detailed view of completed project

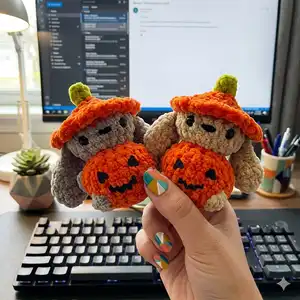
You will crochet the head and body as one piece, add ears and a hat, then finish with a small pumpkin held in the paws. The pattern works well with a 5mm hook and makes a charming decorative toy.

Why You'll Love This Crochet Bunny Pumpkin Amigurumi Pattern

I absolutely love this pattern because it transforms simple stitches into a characterful little companion with big personality. I enjoy how the chenille yarn creates a soft, tactile surface that is perfect for hugging and display. The pumpkin-shaped body and playful hat are creative touches that make this project feel special and seasonal. As a maker I appreciate that the pattern balances straightforward rounds with a few interesting techniques like bobble stitches and BLO rounds to keep things engaging.

Crochet Bunny Pumpkin Amigurumi Pattern step 1 - construction progress Crochet Bunny Pumpkin Amigurumi Pattern step 2 - assembly progress Crochet Bunny Pumpkin Amigurumi Pattern step 3 - details and accessories Crochet Bunny Pumpkin Amigurumi Pattern step 4 - final assembly and finishing

Switch Things Up

I love experimenting with colorβ€”try soft pastels like peach and mint instead of orange and green for a springtime bunny pumpkin.

You can change yarn weight and hook size to make mini or jumbo versions; a thinner yarn with a smaller hook makes a cute keychain-size, and a bulky yarn makes a cuddly pillow-like toy.

I often swap the chenille for a textured acrylic for easier shaping if I want less fuzz but similar bulk.

Instead of safety eyes you can embroider the eyes for a fully baby-safe toy, or mix both methods for different expressions.

Try adding little accessories like a crocheted scarf or a tiny felt leaf glued under the stem for seasonal variety.

To vary features, change the mouth and nose placement or stitch style; a tiny embroidered smile gives a sweeter look while felt shapes give a spooky pumpkin face.

I sometimes add wire to the inner ears to allow posing; use thin craft wire and wrap it in yarn before inserting for safety.

Mix bobble stitch placements or omit the bobbles for a simpler surface; this changes the texture and makes assembly quicker.

Embellish with small buttons, beads, or embroidery to personalize each bunny pumpkin for gifts or market items.

If I want a more realistic pumpkin shape I add extra rounds and shape with strategic decreases, stuffing more in the center to create ridges.

Common Mistakes & How to Fix Them

βœ— Skipping the instruction to stretch your work can leave the pumpkin too squat; gently stretch the rounds to the sides when instructed to make the body rounder. βœ— Forgetting to change colors exactly where noted will make pumpkin and hat transitions look messy; switch to the specified Color A or B at the indicated round and secure ends neatly. βœ— Not adding stuffing gradually results in lumps and uneven shaping; stuff a little at a time while shaping to keep the pumpkin and head smooth and even. βœ— Placing safety eyes without counting stitches can misalign the face; place safety eyes between R13-R14, four single crochets apart, and check symmetry before securing. βœ— Closing the piece too early can flatten the shape; follow decrease rounds to 5 dec, then fasten off and sew shut while squishing slightly to achieve a chubbier look.

Crochet Bunny Pumpkin Amigurumi Pattern

Make an adorable bunny shaped like a pumpkin with this cozy chenille yarn amigurumi pattern. You will enjoy the fluffy texture, playful hat, and cute pumpkin body details. Clear round-by-round instructions guide you step-by-step so you can create a charming handmade gift or seasonal decoration.

Intermediate 5-7 Hours

Materials Needed for Crochet Bunny Pumpkin Amigurumi Pattern

β€” Main Fabric

  • 01
    Chenille yarn - Color A: Orange (main pumpkin body and hat)
  • 02
    Chenille yarn - Color B: Brown (body/trim color used for contrast)
  • 03
    Chenille yarn - Color C: Green (stem and small accents)

β€” Tools Required

  • 01
    Crochet hook size 5mm (recommended)
  • 02
    Yarn needle
  • 03
    Scissors
  • 04
    Stuffing (polyester fiberfill)
  • 05
    Plastic safety eyes
  • 06
    Optional: stitch markers for rounds

Progress Tracker

0% Complete

β€” Materials :

Info :

Chenille yarn, green, orange and brown. Crochet hook (I used 5mm). Yarn needle. scissors. Stuffing. Plastic safety eyes.

β€” Abbreviations :

Infos :

Rx- round x. Sc= single crochet. dec= decrease. inc= increase. BO= bobble stitch. Mr- Magic ring. Sist= slip stitch. ch= chain. BLO= back loop only. FLO= front loop only. dc= double crochet. Fo= fasten off. Color A= Orange. Color B= Brown. Color C Green

β€” Head and Body :

Info :

*start with Color A

Round 1 :

4sc in MR (4)

Round 2 :

4inc (8)

Round 3 :

BLO (sc, inc)x4 (12)

Round 4 :

(2sc, inc) x4 (16)

Round 5 :

Do the BO in Color B: 4sc, BO, 4sc, BO, 6sc (16)

Round 6 :

(3sc, inc) x4 (20)

Round 7 :

sc around (20)

Round 8 :

Do the BO in Color B: 4sc, BO, 10 sc, BO, 4sc (20)

Info :

* Stretch your work to the sides make it rounder

Round 9 :

(2sc, dec) X5 (15)

Round 10 :

(sc, dec) x5 (10)

Info :

*Stretch, stuff change to Color B.

Round 11 :

BLO (sc, inc) x5 (15)

Round 12 :

(2sc, inc) x5 (20)

Round 13 :

sc around (2 rounds) (20)

Round 14 :

change to Color A: sc around (20) *safety eyes between R13-R14 4sc apart, stretch

Round 15 :

BLO (2sc, dec) x5 (15)

Info :

* Stretch your work, stuff

Round 16 :

(sc, dec) x5 (10)

Round 17 :

5dec (5)

Info :

FO, sew shut. *squish to make it chubbier *embroider the nose between eyes.

β€” Pumpkin Body / Pumpkin Details :

Round 1 :

R13: sc around (2 rounds) (20)

Round 2 :

change to Color A: sc around (20) *safety eyes between R13-R14 4sc apart, stretch

Round 3 :

BLO (2sc, dec) x5 (15)

Info :

* Stretch your work, stuff

Round 4 :

(sc, dec) x5 (10)

Round 5 :

5dec (5)

Info :

FO, sew shut. *squish to make it chubbier *embroider the nose between eyes.

β€” HAT - sides :

Info :

*use Color A *insert your hook in the front loops of R16

Round 1 :

(sc, ch, 2dc in 1 sc, ch) do this all around R16.

β€” EARS 2x :

Round 1 :

6sc in MR (6)

Round 2 :

(2inc, sc) x2 (10)

Round 3 :

sc, 2inc, 3sc, 2inc, 2sc (14)

Round 4 :

sc, 2dec, 3sc, 2dec, 2sc (10)

Round 5 :

sc around (10)

Round 6 :

(dec, 3sc) x2 (8)

Info :

*4sc to close, chain 1, turn, 4sc, Fo leave a long tail and sew under the hat however you think looks best.

β€” Pumpkin stem :

Info :

*Insert the hook on the top of the head. Chain 3, start in the second chain from hook 2 hdc, slst in hat.

Info :

*You can make a cute/spooky face out of felt and glue it on the pumpkin or embroider it.

β€” Finishing :

Info :

And you're done!

Assembly Instructions

  • Place safety eyes between R13-R14, spacing them 4 single crochets apart before securing to ensure even placement.
  • Stuff the body and pumpkin gradually and shape by stretching the work to the sides as instructed to make the pumpkin rounder.
  • Sew the ears under the hat using the long tail left from FO, placing them symmetrically and tacking securely so they sit nicely under the brim.
  • Sew the head and pumpkin seams shut after the final decreases, squishing slightly to make the pieces chubbier before finishing.
  • Attach the pumpkin stem to the top of the head using slip stitch and weave in ends; add felt or embroidered face details to the pumpkin.

Important Notes

  • πŸ’‘Use stitch markers or a scrap of contrasting yarn to mark the start of each round so you don’t lose track during shaping.
  • πŸ’‘Stretch your work to the sides when instructed to create a rounder pumpkin shape and more accurate proportions.
  • πŸ’‘Stuff gradually and evenly for best shape; overstuffing can distort the bobble and round sections.

This fluffy chenille bunny pumpkin is designed to charm and delight, perfect as a seasonal gift or cozy decor. The playful hat, pumpkin body, and soft texture make it irresistible to hold and display. Enjoy the simple, creative process and share the finished friend with someone special. πŸ§ΆπŸŽƒ

You ask,

we answer.

FAQs

What size will the finished piece be?

The finished amigurumi measures approximately 12-15 cm tall depending on your yarn tension and exact stuffing; using the recommended chenille yarn and 5mm hook will produce a plush, cuddly size.

Can I use different yarn weights for this pattern?

Yes, you can use different yarn weights but this will change the final size; choose an appropriate hook for your chosen yarn and expect differences in stitch counts and proportions.

Do I need prior crochet experience for this pattern?

This pattern is rated intermediate because it uses bobble stitches, BLO rounds and color changes; basic knowledge of single crochet, increases and decreases is recommended.

How long does this project typically take to complete?

Most crocheters complete this project in 5-7 hours, but time may vary according to experience, customization, and whether you embroider or glue on felt details.