🧢 Beautiful ✨ Detailed πŸ’ Adorable

Cowboy Cat Hat Pattern

Cowboy Cat Hat Pattern
4.5β˜… Rating
2-3 Hours Time Needed
2.3K Made This
βœ‚οΈ

Intermediate Level

Ideal for those with basic crochet experience, featuring slightly more advanced stitches and techniques to expand your skills.

⏱️

Bite-Sized Project

Finishes in 2-4 hoursβ€”perfect for an afternoon of creative relaxation.

πŸŽ€

Playful Twist

Fun patterns meet timeless design in pieces that express personality while remaining wonderfully wearable.

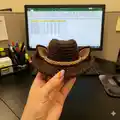
About This Cowboy Cat Hat Pattern

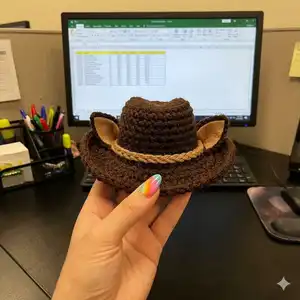
This pattern creates a small cowboy hat designed to fit adult cats (approx. 7-15 lbs) and miniature toy dogs. It is worked top-down in continuous rounds, forming ear holes and a shaped brim for a classic cowboy silhouette. The pattern includes an optional chin strap and a separate band worked in a contrasting color for extra detail.

Cowboy Cat Hat Pattern crochet pattern - detailed view of completed project

Youll find full round-by-round instructions, stitch counts in brackets, and finishing tips to make the indent permanent. A gauge is provided so you can adjust hook size for smaller or larger pets.

Why You'll Love This Cowboy Cat Hat Pattern

I absolutely love this pattern because it turns a simple hat into a playful little accessory that suits many pet personalities. I enjoy how a few strategic chains and skips create clean ear holes without complicated shaping. The optional band and chin straps let me customize color and detail easily, and the finishing technique gives the hat that unmistakable cowboy look. Making these for friends and shelters always brings smiles and easy conversation.

Cowboy Cat Hat Pattern step 1 - construction progress Cowboy Cat Hat Pattern step 2 - assembly progress Cowboy Cat Hat Pattern step 3 - details and accessories Cowboy Cat Hat Pattern step 4 - final assembly and finishing

Switch Things Up

I love experimenting with color combinations for the band β€” try stripes or contrasting colors to match your pets collar.

You can make a miniature version by using a lighter weight yarn and a 3.5mm hook for smaller kittens or toy breeds.

I often replace the chin strap with a decorative ribbon or elastic loop for a faster, removable option that is gentler on skittish pets.

Try adding embroidery or small felt accents to the band to create themed hats (stars, hearts, or initials work great).

For a stiffer brim, lightly starch the finished brim or apply a fabric stiffener and shape it while drying to hold a dramatic cowboy curve.

If you want a reversible look, use two contrasting colors and sew the band so it can be flipped to show the opposite color.

I sometimes add tiny bells or pom poms secured with extra stitching to the chin straps for a whimsical touch.

To change the brim depth, add or reduce rounds before Round 11 and test on your pet for the desired coverage.

You can substitute bulky yarn for an extra cozy, chunky hat, or a smoother acrylic for a cleaner photo-ready finish.

Accessorize further by crocheting miniature bolo ties, tiny feathers, or braided cords to tuck under the band for a custom western style.

Common Mistakes & How to Fix Them

βœ— Skipping the magic ring setup or working it too loosely; ensure your magic ring is snug and secure so the hat top is neat and closed. βœ— Forgetting the note about not slip stitching to join in early rounds; work continuously until Round 9 to preserve correct ear hole placement and stitch counts. βœ— Using the wrong hook size for the yarn weight will alter hat size dramatically; check the gauge and swap to a 3.5mm hook for smaller sizes or 4.5mm for the recommended fit. βœ— Not aligning the ear holes symmetrically leads to lopsided shaping; count stitches carefully around the placement area and verify the ch 10 spaces are opposite each other before continuing.

Cowboy Cat Hat Pattern

Make a charming cowboy-style hat for your cat or small dog with clear, step-by-step instructions. This pattern creates a top-down crochet hat with ear holes and an optional chin strap for a secure fit. Youll love the playful silhouette and easy finishing techniques that give the hat its classic cowboy look. Perfect for gifting or a fun photo prop for your furry friend.

Intermediate 2-3 Hours

Materials Needed for Cowboy Cat Hat Pattern

β€” Main Fabric

  • 01
    Bulky / 5 weight yarn (Red Heart Saver Chunky or similar) - Brown (20gr/.75oz, 34m/38yd)
  • 02
    Worsted / 4 weight yarn (Red Heart Super Saver or similar) - Tan (>1gr/.1oz, >2m/yd)

β€” Tools Required

  • 01
    4.5mm / 7 crochet hook (or as needed to obtain gauge)
  • 02
    3.5mm / E-4 crochet hook (optional, for scaling down to kittens/smaller pets)
  • 03
    Yarn needle for finishing

Progress Tracker

0% Complete

β€” Hat :

Round 1 :

in brown form a magic ring, sc 8 in the magic ring [8]

Info :

-- Note: do not ss to join, you will work continuously in the round until Round 9 --

Round 2 :

sc 2 in each st all the way around [16]

Round 3 :

sc in each st all the way around [16]

Round 4 :

*(sc in the next 3 sts, sc 2 in the next st), repeat from * 3 more times [20]

Round 5 :

sc in each st all the way around [20]

Round 6 :

*(sc in the next 4 sts, sc 2 in the next st), repeat from * 3 more times [24]

Round 7 :

sc in each st all the way around, ss into the next st [24]

Round 8 :

repeat round 7, ss to join [24]

Round 9 :

(this round forms the ear holes) Ch 2 (does not count as stitch), Dc 2 in each of the next 6 sts, Ch 10, sk the next 6 sts, Dc 2 in each of the next 6 sts, Ch 10, sk the next 6 sts, ss to join [24]

Round 10 :

ch 1, * (sc in the first 3 sts, sc 2 in the next st), repeat from * 2 more times, Working around the ch 10 sp, (hdc 1, dc 10, hdc 1), *(sc in the first 3 sts, sc 2 in the next st), repeat from * 2 more times Working around the next ch 10 sp, (hdc 1, dc 10, hdc 1), ss to join. [54]

Round 11 :

turn, ch 1, sc in each st all the way around (creates a solid edge and helps the edges of the hat turn up like a cowboy hat). Ss to join and fasten off. [54]

β€” Band :

Band (P1) :

In tan, ch 35, ss to join. Place the band around the center of the hat and sew on the hat.

β€” Chin straps :

Chin straps (2 - optional) :

Attach your yarn to the underside of the hat around the center 2 dc stitches from Round 10 above (should be the 5th and 6th dc, located at the middle of the ear hole). Ch 25, fasten off. Repeat on the other side.

β€” Finishing :

Finishing :

Weave in any ends. Turn the sides of the hat (near the ear holes) upwards. Push the top of the hat in down slightly so that it is indented about .5" and pinch the sides together to create the "cowboy" look. Alternately, to make the indent permanent, turn the hat inside out, fold in half so the ear holes line up, and sew both sides together along Round 2. Turn right side out.

β€” Supplemental Photos :

Info :

Photo 1: Finished hat, alternate colors. Photo 2: Hat modeled, alternate color. Photo 3: Where to attach your yarn if working chin straps. Photo 4: Folding down and pinching shut the top of the hat.

Assembly Instructions

  • Place and sew the tan band around the center of the hat after joining (ch 35, ss to join) so it sits over the midsection of the crown.
  • If making chin straps, attach yarn to the underside of the hat around the center 2 dc stitches from Round 10 (the 5th and 6th dc at the middle of the ear hole), ch 25 and fasten off; repeat on the other side.
  • Turn the sides of the hat (near the ear holes) upwards and push the top slightly down about 0.5" then pinch the sides together to create the cowboy brim shape and secure with a few stitches.
  • To make the indent permanent, turn the hat inside out, fold in half so the ear holes line up, and sew both sides together along Round 2; then turn the hat right side out.
  • Weave in all loose ends securely with a yarn needle and trim any excess yarn for a clean finish.

Important Notes

  • πŸ’‘The hat is worked in the round from the top down; follow rounds sequentially for correct shaping.
  • πŸ’‘Beginning chains do not count as stitches, so count real stitches after the chain where indicated.
  • πŸ’‘Slip stitches at the end of rounds are made in the top of the first dc from that round to create a clean join.
  • πŸ’‘Stitch counts are shown in brackets after each round; check your counts frequently to avoid mistakes.

This playful Cowboy Cat Hat is a delightful little project that adds personality to photos and playtime. Its top-down construction and simple shaping create authentic cowboy styling with just a few stitches. Perfect for gifting to pet lovers or making a matching set of hats in fun colors. 🐾🎩

You ask,

we answer.

FAQs

What size will the finished piece be?

The finished hat measures about 3.5" tall with a 12" circumference and approximately 2.5" ear hole and forehead allowances when using the recommended yarn and 4.5mm hook.

Can I scale this pattern down for kittens or smaller pets?

Yes β€” to scale down for kittens or smaller pets, substitute a 3.5mm / E-4 hook and use Worsted / 4 / Medium weight yarn; follow the pattern as written to maintain stitch structure.

Do I need to join with slip stitches while working the top rounds?

No β€” do not ss to join; work continuously in the round from Round 1 until Round 9 as noted, then follow joining instructions afterwards.

How long does this project typically take to complete?

Most crocheters complete this project in 2-3 hours, though time may vary depending on experience level and any customizations you choose to add.