๐Ÿงถ Beautiful โœจ Detailed ๐Ÿ’ Adorable

Cow Squishmallow Plushie Amigurumi Pattern

Cow Squishmallow Plushie Amigurumi Pattern
4.5โ˜… Rating
5-7 Hours Time Needed
2.1K Made This
โœ‚๏ธ

Intermediate Level

Ideal for those with basic crochet experience, featuring slightly more advanced stitches and techniques to expand your skills.

โฑ๏ธ

Weekend Treat

Takes 5-7 hours, making it an enjoyable project to finish over a couple of days.

๐Ÿงธ

Cute Companion

An adorable friend to cherish, handcrafted with love to bring comfort and joy for years to come.

About This Cow Squishmallow Plushie Amigurumi Pattern

This pattern creates a soft, squishy cow-inspired plushie in the style of popular squishmallow toys. You will crochet the main body (worked as the head), a rounded nose, two ears, two strawberry horns and two small horns, then assemble them into a delightful plushie. The pattern uses chenille yarn and simple amigurumi shaping to achieve a plush, cuddly finish.

Cow Squishmallow Plushie Amigurumi Pattern crochet pattern - detailed view of completed project

Clear, step-by-step rounds are provided for each piece, with assembly tips and photos to guide placement. Ideal for crafters who enjoy making small stuffed toys with decorative details.

Why You'll Love This Cow Squishmallow Plushie Amigurumi Pattern

I absolutely love this pattern because it turns soft chenille yarn into a squishy, huggable cow with charming details like strawberry horns and a sweet snout. I enjoy how the shaping is done in simple rounds, yet gives a polished, stuffed-animal look that feels professional. The pattern lets me personalize color placement and tiny accessories, which makes each finished plushie unique. Working this pattern is relaxing and rewarding โ€” I always smile when I see the finished face and little ears.

Cow Squishmallow Plushie Amigurumi Pattern step 1 - construction progress Cow Squishmallow Plushie Amigurumi Pattern step 2 - assembly progress Cow Squishmallow Plushie Amigurumi Pattern step 3 - details and accessories Cow Squishmallow Plushie Amigurumi Pattern step 4 - final assembly and finishing

Switch Things Up

I love how easy it is to customize this pattern by changing colors; try soft pastels for a baby-friendly version or bold brights for a playful look.

You can make the plushie smaller or larger by using a finer or bulkier chenille yarn and adjusting your hook size accordingly.

I often add embroidered eyelashes or freckles to give each cow a unique personality and expression.

Swap the strawberry horns for tiny crocheted flowers, bows, or little crowns to create themed variations like floral or royal cows.

Try different eye types โ€” safety eyes, embroidered eyes, or felt circles โ€” depending on the intended recipient and safety needs.

Make a whole herd by varying yarn weights and colors; it's fun to create coordinated sets for gifts or displays.

I like to add a loop at the top to turn a mini version into a keychain or bag charm for a portable keepsake.

For a posable version, you can insert light wire into the horns or ears, but be sure to secure and cover the wire ends safely.

If you want a firmer plushie, use less stuffing and higher tension; for an extra squishy feel, add more stuffing and a plushier yarn.

Finally, I recommend embellishing with tiny accessories like felt patches, mini scarves, or embroidered hearts to make each plushie truly one-of-a-kind.

Common Mistakes & How to Fix Them

โœ— Skipping stitch markers during long rounds leads to losing your starting stitch; place a marker at the start of each round and move it as you finish the round. โœ— Forgetting to stuff gradually causes lumps or misshapen areas; stuff the piece a little at a time and shape as you go to maintain an even form. โœ— Changing tension between color sections creates visible ridges and uneven shaping; keep consistent, moderate tension especially when switching colors. โœ— Not counting stitches after increases and decreases will cause the piece to expand or shrink unexpectedly; count stitches at the end of each round to ensure accuracy. โœ— Sewing parts without pinning will result in misaligned features; pin the nose, eyes and ears in place and check positioning before stitching. โœ— Cutting tails too short makes sewing difficult; leave long tails for sewing and finish by weaving in ends after assembly.

Cow Squishmallow Plushie Amigurumi Pattern

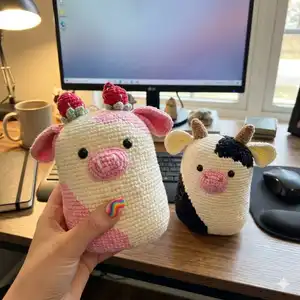
Make your own adorable Cow Squishmallow plushie with this easy-to-follow crochet pattern. You will enjoy shaping the soft chenille yarn into a cuddly, pastel cow with cute strawberry horns and expressive features. The pattern includes full instructions for the head/body, nose, ears, strawberries and horns so you can finish a charming handmade gift. Perfect for gifting or keeping as a cosy little companion.

Intermediate 5-7 Hours

Materials Needed for Cow Squishmallow Plushie Amigurumi Pattern

โ€” Main Fabric

  • 01
    100g soft chenille yarn (approx. 100g skeins) - White (main color)
  • 02
    100g soft chenille yarn - Pink (accent color)
  • 03
    Small amounts of red yarn for strawberries (approx. 10-20g)
  • 04
    Small amount of mint green yarn for strawberry leaves (approx. 5-10g)
  • 05
    Optional brown/tan for horns (small amount)

โ€” Tools Required

  • 01
    Crochet hook size 3.5mm
  • 02
    Stitch marker
  • 03
    Sewing needle
  • 04
    Scissors
  • 05
    Cotton filling (polyester stuffing)
  • 06
    Hot glue gun
  • 07
    Plastic safety eyes (as listed in materials)

Progress Tracker

0% Complete

โ€” Head :

Info :

The pink text is the wool color

Round 1 :

10 Ch, 14 Ch hook on the 2nd stitch 13 SC, 9 SC, 3 SC in one st, 9 SC, 12 SC, INC (48)

Round 2 :

2 INC, 11 SC, 8 SC, 5 INC, 8 SC, 11 SC, 3 INC (58)

Round 3 :

(SC, INC) 2 times, 11 SC, 8 SC, (SC, INC) 5 times, 8 SC, 11 SC, (SC, INC) 3 times (68)

Round 4 :

17 SC, 31 SC, 20 SC(68)

Round 5 :

(2SC, INC) 2 times, 11 SC, 8 SC, (2SC, INC) 5 times, 8 SC, 11 SC, (2SC, INC) 3 times (78)

Round 6-7 :

19 SC, 36 SC, 23 SC(78)

Round 8 :

18 SC, 38 SC, 22 SC(78)

Round 9 :

17 SC, 40 SC, 21 SC(78)

Round 10 :

16 SC, 42 SC, 20 SC(78)

Round 11 :

15 SC, 44 SC, 19 SC(78)

Round 12 :

14 SC, 46 SC, 18 SC(78)

Round 13 :

13 SC, 48 SC, 17 SC(78)

Round 14 :

12 SC, 50 SC, 16 SC(78)

Round 15 :

11 SC, 52 SC, 15 SC(78)

Round 16 :

10 SC, 54 SC, 14 SC(78)

Round 17 :

9 SC, 56 SC, 13 SC(78)

Round 18 :

8 SC, 58 SC, 12 SC(78)

Round 19 :

7 SC, 60 SC, 11 SC(78)

Round 20 :

6 SC, 62 SC, 10 SC(78)

Round 21 :

5 SC, 64 SC, 9 SC(78)

Round 22 :

4 SC, 66 SC, 8 SC(78)

Round 23 :

3 SC, 75 SC(78)

Round 24-29 :

78 SC(78)

Info :

Cut the yarn, leaving a long tail for sewing

โ€” Head (continued) :

Round 30 :

30 SC, 13 SC, 35 SC(78)

Round 31 :

29 SC, 16 SC, 33 SC(78)

Round 32 :

27 SC, 19 SC, 31 SC(78)

Round 33 :

(11SC, DEC) 2 times, 11SC, DEC, 10 SC, SC, DEC, (11SC, DEC) 2 times (72)

Round 34 :

20 SC, 32 SC, 20 SC(72)

Round 35 :

(3SC, DEC) 3 times, 4 SC, 4 SC, (3SC, DEC) 6 times, SC, 3 SC, (3SC, DEC) 3 times (60)

Round 36 :

16 SC, 29 SC, 15 SC(60)

Round 37 :

2 SC, DEC, 12 SC, 10 SC, (2SC, DEC) 2 times, 11 SC, 13 SC, DEC (56)

Round 38 :

15 SC, 27 SC, 14 SC(56)

Round 39 :

(5SC, DEC) 2 times, SC, 4 SC, DEC, (5SC, DEC) 3 times, (5SC, DEC) 2 times (48)

Info :

*stuffing*

Round 40 :

(2 SC, DEC) 3 times, SC, SC, DEC, (2SC, DEC) 5 times, (2 SC, DEC) 3 times (36)

Round 41 :

(SC, DEC) 3 times, SC, DEC, (SC, DEC) 5 times, (SC, DEC) 3 times (24)

Info :

Cut the yarn, leaving a long tail for sewing

โ€” Nose :

Round 1 :

6 Ch hook on the 2nd stitch 4 SC, W, 3 SC, INC (12)

Round 2 :

INC, 3 SC, 3 INC, 3 SC, 2 INC (18)

Round 3 :

SC, INC, 3 SC, (SC, INC) 3 times, 3 SC, (SC, INC) 2 times (24)

Round 4 :

2 SC, INC, 3 SC, (2 SC, INC) 3 times, 3 SC, (2 SC, INC) 2 times (30)

Info :

Cut the yarn, leaving a long tail for sewing.

โ€” Ear :

Round 1 :

6 SCin a MR (6)

Round 2 :

INC 6 times (12)

Round 3 :

(SC, inc) 6 times (18)

Round 4 :

(2 SC, inc) 6 times (24)

Round 5 :

(3 SC, inc) 6 times (30)

Round 6 :

(4 SC, inc) 6 times (36)

Round 7 :

(5 SC, inc) 6 times (42)

โ€” Strawberry :

Round 1 (Red) :

6 SCin a MR (6)

Round 2 :

(SC, inc) 3 times (9)

Round 3 :

(2 SC, inc) 3 times (12)

Round 4 :

(3 SC, inc) 3 times (15)

Round 5 :

(4 SC, inc) 3 times (18)

Round 6-7 :

18 SC(18)

Round 8 :

(SC, inc) 6 times (12)

Round 9 :

6 DEC (6)

Round 10 (Mint) :

slst, 4 Ch hook on the 2nd stitch: slst, 2 SC(repeat 5 times)

โ€” Horn (make 2) :

Round 1 :

6 Sc in a Mr (6)

Round 2 :

(Sc, Inc) 3 times (9)

Round 3 :

9 Sc (9)

Round 4 :

(2Sc, Inc) 3 times (12)

Round 5 :

12 Sc (12)

Round 6 :

(3Sc, Inc) 3 times (15)

Round 7 :

15 Sc (15)

Info :

*Stuffing*

โ€” Assembly :

Info :

Sew the nose on the face and create the nostrils.

Info :

Making sure the eyes are centred before securing them in place.

Info :

Sew the two strawberries together to form the horn (make 2 strawberries then attach).

Info :

Sew 2 ears to almost 2 strawberries (attach ears near the base of the strawberry horns) and stitch horns to top of head.

Info :

Ensure all parts are firmly sewn and weave in all tails; use hot glue if extra security is needed for accessories.

Assembly Instructions

  • Sew the nose to the face using the long tail left after finishing the nose, then shape and stitch nostrils as shown in photos.
  • Position and attach the safety eyes, making sure they are centred and level between the indicated rounds, then secure the washers.
  • Sew two strawberries together to form each horn cluster, attach mint leaf tops, and then sew them onto the top of the head.
  • Attach horns by sewing them firmly to the head near the strawberry placement, stuffing lightly to hold shape before closing.
  • Pin ears in place near the horn bases, then sew the two ears to almost the two strawberries so they sit naturally; weave in ends to finish.

Important Notes

  • ๐Ÿ’กUse stitch markers to keep track of your starting stitch and each round, especially during increases and decreases.
  • ๐Ÿ’กStuff the plushie gradually through the stuffing hole to achieve an even, smooth shape and avoid overstuffing.
  • ๐Ÿ’กPin or baste all facial features (nose, eyes, ears) before permanently sewing to ensure correct placement and symmetry.
  • ๐Ÿ’กWeave in ends and secure safety eye washers tightly to prevent small parts from coming loose if the toy is given to children.

Thank you for making this squishy cow plushie โ€” your handmade friend is ready to cuddle! ๐Ÿงถ I hope you loved shaping the soft chenille and adding the tiny strawberry horns that make this cow extra special. ๐Ÿฎ Share a photo of your finished toy and spread the handmade joy โ€” happy crocheting! โœจ

You ask,

we answer.

FAQs

What size will the finished piece be?

The finished plushie measures approximately the size of a small squishmallow (about 20-25 cm tall) when using the recommended chenille yarn and 3.5mm hook; exact size will vary with yarn and tension.

Can I use different yarn weights for this pattern?

Yes, you can use different yarn weights, but this will affect the final size and texture; choose an appropriate hook size for your yarn and expect the finished piece to be larger with bulky yarn or smaller with fine yarn.

Do I need prior crochet experience for this pattern?

This pattern is rated intermediate, so basic knowledge of single crochet, increases, decreases, and working in the round is recommended for best results.

How long does this project typically take to complete?

Most crocheters complete this project in 5-7 hours, though time may vary depending on experience level, speed, and added embellishments like embroidered details.