๐Ÿงถ Beautiful โœจ Detailed ๐Ÿ’ Adorable

Cow Phone Pouch Amigurumi Pattern

Cow Phone Pouch Amigurumi Pattern
4.6โ˜… Rating
5-7 Hours Time Needed
2.2K Made This
โœ‚๏ธ

Intermediate Level

Ideal for those with basic crochet experience, featuring slightly more advanced stitches and techniques to expand your skills.

โฑ๏ธ

Weekend Treat

Takes 5-7 hours, making it an enjoyable project to finish over a couple of days.

๐Ÿงธ

Cute Companion

An adorable friend to cherish, handcrafted with love to bring comfort and joy for years to come.

About This Cow Phone Pouch Amigurumi Pattern

This pattern creates a textured phone pouch with a sweet amigurumi cow attached, plus a tiny milk bottle accessory. You will work the pouch in spirals and crochet the cow components separately to sew or glue in place. The pattern includes detailed rounds for the head, horns, ears, muzzle, legs, arms, and milk bottle.

Cow Phone Pouch Amigurumi Pattern crochet pattern - detailed view of completed project

The instructions show where to place eyes, how to shape features, and how to assemble everything neatly. Photographs illustrate key assembly steps so you can position pieces accurately.

Why You'll Love This Cow Phone Pouch Amigurumi Pattern

I absolutely love this pattern because it combines a practical accessory with a playful amigurumi character that brings a smile every time. I enjoy the balance of simple repetitive stitches for the pouch and the creative detail work on the cow, which keeps the project interesting. The small parts are a joy to make and assemble, and I find the finished piece perfect for gifting or for showcasing on a market stall. I also appreciate how the design allows slight customizations in color and expression to make each cow unique.

Cow Phone Pouch Amigurumi Pattern step 1 - construction progress Cow Phone Pouch Amigurumi Pattern step 2 - assembly progress Cow Phone Pouch Amigurumi Pattern step 3 - details and accessories Cow Phone Pouch Amigurumi Pattern step 4 - final assembly and finishing

Switch Things Up

I love how easy it is to customize this pouch โ€” I often change the cow colors to match seasons or baby shower themes.

I sometimes make the pouch larger by using a thicker yarn and a larger hook to create a chunky, cozy version perfect for larger phones.

I also experiment with different eye sizes or embroider expressions to give each cow a unique personality.

You can replace the shoulder strap with a short wrist strap or keychain loop to carry it differently.

I like to add felt accessories or tiny crocheted hats for holidays โ€” they attach easily and add personality.

If you want a removable cow, sew the head and limbs onto a small button or snap so you can wash the pouch separately.

Try creating a small family of cows with different markings and display them as a set on a shelf or gift them as a matching set.

I recommend experimenting with safety eyes versus embroidered eyes for child-safe toys; embroidered eyes are best for gifts for very young children.

To add extra protection, consider lining the pouch with thin fabric glued or sewn inside for a smoother interior surface.

If you enjoy embroidery, stitch tiny initials or a small motif onto the lid before attaching it to personalize the pouch even more.

Common Mistakes & How to Fix Them

โœ— Skipping stitch markers when working in spirals causes you to lose track of rounds; place a marker at the start of each round and move it as you go to maintain correct stitch counts. โœ— Not stuffing pieces evenly leads to misshapen features or gaps; stuff gradually, working small amounts into rounded areas and checking shape often. โœ— Pulling stitches too tightly on small parts makes them stiff and difficult to sew; maintain consistent, moderate tension and keep pieces flexible for assembly. โœ— Ignoring placement guidelines for eyes and features results in an unbalanced face; follow the row recommendations carefully and pin pieces before securing to check positioning. โœ— Failing to weave in ends securely can cause parts to come undone during use; leave long tails for sewing, knot if needed, and weave tails well into the piece for a neat finish.

Cow Phone Pouch Amigurumi Pattern

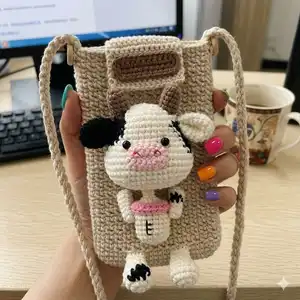
Make a charming Cow Phone Pouch with a tiny removable cow amigurumi attached โ€” a sweet combination of accessory and toy you'll love to crochet. The pattern uses YarnArt Jeans yarn and full step-by-step instructions so you can recreate every detail, from the textured pouch to the little milk bottle. Perfect as a handmade gift or a cute everyday phone case to show off your crochet skills.

Intermediate 5-7 Hours

Materials Needed for Cow Phone Pouch Amigurumi Pattern

โ€” Main Fabric

  • 01
    Jeans from YarnArt yarn: beige (05)
  • 02
    Jeans from YarnArt yarn: white (01)
  • 03
    Jeans from YarnArt yarn: black (53)
  • 04
    Jeans from YarnArt yarn: pink pastel (74)
  • 05
    Jeans from YarnArt yarn: brown (71)
  • 06
    Jeans from YarnArt yarn: cream (03)
  • 07
    Jeans from YarnArt yarn: pink (36)
  • 08
    Polyester fiberfill for stuffing (small amounts)

โ€” Tools Required

  • 01
    Crochet hook size 2.3 mm
  • 02
    Two 6 mm safety eyes
  • 03
    Two 15 mm buttons
  • 04
    Scissors
  • 05
    Yarn needle for sewing
  • 06
    Stitch markers
  • 07
    Fabric glue (for attaching head and bottle into pouch)
  • 08
    Polyester stuffing/fiberfill
  • 09
    Pins for positioning (optional)

Progress Tracker

0% Complete

โ€” Bag :

Info :

There are 2 ways to make a single crochet: v-stitch (yarn over single crochet) and x-stitch (yarn under single crochet). The pattern uses x-stitch (yarn under single crochet). Work in spirals.

Instruction :

Make 24 ch, start in the second ch from hook

Round 1 :

22 sc, 3 sc in the last stitch, continue on the other side of the foundation chain, 21 sc, inc (48)

Round 2 :

inc, 21 sc, 3 inc, 21 sc, 2 inc (54)

Round 3 :

inc, 24 sc, 3 inc, 24 sc, 2 inc (60)

Round 4 :

60 sc (60)

Round 5 :

(1 ch, skip 1 stitch, 1 sc in the next stitch)*30 (60)

Round 6 :

(1 sc in the space of 1 ch, 1 sc in the next stitch)*30 (60)

Rounds 7-47 :

From here the odd rounds (7,9,11,13,15โ€ฆ) will be made the same as Round 5 and the even rounds (8,10,12,14,16โ€ฆ) will be made the same as Round 6. Maintain stitch pattern until you complete the 48th round.

Round 48 :

(1 sc in the space of 1 ch, 1 sc in the next stitch)*30 (60) Stop after finishing the 48th round.

โ€” Lid of pouch :

Info :

Identify the 14 stitches in the middle of the 46th round for the lid placement.

Round 1 :

14 sc, turn

Round 2-13 :

14 sc. Cut and weave the yarn. Sew the button into the lid of pouch.

โ€” Shoulder-strap :

Instruction :

Make 3 ch, start in the second ch from hook: 2 sc, turn

Round 2 :

2 sc, turn

Instruction :

Crochet repeat 2 sc until the shoulder-strap is about 120 cm. Fasten off and weave the yarn. Sew the shoulder-strap and button into the pouch.

โ€” Head :

Info :

Black word: white yarn. Red word: black yarn (B). Start in white yarn.

Round 1 :

6 sc in the magic ring (6)

Round 2 :

6 inc (12)

Round 3 :

(3 inc, 3 sc)*2 (18)

Round 4 :

(4 inc, 5 sc)*2 (26)

Round 5 :

inc, 2 sc, inc, [B 2 sc, inc, 1 sc], 1 sc, inc, 3 sc, (inc, 2 sc)*3, inc, 3 sc (34)

Round 6 :

5 sc, [B inc, 3 sc, inc, 2 sc], 10 sc, inc, 3 sc, inc, 7 sc (38)

Round 7 :

5 sc, [B 9 sc], 9 sc, [B 5 sc], 10 sc (38)

Round 8 :

5 sc, [B 9 sc], 10 sc, [B 5 sc], 9 sc (38)

Round 9 :

5 sc, [B 8 sc], 12 sc, [B 5 sc], 8 sc (38)

Round 10 :

6 sc, [B 6 sc], 13 sc, [B 5 sc], 8 sc (38)

Round 11 :

9 sc, 6 inc, 8 sc, 2 inc, [B 4 inc, 1 sc], 8 sc (50)

Round 12 :

34 sc, [B 7 sc], 9 sc (50)

Round 13-15 :

50 sc (50)

Round 16 :

9 sc, (dec, 8 sc)*3, dec, 9 sc (46)

Round 17 :

9 sc, dec, 6 sc, dec, 8 sc, dec, 6 sc, dec, 9 sc (42)

Round 18 :

9 sc, (dec, 1 sc)*2, dec, 8 sc, (dec, 1 sc)*2, dec, 9 sc (36)

Round 19 :

(4 sc, dec)*6 (30)

Round 20 :

(dec, 3 sc)*6 (24)

Round 21 :

(2 sc, dec)*6 (18)

Info :

Stuff the head before continuing.

Round 22 :

(dec, 1 sc)*6 (12)

Round 23 :

6 dec (6)

Info :

Stuff the head. Fasten off and weave the yarn. Put in the eyes between rows 10-11, leaving 6 stitches space between them. Use fabric glue to pin the head into the pouch.

โ€” Horn (make 2) :

Info :

Start in brown.

Round 1 :

6 sc in the magic ring (6)

Round 2 :

(2 sc, inc)*2 (8)

Round 3 :

(inc, 3 sc)*2 (10)

Round 4-6 :

10 sc (10)

Info :

Slst, fasten off the yarn, leaving a long tail for sewing. Stuff the horns. Put in the horns between rows 3-6.

โ€” Ear (make 2) :

Info :

Make 1 black ear and 1 white ear.

Round 1 :

6 sc in the magic ring (6)

Round 2 :

6 inc (12)

Round 3 :

(inc, 5 sc)*2 (14)

Round 4-7 :

14 sc (14)

Info :

Slst, fasten off the yarn, leaving a long tail for sewing. Do not stuff the ears; flatten and fold the top of the ears. Put in the ears between rows 6-8.

โ€” Muzzle :

Info :

Start in pink. Make 6 ch, start in the second chain from hook.

Round 1 :

4 sc, 3 sc in the last chain, continue on the other side of the foundation chain, 3 sc, inc (12)

Round 2 :

inc, 3 sc, 3 inc, 3 sc, 2 inc (18)

Info :

Fasten off the yarn, leaving a long tail for sewing between rows 10-15. Sew the nose with red yarn.

โ€” Leg (make 2) :

Info :

The first leg: start in white yarn.

Round 1 :

6 sc in the magic ring (6)

Round 2 :

6 inc (12)

Round 3 :

(2 sc, inc)*4 (16)

Round 4-5 :

16 sc (16)

Round 6 :

(dec, 2 sc)*4 (12)

Round 7 :

(dec, 2 sc)*3 (9)

Round 8-9 :

9 sc (9)

Info :

Slst, fasten off the yarn, leaving a long tail for sewing. Stuff up to the 5th row of the leg.

Info :

The second leg: Black word: white yarn. Red word: black yarn (B). Start in white yarn.

Round 1 :

6 sc in the magic ring (6)

Round 2 :

6 inc (12)

Round 3 :

2 sc, inc, [B 2 sc, inc], (2 sc, inc)*2 (16)

Round 4 :

3 sc, [B 4 sc], 9 sc (16)

Round 5 :

3 sc, [B 3 sc], 10 sc (16)

Round 6 :

(dec, 2 sc)*4 (12)

Round 7 :

(dec, 2 sc)*3 (9)

Round 8-9 :

9 sc (9)

Info :

Slst and fasten off the yarn, leaving a long tail for sewing. Stuff up to the 5th row of the leg. Sew the legs at row 4.

โ€” Arm (make 2) :

Info :

The first arm: Black word: white yarn. Red word: black yarn (B). Start in white yarn.

Round 1 :

6 sc in the magic ring (6)

Round 2 :

(inc, 2 sc)*2 (8)

Round 3 :

8 sc (8)

Round 4 :

3 sc, [B 3 sc], 2 sc (8)

Round 5 :

2 sc, [B 3 sc], 3 sc (8)

Round 6-7 :

8 sc (8)

Info :

Slst and fasten off the yarn, leaving a long tail for sewing. Donโ€™t stuff the arm.

Info :

The second arm: Start in white yarn.

Round 1 :

6 sc in the magic ring (6)

Round 2 :

(inc, 2 sc)*2 (8)

Round 3-7 :

8 sc (8)

Info :

Slst and fasten off the yarn, leaving a long tail for sewing. Donโ€™t stuff the arm. Sew the arms between rows 16-18.

โ€” Milk bottle :

Info :

Bottle: Start in cream.

Round 1 :

6 sc in the magic ring (6)

Round 2 :

6 inc (12)

Round 3 :

(1 sc, inc)*6 (18)

Round 4-9 :

18 sc (18)

Info :

Fasten off and weave the yarn. Stuff the bottle.

Section :

Bottle cap

Round 1 :

5 sc in the magic ring (5)

Round 2-3 :

5 sc (5)

Round 4 :

5 inc (10)

Round 5 :

(1 sc, inc)*5 (15)

Round 6 :

(4 sc, inc)*3 (18)

Info :

Fasten off the yarn, leaving a long tail for sewing.

Instruction :

Start in pink, make 22 ch, start in the second chain from hook: 21 hdc. Fasten off and weave the yarn. Use fabric glue to paste it into the bottle.

โ€” Assembling :

Item 1 (P1) :

Sew the legs at row 4 of the pouch as indicated in photos.

Item 2 (P1) :

Use fabric glue to paste the milk bottle into the pouch in the center lower area.

Item 3 (P1) :

Sew the arms into the pouch between rows 16-18, positioning them symmetrically at each side of the bottle.

Item 4 (P1) :

Use fabric glue to paste the head into the pouch, placing it above the milk bottle so the cow sits naturally on the pouch.

Assembly Instructions

  • Sew the legs at row 4 of the pouch so they hang from the bottom edge and are spaced evenly.
  • Use fabric glue to paste the milk bottle into the pouch centered at the lower middle area for stability.
  • Sew the arms into the pouch between rows 16-18, angling them slightly inward to appear to hold the milk bottle.
  • Use fabric glue to paste the head into the pouch above the bottle and secure horns, ears and muzzle in the recommended rows for correct placement.
  • Sew the shoulder-strap and attach the buttons securely to both sides of the pouch at the top opening.
  • Sew the lid button to the lid and close the flap to check fit before final sewing.

Important Notes

  • ๐Ÿ’กUse stitch markers to mark the beginning of each round when working in spirals to avoid losing your place.
  • ๐Ÿ’กStuff small parts gradually to maintain smooth, rounded shapes; avoid overstuffing which can distort pieces.
  • ๐Ÿ’กUse fabric glue sparingly to attach the head and bottle into the pouch, then reinforce with a few hidden stitches if desired.
  • ๐Ÿ’กWeave in ends and leave long tails for sewing to ensure secure assembly and neater finishing.
  • ๐Ÿ’กPin parts in place and check positioning against the photos before permanently gluing or sewing to ensure symmetry.

This Cow Phone Pouch pattern brings a little farmyard charm to your everyday carry and doubles as a delightful gift! The cozy textured pouch and sweet amigurumi cow combine practicality with playful design. Make one for yourself or craft a set to share handmade smiles. ๐Ÿฎ๐Ÿงถ

You ask,

we answer.

FAQs

What size will the finished piece be?

If you use the same YarnArt Jeans yarn and 2.3 mm hook, the finished phone pouch measures approximately 17 cm in length and 10 cm in width.

Can I use different yarn weights for this project?

Yes, you can use different yarn weights, but changing yarn weight and hook size will affect the final size; adjust hook accordingly and test gauge with a small swatch.

Do I need prior crochet experience for this pattern?

This pattern is rated intermediate due to shaping, color changes and multiple small parts; basic amigurumi experience, working in spirals, increases and decreases is recommended.

How long does this project typically take to complete?

Most crocheters complete the pouch and the cow in about 5-7 hours, depending on experience and how much time is spent on assembly and finishing details.