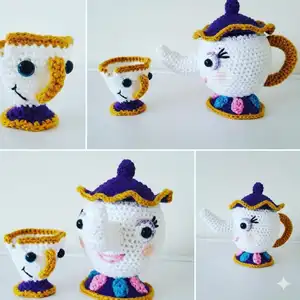
Create a charming Mrs Potts teapot and her cheeky teacup Chip with this detailed crochet pattern. You will get step-by-step rounds, materials, and finishing instructions to make a beautiful display set. Perfect for gifting or adding a whimsical handmade accent to your home. Follow the clear directions and photos to bring these characters to life.
Progress Tracker
0% Complete
— Tools & Notes :
Info :
Yarn for pattern: Drop Paris – Aran 100% cotton 40g – White 25g – Purple 10g – Mustard/gold. 4 x 12mm safety eyes, 4mm hook. Stitch Marker. Small amount of black yarn for facial features and pink and blue yarn for the petals. Note: You can use black yarn to embroider eyes if you prefer not to use the safety eyes. Stuffing material. Darning needle to sew together.
Infos :
PLEASE NOTE: THIS PATTERN IS IN UK CROCHET TERMINOLOGY. The Pattern is worked in continuous rounds so you don’t need to slip st unless otherwise stated but I do advise you use a stitch marker, so you know the beginning of each round. FOR U.S. CROCHET TERMINOLOGY SEE CROCHET CONVERSION TABLE BELOW FOR CONVERSION OF STS.
— Mrs Potts (Teapot) :
Info :
Starting at the top of the teapot using purple yarn and a 4mm hook make a magic circle.
Round 1 :
6dc into magic circle (6)
Round 2 :
(dc in next st, 2dc in next st) repeat around (9)
Round 3 :
Dc into each st (9)
Round 4 :
(dc in next st, dc2tog) repeat around (6)
Round 5 :
Dc into each st (6)
Round 6 :
2dc into each st (12)
Round 7 :
2dc into each st (24)
Round 8 :
Dc into each st (24)
Round 9 :
(dc in next 3 sts, 2dc in next st) repeat around (30)
Round 10 :
(dc in next 4 sts, 2dc in next st) repeat around (36)
Round 11-12 :
Dc into each st (36)
Round 13 :
BLO dc into each st (36)
Info :
Change to white yarn. Stuff the teapot as you are working.
Round 14 :
(dc in next 2 sts, 2dc in next st) repeat around (48)
Round 15 :
Dc into each st (48)
Round 16 :
(dc in next 7 sts, 2dc in next st) repeat around (54)
Round 17-23 :
Dc into each st (54)
Round 24 :
(dc in next 7 sts, dc2tog) repeat around (48)
Round 25 :
(dc in next 6 sts, dc2tog) repeat around (42)
Round 26 :
dc into each st (42)
Round 27 :
(dc in next 5 sts, dc2tog) repeat around (36)
Round 28-29 :
Dc into each st (36)
Round 30 :
(dc in next st, dc2tog) repeat around (24)
Round 31-32 :
dc into each st (24)
Round 33 :
(dc2tog) repeat around (12)
Info :
Change to purple yarn
Round 34 :
FLO 2dc into each st (24)
Round 35 :
(dc in next 3 sts, 2dc in next st) repeat around (30)
Round 36 :
dc into each st (30)
Round 37 :
(dc in next 4 sts, 2dc in next st) repeat around (36)
Round 38 :
dc into each st (36)
Round 39 :
(dc in next 5 sts, 2dc in next st) repeat around (42)
Round 40 :
(dc in next 6 sts, 2dc in next st) repeat around (48)
Info :
Change to mustard/gold yarn
Round 41 :
dc into each st (48)
Info :
FO stuff and thread tail through remaining stitches to close.
— Closing the bottom :
Info :
You will now be working in the BLO from round 33 of the teapot. Using white attach to any st.
Round 1 :
Dc in each st (12)
Round 2 :
(dc2tog) repeat around (6)
Info :
FO and thread through remaining sts to close
— Teapot lid frill :
Info :
You will now be working in the FLO of round 13 from the Teapot. Using purple yarn attach to any st.
Round 1 :
Dc into each st (36)
Round 2 :
(dc in next st, 2dc in next st) repeat around (54)
Round 3 :
(dc in next 2 sts, 2dc in next st) repeat around (72)
Info :
Change to Mustard/gold yarn
Round 4 :
(dc in next 3 sts, 2dc in next st) repeat around (90) FO and sew ends in.
— Spout :
Info :
Using white yarn make a magic circle
Round 1 :
8dc into circle (8)
Round 2 :
BLO dc into each st (8)
Round 3-4 :
dc into each st (8)
Round 5 :
2dc in 1st st, dc in remaining sts (9)
Round 6 :
Dc into each st (9)
Round 7 :
2dc in 1st st, dc in remaining sts (10)
Round 8 :
Dc into each st (10)
Round 9 :
Dc2tog, dc in 3 sts, 2tr in 2 sts, dc in 3 sts (11)
Round 10-12 :
Dc into each st (11)
Round 13 :
dc in 1st st, 2dc in next 2 sts, dc in remaining sts (13)
Round 14 :
dc in 2 sts, 2dc in next 2 sts, dc in remaining sts (15)
Round 15 :
dc into each st (15) FO leaving a long tail for sewing onto the face of the teapot. Sew the teapot spout onto the face before sewing on eyes
— Eyes (Make 2) :
Info :
Using white yarn make a magic circle
Round 1 :
6dc into magic circle (6)
Round 2 :
Dc in 1st st, 2dc in next 4 sts, dc in last st (10)
Round 3 :
(dc in next st, 2dc into next st) repeat around (15)
Round 4 :
Sl st in 2 sts, Change colour to light purple, dc in next 5 sts, sl st in next st, leave the last 2 sts unworked and FO leaving a long tail for sewing onto the front of the teapot. NOTE: Before sewing eyes onto the head, insert the eyes into the middle of the circle and secure.
— Teapot Handle :
Info :
Using mustard/gold yarn make a magic circle
Round 1 :
6dc into circle (6)
Round 2-24 :
dc into each st (6) FO leaving a long tail for sewing onto the back of the teapot. Line it up with the spout so it is on the opposite side before sewing.
— Small petal (make 6 – 3 blue, 3 pink) :
Info :
Using pink/blue yarn ch 4
Round 1 :
Dc in 2nd ch from hook, 2 htr in next st, dc in last st, now working around the opposite side of the foundation ch dc in next st, 2 htr in next st, dc in last st, sl st to 1st st. FO leaving a long tail. Each petal will be sewn on evenly around the bottom of the teapot, rotating each colour.
— Chip (Teacup) :
Info :
Starting at the bottom of the teacup using white yarn make a magic circle
Round 1 :
6dc into magic circle (6)
Round 2 :
2dc in each st (12)
Round 3 :
BLO (dc in next st, 2dc in next st) repeat around (18)
Round 4-5 :
dc into each st (18)
Round 6 :
(dc in 2 sts, 2dc in next st) repeat around (24)
Round 7-8 :
Dc into each st (24)
Round 9 :
(dc in 3 sts, 2dc in next st) repeat around (30)
Round 10-11 :
Dc in each st (30)
Round 12 :
(dc in 4 sts, 2dc in next st) repeat around (36)
Info :
TURN WORK – you are no longer working in rounds.
Round 13 :
Ch1, working back dc in each st to last 2 sts, leave these unworked and turn work (34)
Info :
Change to mustard/gold
Round 14 :
dc in each sts (34) FO and sew in ends.
— Bottom of teacup :
Info :
You will now be working in the FLO from round 3 of the teacup. Using purple attach yarn to any st.
Round 1 :
Dc into each st (12)
Round 2 :
(dc in next st, 2dc in next st) repeat around (18)
Round 3 :
(dc in 2 sts, 2dc in next st) repeat around (24)
Info :
Change to mustard/gold yarn
Round 4 :
Dc in each st (24) FO and sew in ends
— Chips handle :
Info :
Using mustard/gold yarn ch 9.
Round 1 :
Dc in 2nd ch from hook and in remaining sts (8) FO leaving a long tail. Sew the handle onto the front of the face with the chip being on the left side.
— Sewing / Making Up :
Info :
Ensure you read all instructions for sewing. Each part should be sewn on as instructed in each part.
Item - Mrs Potts :
Sew the spout and handle on opposite sides of the teapot. After this sew Mrs Potts eyes onto the front and sew eyelashes using black and the lips using pink. I added some blush to the sides for her cheeks.
Item - Chip :
After sewing the handle onto chips face, insert the safety eyes. Using a small amount of black, sew on chips mouth. NOTE: I made a small cover to sew around the inside over the safety eyes (see pic) for this repeat rounds 1&2 of the teacup using white yarn. Sew this over the safety eyes on the inside of the cup.
Info :
Your set is now complete ☺ Hope you enjoyed my pattern!!!
This Mrs Potts and Chip pattern brings a touch of storybook charm to your crochet projects. Make a delightful pair that looks lovely on a shelf or as a handmade gift. Follow the rounds, colour changes, and finishing tips to create a polished set you can be proud of. 🫖🧶