🧶 Beautiful ✨ Detailed 💝 Adorable

Charmander Amigurumi Pattern

Charmander Amigurumi Pattern
4.5★ Rating
5-7 Hours Time Needed
4.0K Made This
✂️

Beginner Friendly Level

Perfect for those just starting their crochet journey, with clear instructions and simple techniques

⏱️

Weekend Treat

Takes 5-7 hours, making it an enjoyable project to finish over a couple of days.

🧸

Cute Companion

An adorable friend to cherish, handcrafted with love to bring comfort and joy for years to come.

About This Charmander Amigurumi Pattern

This pattern creates small, palm-sized amigurumi versions of Charmander, Charmeleon and Charizard. It uses simple rounds and shaping to build the head, body and small details like horns, wings and the tail flame. The instructions are photographed and written to help you place eyes, embroider the mouth and assemble the pieces for a polished finish.

Charmander Amigurumi Pattern crochet pattern - detailed view of completed project

The pattern is designed for worsted weight yarn and makes a 15cm (6in) amigurumi when using the recommended hook. Clear abbreviations and a full materials list are included so you can get started quickly.

Why You'll Love This Charmander Amigurumi Pattern

I absolutely love this pattern because it captures the playful charm of the Pokemon trio in a small, manageable amigurumi. I enjoy how the shaping is achieved with simple increases and decreases — it feels satisfying to see the character form round by round. The design is versatile so you can make Charmander, Charmeleon or Charizard by changing small details like horns, wings and the tail flame. I find the assembly steps particularly rewarding; attaching the small parts and finishing the flame brings the whole toy to life.

Charmander Amigurumi Pattern step 1 - construction progress Charmander Amigurumi Pattern step 2 - assembly progress Charmander Amigurumi Pattern step 3 - details and accessories Charmander Amigurumi Pattern step 4 - final assembly and finishing

Switch Things Up

I love how easy it is to customize these amigurumi — you can swap colors to make new characters or seasonal variants.

I often change yarn weight and hook size to create mini keyring versions or larger cuddly toys; adjusting the hook will change the finished size dramatically.

I like to embroider different facial expressions or add felt cheeks and tiny accessories like scarves or hats to give personality to each toy.

If you want a posable tail, I add multiple strands of pipe cleaners or thin floral wire inside the tail before stuffing so it holds curves nicely.

Try making the flame in gradient colors by blending red and yellow yarns or using variegated yarn for a painterly effect.

I sometimes replace safety eyes with embroidered eyes for a softer, child-friendly toy suitable for younger children.

Add tiny props like a mini ball, leaf or star by crocheting small shapes and sewing them to the hands for themed displays or gift tags.

For Charizard, use slightly firmer stuffing in the wings and add an extra row of single crochet around the base for durability when sewing to the body.

I recommend testing different eye sizes to change the character proportions — larger eyes give a cuter chibi look, smaller eyes create a more vintage toy vibe.

If you enjoy colorwork, try striping the body or adding small applique shapes to create one-of-a-kind variations you can sell or gift.

Common Mistakes & How to Fix Them

✗ Skipping stitch markers during the eye placement will make the eyes sit unevenly; mark the exact stitches mentioned (18th and 29th at round 13) to ensure correct placement. ✗ Forgetting to stuff gradually leads to lumps and shape issues; add stuffing in small amounts during shaping and before closing openings for a smooth finish. ✗ Pulling yarn too tight when making small pieces like horns or snouts causes distortion; keep a relaxed, consistent tension to preserve the shape and stitch count. ✗ Not hiding tails or securing seams properly can cause parts to loosen over time; leave sewing tails as instructed, knot them together where recommended, then hide them inside the body for a secure finish.

Charmander Amigurumi Pattern

Make your own adorable Charmander family of amigurumi toys — Charmander, Charmeleon and Charizard — with these complete step-by-step instructions. This pattern uses worsted-weight yarn and simple amigurumi techniques to create a 15cm (6in) cute collectible. Youll get clear shaping, assembly guidance, and helpful tips so you can finish a charming little figure you can gift or display.

Beginner Friendly 5-7 Hours

Materials Needed for Charmander Amigurumi Pattern

— Main Fabric

  • 01
    Worsted weight cotton or yarn (results in approximately 15cm / 6 inch amigurumi)
  • 02
    Charmander: Orange - 100m / 110yd
  • 03
    Charmander: Light Yellow - 10m / 11yd
  • 04
    Charmander: Yellow - 10m / 11yd
  • 05
    Charmander: Red - 10m / 11yd
  • 06
    Charmander: Black - A strand for the mouth (embroidery)
  • 07
    Charmeleon: Red - 110m / 120yd
  • 08
    Charmeleon: Light Yellow - 10m / 11yd
  • 09
    Charmeleon: Yellow - 10m / 11yd
  • 10
    Charizard: Orange - 120m / 130yd
  • 11
    Charizard: Light Yellow - 10m / 11yd
  • 12
    Charizard: Yellow - 10m / 11yd
  • 13
    Charizard: Red - 10m / 11yd
  • 14
    Charizard: Teal - 15m / 16yd

— Tools Required

  • 01
    Crochet hook - use the recommended size for your yarn (match yarn band)
  • 02
    Safety eyes - recommended size close to 20mm (approx 4/5 inch) for worsted weight yarns
  • 03
    Polyester fiberfill (stuffing)
  • 04
    Stitch markers
  • 05
    Tapestry needles for sewing and weaving ends
  • 06
    Scissors
  • 07
    Wire or pipe cleaners for shaping the tail (optional)
  • 08
    Black yarn or embroidery thread for the mouth

Progress Tracker

0% Complete

— Head & Body :

Info :

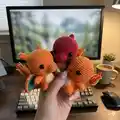
Orange Yarn for Charmander & Charizard. Red Yarn for Charmeleon.

Round 1 :

MR with 6sc (6)

Round 2 :

6inc (12)

Round 3 :

(linc 1sc) x6 (18)

Round 4 :

(1sc linc 1sc) x6 (24)

Round 5 :

(linc 3sc) x6 (30)

Round 6 :

(2sc linc 2sc) x6 (36)

Round 7 :

(linc 5sc) x6 (42)

Round 8 :

(3sc linc 3sc) x6 (48)

Round 9-17 :

9 rounds of 48sc

Info :

At round 13, mark the 18th and 29th stitches for the pair of eyes that will be inserted later.

Round 18 :

(3sc 1dec 3sc) x6 (42)

Round 19 :

(1dec 5sc) x6 (36)

Round 20 :

(2sc 1dec 2sc) x6 (30)

Info :

Insert the eyes in the marked stitches.

Info :

Next, we will do the mouth for Charmander. Skip this step if you’re making Charmeleon or Charizard.

Info :

Using a black yarn and tapestry needle, insert it from the inside of the head to the outside, at the round right below the eyes, with about 3 stitches of distance from each eye. Embroider a mouth with a “u” shape over the surface. You can also use glue to have a smoother mouth. Next, hide the remaining yarn inside the head. Continue with round 21.

Round 21 :

(1dec 3sc) x6 (24)

Round 22 :

(2sc 1dec 2sc) x4 (20)

Infos :

Crochet the yellow instructions with the light yellow yarn. Fill the head with stuffing before continuing.

Round 23 :

8inc 4inc 8inc (40)

Round 24-28 :

15sc 10sc 15sc (40)

Info :

Fill the head with stuffing.

Round 29 :

4sc 1dec 8sc 1dec 8sc 1dec 4sc (36)

Round 30 :

2sc 1dec 4sc 1dec 4sc 1dec 4sc 1dec 1sc 3sc 1dec 4sc 1dec 2sc (30)

Round 31 :

(1dec 3sc) x2, 1dec 3sc 1dec 3sc 1dec 3sc (24)

Round 32 :

1sc (1dec 2sc) x2 1dec 2sc 1dec (2sc 1dec) x2 1sc (18)

Info :

Keep adding more stuffing, and finally add some more before closing the body.

Round 33 :

(1dec 1sc) x6 (12)

Round 34 :

6dec (6)

Info :

F/o with slst and close the body, but don’t hide the remaining yarn. Instead, get it to the bottom back of the body, near the area where the tail will be sewn. This yarn will be used to make a knot with the remaining yarn of the tail, and only then we will hide it inside the body.

— Arms :

Info :

Use the matching color of your amigurumi.

Round 1 :

MR with 6sc (6)

Round 2 :

(2inc 1sc) x2 (10)

Round 3-6 :

4 rounds of 10sc

Info :

F/o with slst and leave a yarn tail for sewing. Fill half of each piece with stuffing.

— Legs :

Info :

Use the matching color of your amigurumi.

Round 1 :

MR with 6sc (6)

Round 2 :

6inc (12)

Round 3-5 :

3 rounds of 12sc

Info :

F/o with slst and leave a yarn tail for sewing. Fill with stuffing.

— Tail :

Info :

Use the matching color of your amigurumi. Stuffing will be added later, after we insert the wire/pipe cleaners.

Round 1 :

MR with 8sc (8)

Round 2-4 :

3 rounds of 8sc

Round 5 :

(linc 3sc) x2 (10)

Round 6 :

10sc (10)

Round 7 :

(2sc linc 2sc) x2 (12)

Round 8 :

12sc (12)

Round 9 :

(linc 5sc) x2 (14)

Round 10 :

14sc (14)

Round 11 :

(3sc linc 3sc) x2 (16)

Round 12 :

16sc (16)

Round 13 :

(linc 7sc) x2 (18)

Round 14 :

18sc (18)

Round 15 :

(4sc linc 4sc) x2 (20)

Info :

F/o with slst and leave a yarn tail for sewing. Insert wire or pipe cleaners inside the tail until it reaches the flame, then add stuffing and bend the tail to the desired shape.

— Tail Flame (Red Yarn) :

Round 1 :

MR with 6sc (6)

Round 2 :

6inc (12)

Round 3 :

(1inc 1sc) x6 (18)

Round 4 :

BLO 18sc (18)

Round 5-6 :

2 rounds of 18sc

Round 7 :

(1dec 1sc) x6 (12)

Round 8 :

12sc (12)

Info :

Fill with stuffing and add some more before closing the piece.

Round 9 :

(1dec 2sc) x3 (9)

Round 10 :

(1dec 1sc) x3 (6)

Info :

F/o with slst and close the flame. Hide the remaining yarn.

— Tail Flame (Yellow Yarn & Triangles) :

Round 1 :

MR with 6sc (6)

Round 2 :

6inc (12)

Round 3 :

(1inc 1sc) x6 (18)

Round 4 :

Crochet 18sc by inserting the hook in the front loop of round 4 of the red piece. (18)

Info :

Next, we will make 6 triangle-like shapes. Crochet one small then one big triangle 3x. Leave a yarn tail, and with the tapestry needle attach the triangles to the flame.

Small Triangle :

3ch, skip 1ch and do 1sc 1hdc, skip 1st and do 1slst.

Big Triangle :

6ch, skip 1ch and do 1sc 2hdc 2dc, skip 2st and do 2slst.

— Snout (Charmeleon & Charizard) :

Round 1 :

MR with 6sc (6)

Round 2 :

6inc (12)

Round 3 :

(1inc 3sc) x3 (15)

Round 4 :

(2sc 1inc 2sc) x3 (18)

Round 5 :

18sc (18)

Round 6 :

(4sc 1inc 4sc) x2 (20)

Info :

F/o with slst and leave a yarn tail for sewing. Fill with stuffing.

— Horn (Charmeleon & Charizard) :

Info :

Use the matching color of your amigurumi. 1 horn for Charmeleon, 2 for Charizard.

Round 1 :

MR with 6sc (6)

Round 2 :

(1inc 1sc) x3 (9)

Round 3-4 :

2 rounds of 9sc

Round 5 :

1inc 3sc, 1inc 4sc (11)

Round 6 :

11sc (11)

Round 7 :

1inc 4sc, 1inc 5sc (13)

Round 8 :

13sc (13)

Info :

F/o with slst and leave a yarn tail for sewing. Fill with stuffing.

— Wings (Charizard) :

Info :

3-inc = 3sc in the same stitch. Teal yarn piece first, then orange. Align corners to work rounds through both pieces.

Teal Round 1 :

MR with 6sc (6)

Teal Round 2 :

(3-inc 1sc) x3 (12)

Teal Round 3 :

1sc 3-inc, (3sc 3-inc) x2, 2sc (18)

Teal Round 4 :

2sc 3-inc, 5sc 1inc, 5sc 3-inc, 7sc (24)

Info :

Go past the end of the round to get to the corner of the triangular piece. F/o with slst and hide the remaining yarn on the 'wrong' side. Make a 2nd one.

Orange Round 1 :

MR with 6sc (6)

Orange Round 2 :

(3-inc 1sc) x3 (12)

Orange Round 3 :

1sc 3-inc, (3sc 3-inc) x2, 2sc (18)

Orange Round 4 :

2sc 3-inc, 5sc 1inc, 5sc 3-inc, 8sc (24)

Info :

Go past the end of the round to get to the corner of the triangular piece. Make 1ch and turn the piece around. Next, grab the teal piece and place it in front of the orange one, then start working the next round through both pieces aligning the corners.

Round 5 :

8sc, (1sc 3ch-picot 1sc) in the same stitch, 8sc

Info :

F/o with slst and leave a yarn tail for sewing. Make the 2nd wing. Adjust yarn tail orientation as needed so one wing has the tail on the opposite side to ease sewing.

— Assembly :

Item :

Legs: Placed 4 rounds below the head and occupies about 4 rounds of height. Keep about 4 to 5 stitches of distance between the legs.

Item :

Arms: Placed right below the head. Ensure the needle gets through both sides of the arm, closing it during the process for a neat seam.

Item :

Snout: Placed at eye height, and occupies about 7 rounds of height. Add extra stuffing before you close the opening and sew centered at eye level.

Item :

Horns: Placed after round 6 of the head and occupy about 4 rounds of height. For Charmeleon place one horn at the center of the head's back. For Charizard place two horns at a diagonal angle similar to the pictures. Add extra stuffing before closing.

Item :

Tail & Flame: Sew the flame to the end of the tail with orange yarn, insert wire or pipe cleaners inside the tail until it reaches the flame and fill with stuffing. Bend the tail until flame stands upright. Place the tail 4 rounds below the head, add extra stuffing then knot the remaining tail yarn with the body closing yarn and hide inside the body.

Item :

Wings (Charizard): Placed 1 round below the head near the arms. Sew wings securely aligning corners and hide remaining yarn tails on the wrong side.

Info :

When sewing pieces, pin or use stitch markers to check symmetry and positioning before permanently stitching. Weave in all loose ends neatly inside the body.

Assembly Instructions

  • Place the legs 4 rounds below the head; they occupy about 4 rounds of height and should be spaced about 4 to 5 stitches apart for balance.
  • Sew the arms right below the head, passing the needle through both sides of the arm to close it as you attach so it sits naturally against the body.
  • Attach the snout at eye height so it occupies about 7 rounds of height; add extra stuffing before closing the opening for a firm shape.
  • Sew the tail to the back 4 rounds below the head, insert wire or pipe cleaners inside the tail until it reaches the flame, stuff and bend to position the flame upright.
  • For Charmeleon place one horn at the center back of the head; for Charizard place two horns angled diagonally similar to the photos and stuff lightly before closing.
  • Sew wings in place 1 round below the head (Charizard) aligning corners of teal and orange pieces and hide remaining yarn tails on the wrong side.

Important Notes

  • 💡Use stitch markers to keep track of rounds and mark the 18th and 29th stitches at round 13 for eye placement.
  • 💡Stuff gradually to maintain smooth shaping; add stuffing before closing each piece to avoid lumps.
  • 💡Pin parts in place before sewing to ensure symmetry and correct positioning.
  • 💡Weave in ends inside the body and use the body closing yarn to knot tail yarn before hiding to secure the tail.

This cute Charmander family pattern lets you crochet three different characters with small changes to the same base shape. Its step-by-step instructions, clear photos and assembly tips make finishing fast and fun. Perfect for gifts, decorations, or keeping as a tiny handmade friend. 🧶✨

You ask,

we answer.

FAQs

What size will the finished piece be?

The finished amigurumi measures approximately 15 cm (6 inches) tall when using worsted weight yarn and the recommended hook size.

Can I use different yarn weights for this pattern?

Yes, you can change yarn weight and hook size to make the toy larger or smaller, but it will change the final dimensions and you should adjust safety eye size accordingly.

Do I need prior crochet experience for this pattern?

This pattern is beginner friendly; basic knowledge of single crochet, increases, decreases and working in the round is helpful to follow the instructions smoothly.

How long does this project typically take to complete?

Most crocheters finish this project in about 5-7 hours, though time will vary depending on experience, customization and assembly time.