🧢 Beautiful ✨ Detailed πŸ’ Adorable

Buzz Lightyear Amigurumi Pattern

Buzz Lightyear Amigurumi Pattern
4.6β˜… Rating
5-7 Hours Time Needed
4.1K Made This
βœ‚οΈ

Intermediate Level

Ideal for those with basic crochet experience, featuring slightly more advanced stitches and techniques to expand your skills.

⏱️

Weekend Treat

Takes 5-7 hours, making it an enjoyable project to finish over a couple of days.

🧸

Cute Companion

An adorable friend to cherish, handcrafted with love to bring comfort and joy for years to come.

About This Buzz Lightyear Amigurumi Pattern

This pattern teaches you how to crochet a detailed Buzz Lightyear amigurumi with clear photos and step-by-step instructions. You will make the head, ears, legs, hands, and decorative details using simple amigurumi techniques and color changes. The design uses cotton yarn and a small hook to create a neat, collectible-sized character. The instructions include placement tips for eyes and embroidery for facial features.

Buzz Lightyear Amigurumi Pattern crochet pattern - detailed view of completed project

The pattern includes materials and abbreviations, detailed rounds for each piece, and assembly guidance to sew parts together. Suitable for crocheters comfortable with single crochet, increases, decreases, and changing colors.

Why You'll Love This Buzz Lightyear Amigurumi Pattern

I absolutely love this pattern because it captures Buzz Lightyear's recognizable look in a compact, handmade form. I enjoy the color changes and small surface embroidery that give the toy personality and charm. The pattern balances simple rounds with small shaping details so I can finish a complete character in a weekend. Sewing the head, ears, and little emblem always feels rewarding and makes each finished doll unique.

Buzz Lightyear Amigurumi Pattern step 1 - construction progress Buzz Lightyear Amigurumi Pattern step 2 - assembly progress Buzz Lightyear Amigurumi Pattern step 3 - details and accessories Buzz Lightyear Amigurumi Pattern step 4 - final assembly and finishing

Switch Things Up

I love how easy it is to customize this pattern with different color choices; try pastel shades for a soft collectible or bold neons for a playful twist.

I sometimes change the yarn weight and use a larger hook to create a chunky, hug-able version β€” just adjust colors and eye placement accordingly.

I like adding tiny felt or crocheted accessories like a removable helmet or belt badge to personalize each Buzz.

If you want a keychain version, use thinner yarn and smaller safety eyes to scale the pattern down while keeping the same stitch counts.

I often embroider different expressions or add blushed cheeks using soft pastels to change the character’s personality.

Try swapping cotton for an acrylic blend if you prefer a softer, fuzzier finish β€” just check that the hook size gives the same gauge look.

For a more realistic look, experiment with surface crochet lines for suit seams instead of embroidery for a subtle texture.

I recommend trying different eye sizes and spacing to create more baby-like or more mature expressions.

If you enjoy sewing, create tiny crocheted accessories like a badge or miniature wings to expand the play possibilities.

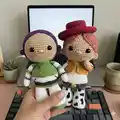
I also like to make a matching set (e.g., Woody or Jessie) using the same head and body structure but changing colors and small outfit details.

Common Mistakes & How to Fix Them

βœ— Skipping placement of safety eyes between the 15-16 rows can make the face look off-center; insert the eyes between rows 15-16 and measure equal distance between them. βœ— Forgetting to leave a long tail when making the head detail or ears makes sewing difficult; always leave a long tail for sewing so you can attach pieces neatly. βœ— Cutting the yarn after finishing the first leg will make joining the body harder; do not cut the thread from the second leg and continue crocheting the body across the chain gap. βœ— Overstuffing the head or limbs causes distortion and lumps; stuff gradually and evenly, checking shape as you go for smooth, firm results. βœ— Not using BLO where instructed on legs will change the look of the edge and color transition; follow BLO instructions exactly and switch colors at the specified rounds.

Buzz Lightyear Amigurumi Pattern

Create your own adorable Buzz Lightyear amigurumi with this friendly, photo-illustrated crochet pattern. You will work simple rounds, color changes, and small details to bring this Toy Story hero to life. The pattern includes clear step-by-step instructions for head, ears, legs, hands and assembly so you can follow along with confidence. Perfect for gifting or adding a handmade character to your collection.

Intermediate 5-7 Hours

Materials Needed for Buzz Lightyear Amigurumi Pattern

β€” Main Fabric

  • 01
    Alize Cotton Gold - 126
  • 02
    Alize Cotton Gold - 152
  • 03
    Alize Cotton Gold - 55
  • 04
    Drops Love you 7 - 10
  • 05
    Drops I Love You 7 - 04
  • 06
    Fiber filling (polyester stuffing as listed)

β€” Tools Required

  • 01
    Hook size β„–2
  • 02
    Tapestry needle for sewing
  • 03
    Scissors
  • 04
    The plastic eyes diameter 7-8 mm (2 pieces)
  • 05
    Stitch markers (recommended)

Progress Tracker

0% Complete

β€” Head :

Round 1 :

6 sc in mr

Round 2 :

6 inc (12)

Round 3 :

(1 sc, inc) x 6 (18)

Round 4 :

(2 sc, inc) x 6 (24)

Round 5 :

(3 sc, inc) x 6 (30)

Round 6 :

(4 sc, inc) x 6 (36)

Round 7 :

(5 sc, inc) x 6 (42)

Round 8 :

(6 sc, inc) x 6 (48)

Round 9 :

(7 sc, inc) x 6 (54)

Round 10-19 :

54 sc

Info :

Between the 15-16 rows insert safety eyes, 7-8 mm in diameter.

Round 20 :

(7 sc, dec) x 6 (48)

Round 21 :

(6 sc, dec) x 6 (42)

Info :

Stuff

Round 22 :

(5 sc, dec) x 6 (36)

Round 23 :

(4 sc, dec) x 6 (30)

Round 24 :

(3 sc, dec) x 6 (24)

Round 25 :

(2 sc, dec) x 6 (18)

Round 26 :

(1 sc, dec) x 6 (12)

Info :

Stuff

β€” Detail for head :

Round 1 :

6 sc in mr

Round 2 :

6 inc (12)

Round 3 :

(1 sc, inc) x 6 (18)

Round 4 :

(2 sc, inc) x 6 (24)

Round 5 :

(3 sc, inc) x 6 (30)

Round 6 :

(4 sc, inc) x 6 (36)

Round 7 :

(5 sc, inc) x 6 (42)

Round 8 :

(6 sc, inc) x 6 (48)

Round 9 :

(7 sc, inc) x 6 (54)

Round 10-16 :

54 sc

Round 17 :

(hdc, 2 dc, 2 inc (dc), 2 dc, hdc, 2 sc) x 2, 34 sc (58)

Round 18 :

(hdc, dc x 8, hdc, 2 sc) x 2, 34 sc (58)

Round 19 :

22 hdc, 36 sc (58)

Round 20 :

58 sc

Info :

Leave a long tail for sewing

Info :

Sew the detail on the head

β€” Ears (x2) :

Info :

Start working with purple color:

Round 1 :

6 sc in mr

Info :

Leave a long tail for sewing

β€” Start forming head :

Info :

1. Between the 16-17 rows sew on ears. Distance from ears to eyes 5-6 sc.

Info :

2. Embroider nose.

Info :

3. Start forming eyes: -Embroider eyes: insert the white threaded needle on bottom of the eye and thread it to the bottom as shown in the picture. Bring the thread out near the second eye and repeat the same steps.

Info :

4. Toned cheeks

β€” Legs (x2) :

Info :

Start working with green color:

Round 1 :

6 sc in mr

Round 2 :

6 inc (12)

Round 3 :

(1 sc, inc) x 6 (18)

Round 4 :

(2 sc, inc) x 6 (24)

Round 5 :

(3 sc, inc) x 6 (30)

Round 6 :

BLO 30 sc

Round 7 :

30 sc

Round 8 :

Change yarn color to the white color: 30 sc

Round 9 :

(8 sc, dec) x 3 (27)

Round 10-11 :

27 sc

Round 12 :

(7 sc, dec) x 3 (24)

Round 13 :

24 sc

Round 14 :

(6 sc, dec) x 3 (21)

Round 15-16 :

21 sc

Round 17 :

(5 sc, dec) x 3 (18)

Round 18 :

18 sc

Round 19 :

(4 sc, dec) x 3 (15)

Info :

Stuff

Info :

Crochet second leg the some way and continue crocheting the body.

Info :

Do not cut off the thread on the second leg and continue crocheting the body. The gap between the legs should be 3 ch:

Round 1 :

15 sc on the leg, 3 sc on the chain, 15 sc on the leg, 3 sc on the chain (36)

Round 2 :

36 sc

Round 3 :

Change yarn color to the green color: 36 sc

Round 4 :

36 sc

Round 5 :

Change yarn color to the grey color: 36 sc

Round 6-7 :

36 sc

Round 8 :

Change yarn color to the white color: BLO (5 sc, inc) x 6 (42)

Round 9 :

(6 sc, inc) x 6 (48)

Round 10 :

(7 sc, inc) x 6 (54)

Round 11 :

Change yarn color to the green color: 54 sc

Round 12-13 :

54 sc

Round 14 :

(7 sc, dec) x 6 (48)

Round 15 :

(6 sc, dec) x 6 (42)

Round 16 :

(5 sc, dec) x 6 (36)

Round 17 :

(4 sc, dec) x 6 (30)

Info :

Stuff

Round 18 :

30 sc

Round 19 :

(3 sc, dec) x 6 (24)

Round 20-21 :

24 sc

Info :

Stuff

β€” Hands :

Info :

Start working with white color:

Round 1 :

6 sc in mr

Round 2 :

(1 sc, inc) x 3 (9)

Round 3-5 :

9 sc

Round 6 :

Change yarn color to the purple color: 9 sc

Round 7 :

Change yarn color to the white color: 9 sc

Round 8-9 :

9 sc

Round 10 :

Change yarn color to the green color: 9 sc

Round 11 :

9 sc

Round 12 :

Change yarn color to the white color: 9 sc

Round 13-14 :

9 sc

Round 15 :

Change yarn color to the green color: 9 sc

Round 16-17 :

9 sc

Info :

Stuff

Info :

Sew the hands to the body.

β€” Assembly & Finishing :

Info :

Sew the head to the body.

Info :

Embroider emblem with blue and red thread on the chest as shown in pictures.

Info :

Sew the detail on the head and attach ears between rows 16-17 at equal distances from the eyes.

Info :

Leave long tails when instructed for sewing and attach all parts securely.

Assembly Instructions

  • Between rounds 16-17 sew on the ears; place them so the distance from each ear to the nearest eye is 5-6 single crochets.
  • Sew the head to the body securely around the neck opening, matching stitches and using the long tail left for sewing.
  • Do not cut the thread after finishing the second leg; join across the 3-chain gap and continue crocheting the body to create a seamless connection between legs and body.
  • Sew the hands to the body in the arm placement areas and embroider the emblem on the chest using blue and red thread as shown in photos.
  • Attach the purple head detail to the face using the long tail and sew securely so the detail frames the face evenly.

Important Notes

  • πŸ’‘Insert safety eyes between rows 15-16 for correct placement and symmetry.
  • πŸ’‘Leave a long tail when instructed (for head detail, ears and legs) to make sewing the parts easier and neater.
  • πŸ’‘Stuff pieces firmly but gradually and evenly; overstuffing will distort the shape.
  • πŸ’‘Use BLO (back loops only) where indicated to create a clear edge or ridge for color changes and shaping.
  • πŸ’‘Do not cut the thread after finishing the first leg; crochet the second leg and continue onto the body as instructed.

This Buzz Lightyear amigurumi pattern is a delightful way to bring Toy Story magic into your home with yarn and love. The project includes clear photos and step-by-step rounds, making it perfect for a focused weekend make. Enjoy crafting every colorful detail and gifting a handmade friend! πŸ§ΆπŸš€

You ask,

we answer.

FAQs

What size will the finished piece be?

The finished amigurumi size depends on your yarn and tension, but using the recommended cotton yarn and 2.0 mm hook will produce a small collectible doll; approximately 20-25 cm tall depending on finishing.

Can I use different yarn weights for this pattern?

Yes, you can change yarn weight, but it will affect finished size and stitch counts. If using a different weight, adjust hook size and be prepared to recalculate placement for eyes and details.

Do I need prior crochet experience for this pattern?

This pattern is rated intermediate and assumes you are comfortable with single crochet, increases, decreases, BLO, and basic color changes.

How long does this project typically take to complete?

Most crocheters finish this amigurumi in 5-7 hours spread over a weekend, depending on experience and whether you complete all embroidery and finishing in the same session.

What size safety eyes should I use?

Use plastic safety eyes 7-8 mm in diameter, placed between rows 15-16 as instructed.