🧢 Beautiful ✨ Detailed πŸ’ Adorable

Bunny Baby Rattle with Teether Ring Amigurumi Pattern

Bunny Baby Rattle with Teether Ring Amigurumi Pattern
4.4β˜… Rating
2-3 Hours Time Needed
3.7K Made This
βœ‚οΈ

Intermediate Level

Ideal for those with basic crochet experience, featuring slightly more advanced stitches and techniques to expand your skills.

⏱️

Bite-Sized Project

Finishes in 2-4 hoursβ€”perfect for an afternoon of creative relaxation.

🎁

Tiny Treasure

Small, sweet, and gift-worthy creations that fit perfectly in the palm of your hand with detailed charm.

About This Bunny Baby Rattle with Teether Ring Amigurumi Pattern

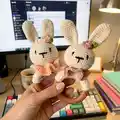
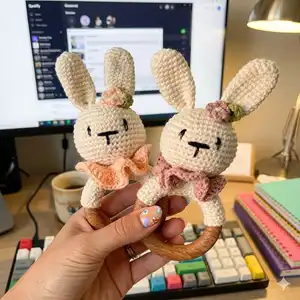
This pattern creates a small bunny rattle fitted over a 6 cm wooden teether ring, finished with a ruffled collar and optional flower. It uses sport/baby weight yarn and a tiny hook for tight stitches that are safe for baby toys. The techniques include working in spiral for amigurumi, simple row work to cover the ring, and a decorative round flower.

Bunny Baby Rattle with Teether Ring Amigurumi Pattern crochet pattern - detailed view of completed project

Includes full materials list, abbreviations in US terms, step-by-step rounds, and illustrated photos to help you sew and finish cleanly. A companion video link/QR is provided for visual guidance.

Why You'll Love This Bunny Baby Rattle with Teether Ring Amigurumi Pattern

I absolutely love this pattern because it’s small, satisfying and makes a delightful handmade gift. I love how the wooden ring and soft yarn combine to create a tactile toy that babies adore. I enjoy designing pieces that are quick to make yet full of personality, and this bunny has just the right amount of charm. I also love that the pattern includes a video reference so you can watch each step if you prefer visual guidance.

Bunny Baby Rattle with Teether Ring Amigurumi Pattern step 1 - construction progress Bunny Baby Rattle with Teether Ring Amigurumi Pattern step 2 - assembly progress Bunny Baby Rattle with Teether Ring Amigurumi Pattern step 3 - details and accessories Bunny Baby Rattle with Teether Ring Amigurumi Pattern step 4 - final assembly and finishing

Switch Things Up

I love to experiment with color palettes to give each bunny a new personality; try soft pastels for a nursery-friendly look or bright primaries for a playful feel.

You can change yarn weight and hook size to make different sizes: bulky yarn and a larger hook will create a chunkier rattle, while thinner yarn makes a tiny keyring-sized toy.

I sometimes add a loop of ribbon or a small bell inside the collar (securely sewn) for extra sensory detail, but always ensure attachments are sewn tightly for safety.

If you want a plush face, embroider with thicker yarn or create felt appliques instead of embroidered eyes, making sure edges are firmly stitched down.

Try crocheting the collar in a contrast color or variegated yarn to make it pop, or make the collar removable by attaching it with small hidden snaps.

For a teething-friendly twist, use a food-safe silicone ring instead of a wooden one, and be sure to follow supplier safety guidelines.

I enjoy adding tiny accessories like a crocheted bow or mini flower; experiment with placement on the ear or collar until you find a look you love.

If you want an eco-friendly version, use organic cotton sport yarn and unfinished wooden rings for a natural aesthetic.

To make a collectible set, vary facial expressions by adjusting the eye placement and mouth embroidery, which changes the bunny's mood dramatically.

I also recommend practicing the ruffle/collar on scrap yarn to change the fullness; increasing or decreasing the chain or stitch repeats will change how ruffled it becomes.

Common Mistakes & How to Fix Them

βœ— Skipping the magic ring technique at the start can leave a noticeable hole; use a properly closed magic ring to create a neat, gap-free center. βœ— Not checking your gauge can change the final size and how the wooden ring fits; crochet a small swatch and adjust hook size to match the provided gauge. βœ— Overstuffing the head will distort the shape and make attachment difficult; stuff gradually and firmly, but not so much that the stitches stretch. βœ— Sewing the head loosely to the body will allow it to move or detach with shaking; sew firmly with a long tail and secure stitches to keep the head stable. βœ— Leaving long loose ends or not weaving tails securely can create hazards for babies; weave in and hide all ends thoroughly and sew pieces tightly.

Bunny Baby Rattle with Teether Ring Amigurumi Pattern

Make a sweet bunny baby rattle with a wooden teether ring using simple amigurumi techniques. This pattern guides you step-by-step through crocheting the head, ears, body sleeve, collar and a cute flower accent. Ideal for gifting or sewing up a quick handmade baby toy, you will enjoy the mix of small shaping and finishing details.

Intermediate 2-3 Hours

Materials Needed for Bunny Baby Rattle with Teether Ring Amigurumi Pattern

β€” Main Fabric

  • 01
    Yarn Art Jeans (color 05) - approx. 90 yards (main color)
  • 02
    Yarn Art Jeans (any color for decoration) - approx. 5 yards (accents)
  • 03
    Suggested yarn: Sport/Baby weight (Fine - 2)

β€” Tools Required

  • 01
    Crochet hook size 2.00 mm
  • 02
    Wooden ring 6 cm / 2.5" diameter
  • 03
    Rattle ball 24 mm / 1"
  • 04
    Fiberfill for stuffing
  • 05
    Sewing needle for sewing pieces together
  • 06
    Sewing pins to hold pieces in place
  • 07
    Scissors
  • 08
    Stitch markers (optional)
  • 09
    Embroidery yarn or sewing thread for facial features

Progress Tracker

0% Complete

β€” Materials and Tools :

Infos :

Original yarns: Yarn Art Jeans (color 05) approx. 90 yards. Yarn Art Jeans (any color for decoration) approx. 5 yards. Suggested yarn: Sport, Baby (Fine - 2). Hook: 2.00 mm. Rattle accessories: 6 cm / 2.5" diameter wooden ring; 24 mm / 1" rattle ball. Notions: fiberfill for stuffing, sewing needle and pins, scissors. Gauge: 24 stitches and 25 rows = 4" (10cm) in sc.

β€” Size :

Info :

When using similar materials, the rattle diameter will be ~ 2 1/2" (6 cm) high with ring will be ~ 5 1/2" (14 cm). Wooden ring diameter ~ 2 1/2" (6 cm).

β€” Head :

Info :

Crochet by spiral.

Round 1 :

6 sc in Magic ring [fig 1] (6)

Round 2 :

6 inc (12)

Round 3 :

(1 sc, inc) * 6 (18)

Round 4 :

(2 sc, inc) * 6 (24)

Round 5 :

(3 sc, inc) * 6 (30)

Round 6 :

(4 sc, inc) *6 [fig 2] (36)

Round 7 :

(5 sc, inc) * 6 (42)

Round 8 :

(6 sc, inc) * 6 (48)

Round 9-15 :

48 sc [fig 3]

Round 16 :

(6 sc, dec) * 6 (42)

Round 17 :

(5 sc, dec) * 6 (36)

Round 18 :

(4 sc, dec) * 6 (30)

Round 19 :

(3 sc, dec) * 6 (24)

Info :

Stuff the head firmly and insert the rattle ball [fig 4]

Round 20 :

(2 sc, dec) * 6 (18)

Round 21 :

(1 sc, dec) * 6 (12)

Round 22 :

(sc) * 6 (6)

Info :

Cut the yarn with long tail [fig 5].

β€” Ears :

Info :

Make 2. Crochet by spiral.

Round 1 :

6 sc in Magic ring (6)

Round 2 :

6 inc (12)

Round 3 :

(2 sc, inc) * 4 (16)

Round 4-11 :

16 sc

Round 12 :

(6 sc, dec) * 2 (14)

Round 13 :

14 sc

Round 14 :

(4 sc, dec) * 2 (12)

Round 15 :

12 sc

Round 16 :

(4 sc, dec) * 2 (10)

Info :

Cut the yarn with long tail approx. 15 cm /6" [fig 6]. Make the second ear.

β€” Body (sleeve for ring) :

Info :

Working in rows. Start with foundation chain. NOTE that you may need to increase or decrease the number of rows to match your wooden ring. It should `hug` wooden ring completely.

Instruction :

Chain 25.

Rows 1-9 :

24 sc, ch 1 and turn [fig 7]

Info :

Cut the yarn leaving a long tail for sewing. Wrap the ring and sew along [fig 8].

β€” Collar :

Info :

Working in rows. Using brown yarn.

Instruction :

Chain 20

Row 1 :

ch 2, 1 dc in the 20th ch, *2 dc in the next st* till the end, turn [fig 9]

Row 2 :

ch 2, *2 dc in the next st* till the end.

Info :

Cut the yarn leaving a long tail for sewing [fig 10]

β€” Flower :

Info :

Add some personality to your toy. Complete it with a bow or decorate it with a flower.

Instruction :

Chain 10 [fig 17].

Row 1 :

ch 1, 4 sc in one ch, sl-st, 4 hdc in one ch, sl-st, 4 dc in one ch, sl-st, change color of the yarn: (1 hdc, 2 dc, 2 trc, 2 dc, 1 hdc) in one ch, sl-st, (1 hdc, 2 dc, 2 tr, 2 dc, 1 hdc) in one ch.

Info :

Cut the yarn. Roll up and give the shape of a flower [fig 18-19]. Sew tightly.

β€” Assembling :

Step 1 :

Attach the head to the middle of the body. And sew it, firmly as you can, so it doesn't move when shaking [fig 11]

Step 2 :

Fold the ears in half lengthwise so that a dimple forms at the base. Sew the ears between round 4 and 5. Use the sewing pins to place and fixate the ears. [fig 12]

Step 3 :

Place the collar between the body and head and sew the ends together into a ring. To prevent it from dangling, sew it to the head in several places [fig 13,14].

Step 4 :

Take black yarn and embroider the nose and eyes. Please, refer to the pictures! [fig 15]

Info :

Between the 11th and 12th rows embroider the horizontal line of the nose (the width of the nose is about 4 sc). From the middle down, embroider the nose with a vertical line in 2 rows. Embroider the eyes at a distance of 2 sc in the direction of the horizontal line of the nose. Make sure the muzzle is symmetrical.

β€” Safety & Finishing :

Infos :

Please sew all pieces tightly because a baby will play with it! Do not leave toys unattended in the crib! Ensure all ends are woven in and attachments are secure before giving to a child.

Assembly Instructions

  • Attach the head to the middle of the body sleeve and sew it firmly so it doesn't move when shaking, securing with multiple passes [fig 11].
  • Fold each ear in half lengthwise to create a dimple at the base and sew the ears between rounds 4 and 5 on the head, using sewing pins to position and fixate them [fig 12].
  • Wrap the crocheted body sleeve around the wooden ring, sew the sleeve closed and then sew the sleeve securely to the ring, making sure it hugs the ring completely [fig 8].
  • Place the ruffled collar between the head and body, sew the ends together into a ring, then tack the collar to the head in several places to prevent dangling [fig 13,14].
  • Embroider the nose and eyes using black yarn: embroider a horizontal nose line between the 11th and 12th rows (about 4 sc wide) and a vertical line downwards in 2 rows; place eyes 2 sc from the horizontal nose line [fig 15].

Important Notes

  • πŸ’‘Use a tight stitch and small hook (2.00 mm) so the stuffing and rattle ball are secure and the toy is safe for babies.
  • πŸ’‘Stuff the head firmly but not so much that stitches stretch; insert the rattle ball before closing the head.
  • πŸ’‘Sew all pieces tightly and weave in all ends to prevent small parts from loosening during play.
  • πŸ’‘Adjust the number of rows for the body sleeve if needed so the crochet piece hugs the wooden ring completely.

This Bunny Baby Rattle pattern is a tiny, heartfelt project that makes the sweetest baby gift. It combines a wooden teether with a soft amigurumi bunny head for tactile play and soothing chewing. Make a set in different colors for a personalized baby shower present. πŸ§ΆπŸŽ€

You ask,

we answer.

FAQs

What size will the finished piece be?

When using similar materials the rattle diameter will be ~2 1/2" (6 cm) and the full height with the ring will be ~5 1/2" (14 cm).

Can I use different yarn weights for this pattern?

Yes, you can substitute yarn, but this will affect the final size and fit on the wooden ring; adjust hook size and stitch count as needed to maintain the correct fit.

Do I need prior crochet experience for this pattern?

This pattern is rated intermediate, so basic knowledge of single crochet, increases, decreases and working in spirals is recommended.

How long does this project typically take to complete?

Most crocheters complete this bite-sized project in about 2-3 hours, though time may vary based on experience and finishing work.

Is the face made with safety eyes or embroidery?

The pattern uses embroidered eyes and nose with black yarn for a baby-safe finish; follow the embroidery placement instructions between rows 11 and 12.