🧢 Beautiful ✨ Detailed πŸ’ Adorable

Bumble Blossom Amigurumi Pattern

Bumble Blossom Amigurumi Pattern
4.6β˜… Rating
5-7 Hours Time Needed
3.9K Made This
βœ‚οΈ

Intermediate Level

Ideal for those with basic crochet experience, featuring slightly more advanced stitches and techniques to expand your skills.

⏱️

Weekend Treat

Takes 5-7 hours, making it an enjoyable project to finish over a couple of days.

🧸

Cute Companion

An adorable friend to cherish, handcrafted with love to bring comfort and joy for years to come.

About This Bumble Blossom Amigurumi Pattern

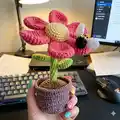
This pattern teaches you how to crochet a potted flower with six petals, a textured center, leaves, and a charming bumblebee. Each piece is written out round-by-round so you can easily follow along and assemble the finished flower. The pattern uses sport weight yarn and small hook sizes for crisp stitch definition.

Bumble Blossom Amigurumi Pattern crochet pattern - detailed view of completed project

Detailed assembly notes and photos guide the final construction so your flower stands securely in the pot. The stem can be reinforced with optional wire for extra stability.

Why You'll Love This Bumble Blossom Amigurumi Pattern

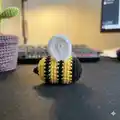
I absolutely love this pattern because it combines small, satisfying motifs into one delightful finished piece that brings color and personality to any shelf. I enjoy how each petal is crocheted individually and then arranged to create a full bloom. The tiny bumblebee is a fun finishing touch that makes the project feel playful and complete. Sewing the pieces together is so rewardingβ€”watching it come to life is one of my favorite parts.

Bumble Blossom Amigurumi Pattern step 1 - construction progress Bumble Blossom Amigurumi Pattern step 2 - assembly progress Bumble Blossom Amigurumi Pattern step 3 - details and accessories Bumble Blossom Amigurumi Pattern step 4 - final assembly and finishing

Switch Things Up

I love customizing this pattern to make different flowers β€” try swapping the petal color to create daisies, sunflowers, or even pastels for a nursery-friendly look.

I sometimes substitute a DK yarn and a 3.0mm hook to make a slightly larger, chunkier bloom; remember to adjust stuffing and possibly the pot base to fit the new size.

To create a mini keychain version, use fingering weight yarn and a 1.75mm hook and omit the pot and cardboard base.

I often embroider small details on the flower center or add French knots for texture to give each bloom a unique face.

Try making a set of three flowers in graduated sizes and place them in a longer planter for a sweet decorative display.

For a seasonal twist, use autumn tones for fall, bright pastels for spring, or red and white for a cheerful holiday palette.

I like to add beads or tiny buttons to the pot rim as decorative stitchesβ€”just sew them on securely before final assembly.

Want more posability? Add a length of florist wire inside the stem and wrap it with yarn so you can bend the bloom to face different directions.

I also enjoy making little outfits or tiny accessories for the bumblebeeβ€”tiny felt hats or embroidered eyes add personality.

To speed up the make, crochet more than one petal at a time in assembly-line fashion then sew them together, which makes production faster and keeps petals consistent.

Common Mistakes & How to Fix Them

βœ— Skipping stitch markers during long rounds can cause you to lose your place; use a stitch marker at the start of each round to keep your count accurate. βœ— Failing to stuff the stem firmly will make the finished flower flop over; add stuffing gradually and pack the stem tightly for a sturdy plant. βœ— Forgetting to reinforce the stem can result in a floppy bloom; insert wire or pipe cleaner inside the stem if your stitches are loose or you want posability. βœ— Not counting increases precisely when making the pot can alter size and fit; count after each increase round to ensure the dirt and pot will match when assembled.

Bumble Blossom Amigurumi Pattern

Create a cheerful crocheted potted flower complete with petals, leaves, a sturdy stem, and a tiny bumblebee friend. This pattern guides you through making each piece with clear round-by-round instructions so you can sew everything together with confidence. Perfect for gifting or brightening your own windowsill, the finished piece stands about 12cm tall and is made with sport weight yarn.

Intermediate 5-7 Hours

Materials Needed for Bumble Blossom Amigurumi Pattern

β€” Main Fabric

  • 01
    Sport weight yarn (Schachenmayr Catania recommended)
  • 02
    Kamelie 00252 - pink (petals)
  • 03
    Honig 00206 - light yellow (flower center)
  • 04
    Greenery 00418 - green (stem, leaves, sepal)
  • 05
    Teddy 00161 - light brown (pot interior/top of dirt)
  • 06
    Marone 00157 - brown (dirt, pot base)
  • 07
    Sonne 00208 - yellow (bumblebee stripes)
  • 08
    Schwarz 00110 - black (bumblebee body)
  • 09
    Weiss 00106 - white (bumblebee wings)

β€” Tools Required

  • 01
    Crochet hook size 2.0mm
  • 02
    Sewing needle
  • 03
    Stitch marker
  • 04
    Stuffing material (polyester fiberfill)
  • 05
    Cardboard for the pot base
  • 06
    Optional wire for the stem
  • 07
    Scissors
  • 08
    Yarn needle for sewing pieces together

Progress Tracker

0% Complete

β€” Petals (Make 6) :

Round 1 :

6 sc in mr (6)

Round 2 :

6 inc (12)

Round 3 :

(1 sc, 1 inc) x 6 (18)

Round 4 :

(2 sc, 1 inc) x 6 (24)

Round 5-7 :

24 sc (24) (3 rounds)

Round 8 :

(2 sc, 1 dec) x 6 (18)

Round 9-11 :

18 sc (18) (3 rounds)

Round 12 :

(1 sc, 1 dec) x 6 (12)

Round 13 :

12 sc (12)

Info :

Cut the yarn and fasten off, leaving a long tail for sewing. Do not add stuffing.

β€” Stem (Make 1) :

Round 1 :

8 sc in mr (8)

Round 2-30 :

8 sc (8) (29 rounds)

Info :

Add stuffing material to the stem as you go along. It is important to stuff the stem very firmly to make sure the finished project stands up. Adding wire is encouraged to help the flower stand up, especially if your stitches tend to be looser.

Round 31 :

BLO (1 sc, 1 inc) x 4 (12)

Round 32 :

12 inc (24)

Round 33 :

(3 sc, 1 inc) x 6 (30)

Round 34 :

(9 sc, 1 inc) x 3 (33)

Round 35 :

33 sc (33)

Info :

Cut the yarn and fasten off invisibly.

Info :

Add the sepal to the stem. Holding the flower with the stem facing up, insert the hook into the last stitch of the remaining loops of round 31 and attach green yarn (pic 1). ch 4, 3-ch picot, ch 1, slst into the next loop in the row (pics 2-3). Repeat 7 more times in the remaining loops for a total of 8 sepal (pic 4). Cut yarn and fasten off invisibly.

β€” Flower Center (Make 1) :

Round 1 :

6 sc in mr (6)

Round 2 :

6 inc (12)

Round 3 :

(1 sc, 1 inc) x 6 (18)

Round 4 :

(2 sc, 1 inc) x 6 (24)

Round 5 :

(3 sc, 1 inc) x 6 (30)

Round 6 :

(9 sc, 1 inc) x 3 (33)

Round 7-8 :

33 sc (33) (2 rounds)

Info :

Cut the yarn and fasten off, leaving a long tail for sewing.

β€” Leaves (Make 2) :

Round 1 :

5 sc in mr (5)

Round 2 :

(1 sc, 1 inc) x 2, 1 sc (7)

Round 3 :

(2 sc, 1 inc) x 2, 1 sc (9)

Round 4 :

(2 sc, 1 inc) x 3 (12)

Round 5-7 :

12 sc (12) (3 rounds)

Round 8 :

(2 sc, 1 dec) x 3 (9)

Round 9 :

(1 sc, 1 dec) x 3 (6)

Info :

Cut the yarn and fasten off, leaving a long tail for sewing. Do not add stuffing.

β€” Pot (Make 1) :

Round 1 :

6 sc in mr (6)

Round 2 :

6 inc (12)

Round 3 :

(1 sc, 1 inc) x 6 (18)

Round 4 :

(2 sc, 1 inc) x 6 (24)

Round 5 :

(3 sc, 1 inc) x 6 (30)

Round 6 :

(4 sc, 1 inc) x 6 (36)

Round 7 :

(5 sc, 1 inc) x 6 (42)

Round 8 :

BLO 42 sc (42)

Round 9-11 :

42 sc (42) (3 rounds)

Round 12 :

(13 sc, 1 inc) x 3 (45)

Round 13-15 :

45 sc (45) (3 rounds)

Round 16 :

(14 sc, 1 inc) x 3 (48)

Round 17-19 :

48 sc (48) (3 rounds)

Round 20 :

FLO (7 dc, 1 dcinc) x 6 (54)

Round 21 :

54 sc (54)

Info :

Cut the yarn and fasten off invisibly.

β€” Dirt (Make 1) :

Info :

Using brown yarn. The dirt will go inside the pot and is created in two parts: the hole in which the flower will be inserted and the top of the dirt. Begin by crocheting the hole.

Round 1 :

6 sc in mr (6)

Round 2 :

6 inc (12)

Round 3-14 :

12 sc (12) (12 rounds)

Info :

Cut the yarn and fasten off invisibly.

Info :

Begin to crochet the top of the dirt. Holding the hole with the opening facing up, insert the hook from the inside of the hole going out (pic 5). Re-attach the yarn and continue to crochet the dirt top (pics 6-7).

Info :

The "wrong side" of the stitches should be on the bottom of the dirt when you are finished. Make sure to insert your hook correctly when re-attaching your yarn!

Round 15 :

(1 sc, 1 inc) x 6 (18)

Round 16 :

(2 sc, 1 inc) x 6 (24)

Round 17 :

(3 sc, 1 inc) x 6 (30)

Round 18 :

(4 sc, 1 inc) x 6 (36)

Round 19 :

(5 sc, 1 inc) x 6 (42)

Round 20 :

(6 sc, 1 inc) x 6 (48)

Info :

Cut the yarn and fasten off, leaving a long tail for sewing.

β€” Bumblebee Wing (Make 2) :

Info :

Using white yarn, ch 4. Starting in the 2nd chain from the hook and working into both sides of the chain.

Round 1 :

1 sc, 1 hdc, 5 dc in the same stitch, 1 hdc, 1 sc (9)

Info :

Cut the yarn and fasten off, leaving a long tail for sewing.

β€” Bumblebee Body (Make 1) :

Round 1 :

6 sc in mr (6)

Round 2 :

6 inc (12)

Round 3 :

12 sc (12)

Info :

Switch to yellow yarn.

Round 4-5 :

12 sc (12) (2 rounds)

Info :

Switch to black yarn.

Round 6-7 :

12 sc (12) (2 rounds)

Info :

Begin to add stuffing material, adding more as you go along if needed.

Info :

Switch to yellow yarn.

Round 8 :

6 dec (6)

Info :

Cut the yarn and use the yarn tail to close the remaining stitches.

β€” Assembly :

Info :

Begin to assemble the flower by attaching the stem to the center piece. Place the center piece on the stem and sew the pieces together using the yarn tail of the center piece (pics 8-9). Add stuffing before sewing the last remaining stitches closed (pics 10-11).

Info :

Attach the petals by sewing along the rounds where the stem and center piece were connected (pic 12). The petals will fit closely next to one another when attached, with very little space between one another (pic 13).

Info :

Position the leaves on either side of the stem and sew in place using the long yarn tails.

Info :

Before assembling the pot, cut out a piece of cardboard and add to the bottom of the pot for added stability.

Info :

Attach the dirt to the pot by sewing into the remaining loops of round 20 of the pot (pics 16-18). Add stuffing before sewing the last remaining loops closed (pic 19).

Info :

Take your time adding the stuffing and make sure the hole is centered in the pot. This will help the flower stand up without falling over.

Info :

Sew the wings to the bumblebee body between rounds 4 and 5 of the body using the long yarn tails. Use the long tails from the bee wings and body to attach the bumblebee to one of the petals or the flower center as desired.

Assembly Instructions

  • Attach the center piece to the stem by placing the center on the stem and sewing through the front loops of the last stem round and the front loops of the center using the center yarn tail, then add stuffing before closing the last stitches.
  • Sew the six petals around the flower center by aligning each petal next to the previous one and stitching along the rounds where the stem and center are connected so petals fit snugly together.
  • Position the two leaves on either side of the stem and sew them in place using the long yarn tails, ensuring they are symmetrical and secure.
  • Cut a circle of cardboard to fit the bottom of the pot and insert it for stability before attaching the dirt piece.
  • Sew the dirt piece into the remaining loops of round 20 of the pot and add stuffing so the hole is centered and the flower will stand upright.
  • Sew the bumblebee wings to the bee body between rounds 4 and 5 using the long yarn tails, then attach the finished bee to a petal or the flower center with the tails.

Important Notes

  • πŸ’‘Work stitches tightly as with all amigurumi patterns to achieve the desired shape and firmness for the finished pieces.
  • πŸ’‘Each round is worked in a spiral and does not need to be joined unless otherwise specified β€” use a stitch marker to track the start of rounds.
  • πŸ’‘The stem may be reinforced with wire for extra stability; this is recommended if your stitches are loose or you want a posable stem.

This adorable Bumble Blossom pattern brings a little cheerful bloom and a tiny bee into your home with handcrafted charm. The potted flower is sturdy, colorful, and full of texture, perfect for brightening a windowsill or gifting to a friend. Follow the step-by-step rounds and assembly tips to create your very own floral friend. 🌸🐝

You ask,

we answer.

FAQs

What size will the finished piece be?

The finished project will be approximately 12cm tall by 8.5cm wide when using the recommended sport weight yarn and 2mm hook.

Can I use a different yarn weight and hook?

Yes, you can change yarn weight and hook size, but the final size and stitch definition will change; choose a larger hook and bulkier yarn for a chunkier version or thinner yarn and smaller hook for a mini version.

Is prior amigurumi experience required?

This pattern is rated intermediate, so basic knowledge of amigurumi techniques (magic ring, increases, decreases, and sewing pieces) is recommended for best results.

How should I reinforce the stem so the flower stands up?

You can insert floral wire or a sturdy wire inside the stem as you stuff it to add stiffness and posability; make sure to leave the ends secured and covered by stuffing.

Do rounds join or are they worked in a spiral?

Each round is worked in a spiral and does not need to be joined unless the instructions state otherwise; use a stitch marker to mark the beginning of the round.