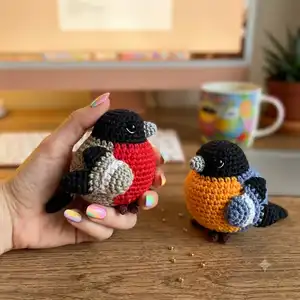
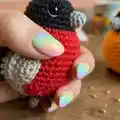
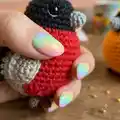
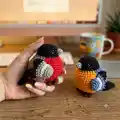
Make a charming bullfinch amigurumi with clear step-by-step instructions and helpful photos. This pattern walks you through each part — head, body, wings, tail, beak and feet — with color-change tips and assembly guidance. Perfect as a handmade gift or a festive tree ornament, you will enjoy creating a detailed, cuddly bird with professional finishing touches. Grab your yarn and hooks and start crocheting a delightful bird companion.
Progress Tracker
0% Complete
— Head :
Info :
The part is worked continuously. You should use a stitch marker. With black yarn create a Magic Ring with 6 SCs.
Round 1 :
SC INC in next 6 SCs = total 12.
Round 2 :
(1 SC in next SC, SC INC in next SC)*6 = total 18.
Round 3 :
(1 SC in next 2 SCs, SC INC in next SC)*6 = total 24.
Round 4 :
1 SC in next 24 SCs = total 24.
Round 5 :
1 SC in next 24 SCs = total 24.
Round 6 :
1 SC in next 24 SCs = total 24.
Round 7 :
1 SC in next 24 SCs = total 24.
Info :
Don't cut the black thread, place a stitch marker in the last loop of the black yarn and continue with red yarn from the next loop (Picture 1). Do not use 'An invisible color change' method in this case, we will use this method only for the wings and for the tail.
— Body :
Row 8 :
1 SC in next 3 SCs, SC INC in next 7 SCs, 1 SC in next 2 SCs = total 19 (Pictures 2, 3). Make 1 additional Ch and turn your work (Picture 4, Picture 5).
Row 9 :
1 SC in next 19 SCs = total 19 (Picture 6).
Row 10 :
1 SC in next 19 SCs = total 19. Make 1 additional Ch and turn your work.
Row 11 :
1 SC in next 19 SCs = total 19. Make 1 additional Ch and turn your work.
Row 12 :
1 SC in next 19 SCs = total 19. Make 1 additional Ch and turn your work.
Row 13 :
1 SC in next 19 SCs = total 19. Make 1 additional Ch and turn your work.
Row 14 :
1 SC in next 19 SCs = total 19. Make 1 additional Ch and turn your work.
Row 15 :
1 SC in next 19 SCs = total 19. Make 1 additional Ch and turn your work.
Row 16 :
1 SC in next 19 SCs = total 19. Make 1 additional Ch and turn your work.
Row 17 :
1 SC in next 4 SCs, (SC DEC, 1 SC in next 3 SCs)*3 = total 16. Make 1 additional Ch and turn your work.
Row 18 :
1 SC in next 16 SCs = total 16. Make 1 additional Ch and turn your work.
Row 19 :
(1 SC in next 4 SCs, SC DEC)*2, 1 SC in next 4 SCs = total 14. Make 1 additional Ch and turn your work.
Row 20 :
1 SC in next 6 SCs, SC DEC, 1 SC in next 6 SCs = total 13. We completed the red part of the body. Do not cut the red thread, place a stitch marker in the last loop (Picture 7).
Info :
Continue with the black part. Insert your hook into the last black loop instead of a stitch marker (Picture 8). Take grey yarn and make a loop into the same stitch (Picture 9). Cut the black thread and tie the ends (Picture 10). Continue with grey thread. Make 1 additional Ch and turn your work.
Row 8 (grey side) :
1 SC in next 12 SCs = total 12 (Picture 11). Make 1 additional Ch and turn your work.
Row 9 (grey side) :
(1 SC in next 3 SCs, SC INC in next SC)*3 = total 15. Make 1 additional Ch and turn your work.
Row 10 (grey side) :
1 SC in next 15 SCs = total 15. Make 1 additional Ch and turn your work.
Row 11 (grey side) :
(1 SC in next 2 SCs, SC INC in next SC)*5 = total 20. Make 1 additional Ch and turn your work.
Row 12 (grey side) :
(1 SC in next 3 SCs, SC INC in next SC)*5 = total 25. Make 1 additional Ch and turn your work.
Row 13 (grey side) :
1 SC in next 25 SCs = total 25. Make 1 additional Ch and turn your work.
Row 14 (grey side) :
(1 SC in next 7 SCs, SC DEC)*2, 1 SC in next 7 SCs = total 23. Make 1 additional Ch and turn your work.
Row 15 (grey side) :
1 SC in next 10 SCs, SC DEC, 1 SC in next 11 SCs = total 22. Make 1 additional Ch and turn your work.
Row 16 (grey side) :
1 SC in next 22 SCs = total 22. Make 1 additional Ch and turn your work.
Row 17 (grey side) :
(1 SC in next 6 SCs, SC DEC)*2, 1 SC in next 6 SCs = total 20. Make 1 additional Ch and turn your work.
Row 18 (grey side) :
1 SC in next 20 SCs = total 20. Make 1 additional Ch and turn your work.
Row 19 (grey side) :
1 SC in next 20 SCs = total 20. Make 1 additional Ch and turn your work.
Row 20 (grey side) :
1 SC in next 20 SCs = total 20 (Picture 12). Don't cut the grey thread.
Info :
Continue making the body. Join the grey and the red parts with 1 SL ST (Pictures 22, 23) and crochet in rounds. Cut red thread and continue with grey yarn (Picture 24). Join the second red edge with the usual SC (Picture 25).
Round 21 :
1 SC in next 33 SCs = total 33 (Picture 26, 27).
Round 22 :
1 SC in next 23 SCs, (SC DEC)*5 = total 28.
Round 23 :
(1 SC in next 5 SCs, SC DEC)*2, 1 SC in next 4 SCs, (SC DEC)*5 = total 21.
Round 24 :
(SC DEC)*10, 1 SC in next SC = total 11.
Info :
Using a yarn needle and the grey thread close the hole (Pictures 28, 29). Sew one side of the body with grey yarn and a yarn needle (Pictures 30, 31). Don't cut the thread. Stuff the bird (Picture 32). Sew the remaining open edges with the same thread (Picture 33). The body is ready (Pictures 34-36).
— Eyes :
Info :
Take one pair of 5 mm safety eyes and place them symmetrically three rounds above the red edge (Picture 13) and above the third red stitch (Picture 14). For reference, the distance between the eyes is 6 stitches (Picture 15).
Info :
With white lace yarn and a yarn needle make a stitch for each eye (Pictures 16-21).
— Wing (x2) :
Info :
The part is worked continuously. You should use a stitch marker. With grey yarn create a Magic Ring with 6 SCs.
Round 1 :
SC INC in next 6 SCs = total 12.
Round 2 :
1 SC in next 12 SCs = total 12.
Round 3 :
1 SC in next 12 SCs = total 12. Change to white yarn.
Info :
Changing the color of the yarn follow the instructions 'How to make an invisible color change in Single Crochet Stitch' on pages 4-7.
Round 4 :
1 SC in next 12 SCs = total 12.
Info :
Flatten the detail, leave a long tail for sewing and cut the yarn (Picture 37). To complete the wing, we need to make two feathers - long and short.
— Long Feather :
Info :
The part is worked continuously. You should use a stitch marker. With black yarn create a Magic Ring with 6 SCs.
Round 1 :
(1 SC in next SC, SC INC in next SC)*3 = total 9.
Round 2 :
1 SC in next 9 SCs = total 9.
Round 3 :
1 SC in next 9 SCs = total 9.
Round 4 :
1 SC in next 9 SCs = total 9. Change to grey yarn.
Round 5 :
1 SC in next 9 SCs = total 9.
Round 6 :
(1 SC in next SC, SC DEC)*3 = total 6.
Info :
The long feather is ready (Picture 38).
— Short Feather :
Info :
The part is worked continuously. You should use a stitch marker. With black yarn create a Magic Ring with 6 SCs.
Round 1 :
(1 SC in next SC, SC INC in next SC)*3 = total 9.
Round 2 :
1 SC in next 9 SCs = total 9. Change to grey yarn.
Round 3 :
1 SC in next 9 SCs = total 9.
Round 4 :
(1 SC in next SC, SC DEC)*3 = total 6.
Info :
The short feather is ready (Picture 39). Using a long white thread, sew two feathers to the main part, the short feather is up and the long feather is down (Pictures 40-42). Make the second wing in the same way (Picture 43). Sew the wings to the body symmetrically, short feathers up, long ones down (Pictures 44-47).
— Tail :
Info :
The tail consists of two long feathers.
Round 1 :
With black yarn create a Magic Ring with 6 SCs. (1 SC in next SC, SC INC in next SC)*3 = total 9.
Round 2 :
1 SC in next 9 SCs = total 9.
Round 3 :
1 SC in next 9 SCs = total 9.
Round 4 :
1 SC in next 9 SCs = total 9. Change to grey yarn.
Round 5 :
1 SC in next 9 SCs = total 9.
Round 6 :
(1 SC in next SC, SC DEC)*3 = total 6.
Info :
The long feather is ready. Repeat the same steps to make the second feather. Place the two feathers on the back of the bird (Picture 48) and sew them with grey yarn (Picture 49).
— Beak :
Info :
The part is worked continuously. You should use a stitch marker. With grey lace yarn and a 1.5 mm crochet hook create a Magic Ring with 10 SCs (Picture 50).
Round 1 :
1 SC in next 10 SCs = total 10.
Round 2 :
1 SC in next 10 SCs = total 10.
Round 3 :
1 SC in next 10 SCs = total 10.
Info :
The beak is ready. Leave a long tail for sewing (Picture 51). Place the beak between the eyes and sew it with grey thread (Pictures 52-56). Do not stuff the beak.
— Foot (x2) :
Step 1 :
Take brown yarn and crochet 4 Chs (Picture 57).
Step 2 :
Insert the hook into the second Ch from the hook (don't count a Ch with a hook in it) and crochet SL ST in next 3 Chs (Picture 58). One toe is ready.
Step 3 :
Make 4 Chs (Picture 59). Insert the hook into the second Ch from the hook and crochet SL ST in next 3 Chs (Picture 60). Two toes are ready.
Step 4 :
Make 4 Chs (Picture 61). Insert the hook into the second Ch from the hook and crochet SL ST in next 3 Chs. Crochet 1 SL ST into the starting Ch to create a foot (Pictures 62, 63). Three toes are ready.
Step 5 :
Make 4 Chs (Picture 64). Insert the hook into the second Ch from the hook and crochet SL ST in next 3 Chs (Picture 65). Cut the yarn and tie the ends. One foot is ready.
Step 6 :
Repeat the same steps for the second foot and sew them to the bottom of the bird only in the middle of the foot (Pictures 66-68).
— Final Assembly :
Info :
Sew wings, tail feathers, beak and feet to the body according to photos. Attach eyes as instructed and add white lace stitches for eye highlights. Weave in and secure all ends. Our bullfinch is ready to use as a toy, decoration or Christmas tree ornament.
This adorable bullfinch amigurumi is small, festive and full of character — perfect for gifts or tree ornaments. It uses simple rounds with a few clever color-change tricks to get a polished look. Enjoy making this little bird and give it as a handmade treasure to someone special. 🧶✨