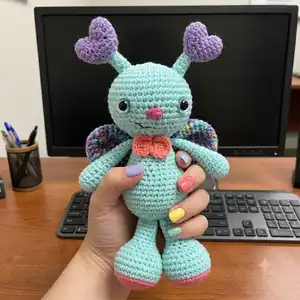
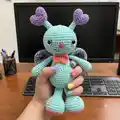
Make a sweet handmade butterfly amigurumi with this detailed crochet pattern. You will create a cuddly, whimsical companion with wings, heart-tipped antennae, and a cute bow. The pattern includes complete stitch-by-stitch rounds, materials, assembly photos, and helpful tips so you can finish a charming toy you will be proud to gift or display. Suitable for crocheters ready to expand their skills with shaping and assembly.
Progress Tracker
0% Complete
— Head :
Round 1 :
Make 6 sc into a magic ring (6)
Round 2 :
Increase in each st around (12)
Round 3 :
(sc, inc) x 6 (18)
Round 4 :
sc, inc, (2 sc, inc) x 5, sc (24)
Round 5 :
(3 sc, inc) x 6 (30)
Round 6 :
2 sc, inc, (4 sc, inc) x 5, 2 sc (36)
Round 7 :
(5 sc, inc) x 6 (42)
Round 8 :
3 sc, inc, (6 sc, inc) x 5, 3 sc (48)
Rounds 9-14 :
sc in each st around
Info :
Place eyes between rounds 12 and 13, leaving 10 holes between them. Place nose in between eyes between rounds 13 and 14. (On page 17, there are different options for noses if wanted). TIP! You may have to adjust the eye placement depending on yarn and hook size you use.
Round 15 :
3 sc, dec, (6 sc, dec) x 5, 3 sc (42)
Round 16 :
(5 sc, dec) x 6 (36)
Info :
Start stuffing the head
Round 17 :
2 sc, dec, (4 sc, dec) x 5, 2 sc (30)
Round 18 :
(3 sc, dec) x 6 (24)
Round 19 :
(2 sc, dec) x 6 (18)
Info :
F/O and leave a tail. (the tail does not need to be long)
— Body :
Round 1 :
Make 6 sc into a magic ring (6)
Round 2 :
Increase in each st around (12)
Round 3 :
(sc, inc) x 6 (18)
Round 4 :
(inc, 2 sc) x 6 (24)
Round 5 :
(3 sc, inc) x 6 (30)
Round 6 :
2 sc, inc, (4 sc, inc) x 5, 2 sc (36)
Rounds 7-13 :
sc in each st around
Round 14 :
(5 sc, dec) x 4, 8 sc (32)
Round 15 :
(4 sc, dec) x 3, 14 sc (29)
Round 16 :
(dec, 7 sc) x 2, dec, 9 sc (26)
Round 17 :
3 sc, dec, 16 sc, dec, 3 sc (24)
Info :
Start stuffing the body
Round 18 :
sc in each st around
Round 19 :
8 sc, dec, 4 sc, dec, 8 sc (22)
Round 20 :
sc in each st around
Round 21 :
dec, 8 sc, dec, 10 sc (20)
Round 22 :
sc in each st around
Round 23 :
(dec, 8 sc) x 2 (18)
Info :
F/O and leave a long tail for sewing
— Arms (Make 2) :
Round 1 :
Make 6 sc into a magic ring (6)
Round 2 :
Increase in each st around (12)
Rounds 3-6 :
Sc in each st around
Info :
Stop stuffing the arms
Round 7 :
5 sc, dec, 5 sc (11)
Round 8 :
Sc in each st around
Round 9 :
4 sc, dec, 3 sc, dec (9)
Round 10 :
Sc in each st around
Rounds 12-16 :
Sc in each st around
Info :
F/O and leave a long tail for sewing. !Tip! If you fold the arms in half and sc closed, you will have an easier time when sewing them.
— Bow :
Instruction 1 :
With Color C: Make a magic ring and ch 4
Instruction 2 :
Into the magic ring: make 3 tr, ch 4, sl st, ch 4, 3 tr, ch 4, sl st
Info :
F/O and leave an extra long tail for sewing
— Legs (Make 2) :
Setup :
Starting with Color C: Ch 6
Round 1 :
inc in 2nd chain from hook, 3 sc, 4 sc in the last chain, working on the opposite side of the chain; 3 sc, inc (14)
Info :
*For help with working on the opposite side of the chain refer to page 15*
Round 2 :
Inc3, 4 sc, inc3, 2 sc, inc3, 5 sc (20)
Round 3 :
inc x 3, 5 sc, inc3, 4 sc, inc3, 6 sc (27)
Round 4 :
sc, inc x 3, 8 sc, inc3, 6 sc, inc3, 7 sc (34)
Rounds 5-7 :
sc in each st around
Round 8 :
17 sc, dec x 6, 5 sc (28)
Info :
Stuff the legs as you work
Round 9 :
16 sc, dec x 4, 4 sc (24)
Round 10 :
15 sc, dec x 4 (20)
Round 11 :
12 sc, dec x 4 (16)
Info :
Stop stuffing the legs
Round 12 :
(dec, 6 sc) x 2 (14)
Round 13 :
sc in each st around
Round 14 :
(dec, 5 sc) x 2 (12)
Round 15 :
sc in each st around
Round 16 :
(dec, 4 sc) x 2 (10)
Round 17 :
sc in each st around
Info :
F/O and leave a long tail for sewing
— Antennaes (Make 2) :
Setup :
Starting with Color B: Heart Humps (Make 2)
Round 1 :
Make 6 sc into a magic ring (6)
Round 2 :
(sc, inc) x 3 (9)
Round 3 :
sc in each st around
Info :
Do not F/O the 2nd hump!
Round 4 :
Work a single crochet in the 2nd hump to connect the 1st hump and 2nd hump together. Work 8 more sc around, work 9 sc in the next hump (18)
Round 5 :
sc in each st around
Round 6 :
(4 sc, dec) x 3 (15)
Round 7 :
(3 sc, dec) x 3 (12)
Round 8 :
(2 sc, dec) x 3 (9)
Round 9 :
(sc, dec) x 3 (6)
Info :
Stop stuffing. Change to Color A
Rounds 10-13 :
sc in each st around
Info :
F/O and leave a long tail for sewing
— Wings (Make 2) :
Round 1 :
With Color D: Make 6 sc into a magic ring (6)
Round 2 :
Increase in each st around (12)
Round 3 :
(sc, inc) x 6 (18)
Round 4 :
(2 sc, inc) x 6 (24)
Round 5 :
(3 sc, inc) x 6 (30)
Rounds 6-7 :
sc in each st around
Round 8 :
(3 sc, dec) x 6 (24)
Rounds 9-10 :
sc in each st around
Info :
Do not stuff the wings
Round 11 :
(2 sc, dec) x 6 (18)
Rounds 12-13 :
sc in each st around
Round 14 :
(sc, dec) x 6 (12)
Round 15 :
sc in each st around
Info :
F/O and leave a long tail for sewing. !TIP! If you fold the wings in half and sc the opening closed, sewing will be much easier!
— Assembly :
Info :
Head and Body: 1. Cut a long strand of white embroidery thread. Insert the needle into the bottom of the head. Bring the needle up to a corner on the bottom of the eye. Insert the needle into a hole around to the top of the eye. Make sure you do not pull the thread too tightly. Repeat on the 2nd eye and weave in the tails.
Info :
Head and Body: 2. Sew the head to the body. You may need to add stuffing when you get to the last few stitches to close.
Info :
Antennae: 1. Optional: Cut a piece of pipe cleaner in half. Fold the half in half again and twist. Insert the pipe cleaner into the lower half of the antennae. Cut any excess off. You can choose to stuff them instead. 2. Pin the antennaes onto the head approximately between rounds 6 and 8. 3. Sew the antennaes onto the head.
Info :
Arms: 1. Pin the arms to the side of the body approximately between rounds 21 and 22. 2. Sew the arms onto the body in a forward facing angle.
Info :
Bow: 1. Pin the bow onto the front of the body. 2. Sew the bow onto the neck.
Info :
Legs: 1. Turn the body upside down with the front of the face facing away from you. Pin the legs onto the bottom of the body approximately between rounds 4 and 5. 2. Sew the legs onto the body.
Info :
Wings: 1. Pin the wings onto the back of the body. 2. Sew the wings onto the back of the body.
Info :
Mouth: 1. Thread your needle with a long strand of black thread. Insert the needle into a spot on the side of the head and bring the needle up to a hole on the side of the face. 2. Embroider a smile. 3. Weave in the ends.
— Rizzo the Ladybug - Head :
Round 1 :
Make 6 sc into a magic ring (6)
Round 2 :
Increase in each st around (12)
Round 3 :
(sc, inc) x 6 (18)
Round 4 :
sc, inc, (2 sc, inc) x 5, sc (24)
Round 5 :
(3 sc, inc) x 6 (30)
Round 6 :
2 sc, inc, (4 sc, inc) x 5, 2 sc (36)
Round 7 :
(5 sc, inc) x 6 (42)
Round 8 :
3 sc, inc, (6 sc, inc) x 5, 3 sc (48)
Rounds 9-13 :
sc in each st around
Round 14 :
(6 sc, dec) x 6 (42)
Info :
F/O and leave a long tail for sewing
— Rizzo - Cap :
Round 1 :
With Color B: Make 6 sc into a magic ring (6)
Round 2 :
Increase in each st around (12)
Round 3 :
(sc, inc) x 6 (18)
Round 4 :
sc, inc, (2 sc, inc) x 5, sc (24)
Round 5 :
(3 sc, inc) x 6 (30)
Round 6 :
2 sc, inc, (4 sc, inc) x 5, 2 sc (36)
Round 7 :
(5 sc, inc) x 6 (42)
Round 8 :
3 sc, inc, (6 sc, inc) x 5, 3 sc (48)
Rounds 9-13 :
sc in each st around
Info :
F/O and leave a long tail for sewing
— Rizzo - Body :
Round 1 :
With Color B: Make 6 sc into a magic ring (6)
Round 2 :
Increase in each st around (12)
Round 3 :
(sc, inc) x 6 (18)
Round 4 :
(inc, 2 sc) x 6 (24)
Round 5 :
(3 sc, inc) x 6 (30)
Round 6 :
2 sc, inc, (4 sc, inc) x 5, 2 sc (36)
Rounds 7-13 :
sc in each st around
Round 14 :
(5 sc, dec) x 4, 8 sc (32)
Round 15 :
(4 sc, dec) x 3, 14 sc (29)
Round 16 :
(dec, 7 sc) x 2, dec, 9 sc (26)
Round 17 :
3 sc, dec, 16 sc, dec, 3 sc (24)
Info :
Start stuffing the body
Round 18 :
sc in each st around
Round 19 :
8 sc, dec, 4 sc, dec, 8 sc (22)
Round 20 :
sc in each st around
Round 21 :
dec, 8 sc, dec, 10 sc (20)
Round 22 :
sc in each st around
Round 23 :
(dec, 8 sc) x 2 (18)
Info :
F/O and leave a long tail for sewing
— Rizzo - Arms (Make 2) :
Round 1 :
Make 6 sc into a magic ring (6)
Round 2 :
Increase in each st around (12)
Rounds 3-6 :
sc in each st around
Info :
Stop stuffing the arms
Round 7 :
5 sc, dec, 5 sc (11)
Round 8 :
sc in each st around
Round 9 :
4 sc, dec, 3 sc, dec (9)
Round 10 :
sc in each st around
Rounds 12-16 :
sc in each st around
Info :
F/O and leave a long tail for sewing
— Rizzo - Scarf :
Setup :
With Color C: Chain 41
Instruction 1 :
sl st in 2nd chain from hook, sc, hdc, 2 dc, hdc, 26 sc, hdc, 2 dc, hdc, sc, 2 sl st across the chain
Info :
F/O and leave a long tail for sewing
— Rizzo - Legs (Make 2) :
Setup :
Starting with Color C: Ch 6
Round 1 :
inc in 2nd chain from hook, 3 sc, 4 sc in the last chain, working on the opposite side of the chain; 3 sc, inc (14)
Info :
*For help with working on the opposite side of the chain refer to page 18*
Round 2 :
Inc3, 4 sc, inc3, 2 sc, inc3, 5 sc (20)
Round 3 :
inc x 3, 5 sc, inc3, 4 sc, inc3, 6 sc (27)
Round 4 :
sc, inc x 3, 8 sc, inc3, 6 sc, inc3, 7 sc (34)
Rounds 5-7 :
sc in each st around
Round 8 :
17 sc, dec x 6, 5 sc (28)
Info :
Stuff the legs as you work
Round 9 :
16 sc, dec x 4, 4 sc (24)
Round 10 :
15 sc, dec x 4 (20)
Round 11 :
12 sc, dec x 4 (16)
Info :
Stop stuffing the legs
Round 12 :
(dec, 6 sc) x 2 (14)
Round 13 :
sc in each st around
Round 14 :
(dec, 5 sc) x 2 (12)
Round 15 :
sc in each st around
Round 16 :
(dec, 4 sc) x 2 (10)
Round 17 :
sc in each st around
Info :
F/O and leave a long tail for sewing
You now have your finished Blue the Butterfly—what a delightful, whimsical companion full of personality! This pattern was created with love to help you make a sweet handmade friend that brightens any room. Share your finished creations and enjoy the satisfaction of a perfectly stitched toy. 🧶✨