🧢 Beautiful ✨ Detailed πŸ’ Adorable

Baby Barefoot Sandals Pattern

Baby Barefoot Sandals Pattern
4.4β˜… Rating
1-2 Hours Time Needed
1.4K Made This
βœ‚οΈ

Beginner Friendly Level

Perfect for those just starting their crochet journey, with clear instructions and simple techniques

⏱️

Quick Make

Complete in under 2 hoursβ€”lightning fast fun for instant gratification and quick gifts.

πŸ‘•

Casual Chic

Relaxed style with a modern twist, perfect for everyday wear while maintaining that handcrafted uniqueness.

About This Baby Barefoot Sandals Pattern

This pattern creates delicate baby barefoot sandals with a crocheted flower centre that measures approximately 1.5 inches for baby size and 2 inches for toddler size. You can make them in fingering weight, crochet thread, or worsted weight yarn depending on desired size. The pattern includes clear rounds for the sandal base, two straps, and a five-petal flower with finishing instructions.

Baby Barefoot Sandals Pattern crochet pattern - detailed view of completed project

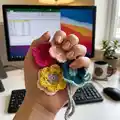
Perfect for baby photos, gifts, or summer events, these sandals are customizable with any color combination. The instructions are straightforward and include picture references for clarity.

Why You'll Love This Baby Barefoot Sandals Pattern

I absolutely love this pattern because it turns simple stitches into a sweet and wearable baby accessory that looks professionally made. I enjoy how quickly a pair comes togetherβ€”perfect for last-minute gifts or photo props. The small flower detail feels charming and allows me to play with color combinations every time. Sewing the straps and finishing the center with slip stitches is satisfying and makes each pair unique.

Baby Barefoot Sandals Pattern step 1 - construction progress Baby Barefoot Sandals Pattern step 2 - assembly progress Baby Barefoot Sandals Pattern step 3 - details and accessories Baby Barefoot Sandals Pattern step 4 - final assembly and finishing

Switch Things Up

I love customizing these sandals by changing yarn colors to suit outfits β€” try tonal pastels or a bright contrasting flower for a fun look.

I sometimes use metallic embroidery floss for the flower center to add a tiny sparkle that catches light in photos.

To make a chunkier pair, I use a thicker yarn and a larger hook; this creates a sturdier sandal perfect for toddlers who want more durability.

For a daintier look, I pick a lace-weight thread and a fine hook to create tiny floral sandals ideal for newborn photo props.

I often add a small button or bead at the flower center instead of heavy slip stitching for a decorative focal point.

If I want posability, I shorten the strap chain and sew strap ends under the sandal to create a fixed loop rather than a tie.

I like to embroider a tiny initial on the underside of the flower or glue a felt backing for added comfort against delicate skin.

Try alternating two colors for each petal to make a variegated flower effect without changing yarn mid-petal.

I sometimes convert the sandal into an anklet by shortening the base and making the straps longer so it sits above the foot like jewelry.

For photo sets, I make matching headbands or tiny bows using the same flower motif so the pieces coordinate beautifully.

Common Mistakes & How to Fix Them

βœ— Skipping the slip stitch join at the end of the round can alter shaping; always join to the top of the chain you started the round with to keep rounds even. βœ— Counting the chain as a stitch at the beginning of a round can cause extra stitches; remember that the chain does not count as a stitch unless specified in the pattern. βœ— Working petals into the wrong loops will misplace the flower texture; attach color B to an exposed front loop that was not worked in round 3 and follow the bracketed stitch groups exactly. βœ— Not filling the flower center enough can leave holes visible; slip stitch randomly across the center several times until you are happy with the coverage.

Baby Barefoot Sandals Pattern

Make adorable, lightweight baby barefoot sandals with a pretty crochet flower center that fits infants and toddlers. This pattern walks you through every round, strap, and the flower assembly so you can create charming, handmade sandals for gifts or photos. Use fingering or worsted yarn depending on the size and customize colors for a personal touch.

Beginner Friendly 1-2 Hours

Materials Needed for Baby Barefoot Sandals Pattern

β€” Main Fabric

  • 01
    Baby Size: Flower measures 1.5 inches across; use Fingering weight yarn, crochet thread, or embroidery floss for Color A (Sandal Base) and Color B (Flower)
  • 02
    Toddler Size: Flower measures 2 inches across; use Worsted Weight yarn for Color A and Color B
  • 03
    Featured yarns used: Knit Picks Comfy Fingering and Worsted weight yarns

β€” Tools Required

  • 01
    Crochet hook size C (2.75 mm) for Baby Size
  • 02
    Crochet hook size D (3.25 mm) for Toddler Size
  • 03
    Yarn or thread appropriate for chosen yarn weight (fingering, crochet thread, embroidery floss or worsted)
  • 04
    Yarn needle for weaving in ends and finishing
  • 05
    Scissors

Progress Tracker

0% Complete

β€” Materials :

Info :

Baby Size: 1.5 inches across flower Santal Base Color A - C or 2.75 mm hook Fingering weight yarn, crochet thread or embroidery Floss Flower Color B - Fingering weight yarn, crochet thread or embroidery Floss Toddler Size: 2 inches across flower D or 3.25 mm hook Color A and B are Worsted Weight yarn Use the same pattern for both sizes Featured Sandals are made with Knit Picks Comfy Fingering and Worsted weight yarns

β€” Abbreviations :

Info :

Ch Chain. Sc Single crochet. Dc Double Crochet. Sl st Slip stitch.

β€” Notes :

Infos :

1. Do not count the chain stitch as a stitch at the beginning of round. 2. When joining at end of round always join to the top of the chain stitch you began the round with. 3. I did not do an end of the round stitch count in this pattern because of all the chaining. I thought it might be confusing. All of our other patterns do have stitch count though. :o)

β€” How to read pattern :

Infos :

A. When you see parenthesis () in the pattern they are either referring to the numbers for the larger sizes or will be around notations such as (See Note A). Note A) When you see Brackets [] in the pattern that means that you work everything in them as a set or together. B) When you see Brackets [] in the pattern that means that you work everything in them as a set or together. C) When I have a number followed by a st, that stitch needs to be worked over that number of stitches. Example: "10 sc" that is 1 sc in each of the next 10 stitches.

β€” Gauge :

Info :

??????? I wasn't sure what to put here! We normally have gauge I just wasn't sure how to measure it for this pattern. :o)

β€” Sandal Base :

Round 1 :

With color A ch 4, join with slip stitch to 4th chain from hook to form a small ring. (See Picture A)

Round 2 :

Chain 1 (does not count as stitch) place 9 sc in ring. Join with slip stitch to the chain 1 from the beginning of round. (See Picture B) Do not turn.

Round 3 :

In this pattern when stitches are in brackets that means to put that group of stitches in the same stitch. This whole round will be worked in the back loops only of the previous round. Ch 3, starting in first stitch * [2 dc, chain 2, 2 dc], 1 dc in each of the next two stitches. Repeat from * 1 more time. [2 dc, chain 11, now working back down chain put 1 slip stitch in 10th chain from hook, ch 1, 2 dc back in same stitch], 1 dc in each of the next two stitches]. Join with slip stitch to the top of the chain 3 that you started the round with. Do not turn.

Item Name (P1) :

First strap: Slip stitch in next 3 stitches. This should bring you to the middle of the first chain 2 spot. (See pictures C and D) Ch 60, Bind off!

β€” Second Strap :

Item Name (P1) :

Second Strap: Attach yarn to next chain three spot with a single crochet. (See Picture D on first page) Ch 60, Bind off!

Info :

Note: I tied the ends of my straps in a knot to kind of finish them off. You don't have to, I just thought it made them look better. :o)

β€” Flower :

Item Name (P1) :

With color B attach yarn to any one of the exposed front loops that were not worked in round 3. (See Picture E). Starting in the stitch you attached to, remember to work all stitches between brackets in the same stitch. [Ch 2, 5 dc, ch 2, slip stitch back to same stitch], first petal made! :o) Now skip next stitch, *[slip stitch to next stitch, Ch 2, 5 dc, ch 2, slip stitch back to same stitch], skip next stitch, repeat from * all the way around and end round by joining with a slip stitch to base of first flower petal made. You should have 5 flower petals when complete. Bind off!

Info :

Around the center circle fill in the center by slip stitching across the flower's center in random stitches until the center is filled to your liking. :o) This may look ugly before it is finished but no worries! Just keep slip stitching away and fill in the holes until it is pretty. :o) (See Picture H) Bind Off!

Info :

Slip stitch across the center several times to fill in the center. Do this randomly like arrows show.

β€” Finishing :

Info :

Using color A again attach to center of flower by pulling a loop of yarn from back to front and top stitch by slip stitching all the way around the center of the flower at the base of the petals. (See arrows in picture G) After slip stitching around the center circle fill in the center by slip stitching across the flower's center in random stitches until the center is filled to your liking. Bind Off! Weave in Ends and you are Done!

Assembly Instructions

  • Attach the first strap by slip stitching in the next 3 stitches after round 3 so that the chain 60 ties sit in the middle of the first chain-2 spot; bind off and knot the ends if desired.
  • Attach the second strap by joining yarn to the next chain-3 spot with a single crochet and ch 60; bind off and knot the strap ends to finish.
  • Attach the flower to the sandal by using color B to work petals into the exposed front loops that were not worked in round 3 and join petals around the base, then bind off.
  • Finish the flower center by attaching color A to the center and slip stitching around and across the center randomly until it is filled and neat.
  • Weave in all ends securely with a yarn needle and trim any excess to complete the sandal.

Important Notes

  • πŸ’‘Do not count the chain stitch as a stitch at the beginning of a round; follow the pattern notes carefully for counting.
  • πŸ’‘When joining at the end of rounds always join to the top of the chain stitch you began the round with to keep your rounds even.
  • πŸ’‘Fold a corner of the sandal to the back to more easily access exposed front loops when making the flower petals for neater placement.
  • πŸ’‘Tying the ends of the straps in a small knot is optional but can give the straps a finished, tidy look.

These baby barefoot sandals make a sweet, handmade accessory perfect for photos, gifts, or summer days with tiny toes peeking through. Change up the colors and thread for endless variations and charming finishing touches. Handmade with love, quick to make, and oh-so-photogenic! 🧢🌸

You ask,

we answer.

FAQs

What size will the finished flower be?

The finished flower measures approximately 1.5 inches across for the baby size and about 2 inches across for the toddler size when using the recommended yarn and hook sizes.

Can I use different yarn weights for this pattern?

Yes, you can use different yarn weights; the pattern lists fingering weight or crochet thread for baby size and worsted weight for toddler size. Changing yarn weight will affect finished size so adjust hook size accordingly.

Do I need prior crochet experience for this pattern?

This pattern is rated Beginner Friendly and uses basic stitches like chain, single crochet, and double crochet, so basic crochet knowledge is recommended.

How long does this project typically take to complete?

Most crafters can finish a pair of sandals in under 2 hours depending on experience and customization, making it a quick and satisfying project.