🧢 Beautiful ✨ Detailed πŸ’ Adorable

Baby Alien Amigurumi Pattern

Baby Alien Amigurumi Pattern
4.3β˜… Rating
5-7 Hours Time Needed
4.1K Made This
βœ‚οΈ

Intermediate Level

Ideal for those with basic crochet experience, featuring slightly more advanced stitches and techniques to expand your skills.

⏱️

Weekend Treat

Takes 5-7 hours, making it an enjoyable project to finish over a couple of days.

🧸

Cute Companion

An adorable friend to cherish, handcrafted with love to bring comfort and joy for years to come.

About This Baby Alien Amigurumi Pattern

This pattern creates a small Baby Alien amigurumi inspired by Baby Yoda, standing approximately 5.5 inches (14 cm) tall. It uses worsted weight yarn and basic single crochet shaping to form the head, ears, body, arms and a separate cowl. The pattern includes clear round-by-round instructions and helpful finishing tips so you can assemble tidy facial features and a removable cowl.

Baby Alien Amigurumi Pattern crochet pattern - detailed view of completed project

Perfect for makers who enjoy small character toys, this design balances simple stitches with shaping details for a polished finished piece. Photos and notes in the pattern guide you through placement of eyes, ears, eyelids and the cowl.

Why You'll Love This Baby Alien Amigurumi Pattern

I absolutely love this pattern because it captures a lot of personality with very simple stitches and small shaping details. I enjoy how quickly this little amigurumi comes together β€” you can make a complete friend in a weekend. The ears and eyelids add so much character with minimal extra work, and the removable cowl is a fun finishing touch. It is a satisfying project to sew and personalize, and I find the finishing steps especially rewarding when the face comes together.

Baby Alien Amigurumi Pattern step 1 - construction progress Baby Alien Amigurumi Pattern step 2 - assembly progress Baby Alien Amigurumi Pattern step 3 - details and accessories Baby Alien Amigurumi Pattern step 4 - final assembly and finishing

Switch Things Up

I love how easy it is to customize this pattern to create different characters by changing yarn colors and eye sizes.

You can make a mini keychain version by using fingering weight yarn and a smaller hook for a tiny, portable pal.

I often swap the dark brown cowl for a brighter color to give the character a playful personality.

Want a fluffier look? Try a lighter worsted or a DK weight yarn with an appropriate hook for a softer texture.

I sometimes replace safety eyes with embroidered eyes for a fully child-safe toy or to achieve a different expression.

Try adding a little embroidered mouth or freckles to change the mood of the face and personalize each piece.

For posability, consider adding a thin wire armature inside the arms before stuffing so you can pose them.

I recommend trying different cuff heights on the arms by working fewer or more rounds of brown to change proportions.

You could embellish the cowl with a tiny button, embroidered trim, or a contrasting edge to make it unique.

When making sets, adjust hook size and yarn to create matching small, medium and large versions for a fun family of characters.

If you like a more realistic look, use matte safety eyes and subtle color changes for shading around the eyelids.

I also enjoy sewing tiny accessories like a satchel or a little scarf to expand the character's story and playability.

Common Mistakes & How to Fix Them

βœ— Skipping stitch counting during increases will change the head shape dramatically; count stitches at the end of each round to ensure you hit the correct stitch counts. βœ— Placing safety eyes too close or too far apart can ruin the expression; insert the 12mm eyes between rounds 13 and 14 with six stitches between them as instructed. βœ— Overstuffing the body will prevent the doll from sitting flat and distort proportions; stuff the body lightly so it holds shape but remains squishy to sit. βœ— Stuffing the ears will make them stiff and less ear-like; do not stuff the ears and leave one side to bend up more naturally before sewing in place. βœ— Not securing color changes neatly can create gaps; weave in the ends at the color change and fasten off leaving a tail for neat sewing and finishing. βœ— Failing to pin parts before sewing can cause asymmetry; pin or hold pieces in place and check positioning before securing with stitches.

Baby Alien Amigurumi Pattern

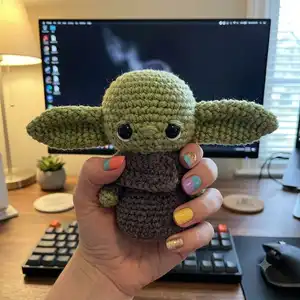
Make an irresistible Baby Alien inspired by Baby Yoda with this detailed crochet pattern. You will learn simple shaping, ear and eyelid assembly, and how to sew a cozy cowl. The pattern includes step-by-step rounds, materials, abbreviations and helpful assembly notes so you can recreate this 5.5-inch (14 cm) cutie with confidence.

Intermediate 5-7 Hours

Materials Needed for Baby Alien Amigurumi Pattern

β€” Main Fabric

  • 01
    Medium/worsted weight yarn (#4) - Green (Loops & Threads Impeccable in 'Fern')
  • 02
    Medium/worsted weight yarn (#4) - Dark brown (Patons Classic Wool Worsted Yarn in 'Natural')
  • 03
    One strand of white yarn for eye highlights

β€” Tools Required

  • 01
    Crochet hook size 3.75mm
  • 02
    Yarn needle
  • 03
    One pair of 12 mm safety eyes
  • 04
    Polyester fiber fill stuffing

Progress Tracker

0% Complete

Infos :

Welcome! I hope you will enjoy the creation of this little alien inspired by baby Yoda! Please contact the designer at hello@theresascrochetshop.com with any questions. Final measurement for the finished Yoda will be 5.5 inches (14 cm) tall.

Infos :

Materials You Will Need: Crochet hook size: 3.75mm. Medium/worsted weight yarn: green (I used Loops & Threads Impeccable in 'Fern') and dark brown (I used Patons Classic Wool Worsted Yarn in 'Natural'), plus 1 strand of white for the eyes. Yarn needle. One pair of 12 mm safety eyes. Polyester fiber fill stuffing.

Infos :

Abbreviations: ch(s) – chain(s). sc – single crochet. sts – stitches. dec – sc decrease st*. BLO – back loops only.

Info :

*Single crochet decrease stitch explanation: Insert the hook into the next stitch and yarn over. Pull a loop through so that there are now 2 loops on the hook. Insert the hook into the next stitch and yarn over. Pull a loop through so that there are now 3 loops on the hook. Yarn over again and pull the loop of yarn through all 3 loops on the hook.

Infos :

Note #1: Except for the cowl, all the parts of baby Yoda are crocheted in continuous rounds (you will not join each round). Note #2: In my patterns, I begin each circle with 'ch 2, 6 sc in first ch.' Another way of beginning is to start with a magic circle. If you are more familiar with this method, just do 6 sc into your magic circle.

β€” Head :

Round 1 :

Ch 2, 6 sc in first ch. (6 sts)

Round 2 :

2 sc in each st around. (12 sts)

Round 3 :

(Sc 1, 2 sc in next st), 6 times. (18 sts)

Round 4 :

(Sc 2, 2 sc in next st), 6 times. (24 sts)

Round 5 :

(Sc 3, 2 sc in next st), 6 times. (30 sts)

Round 6 :

(Sc 4, 2 sc in next st), 6 times. (36 sts)

Round 7-10 :

Sc 36. (4 total rounds)

Round 11 :

(Sc 5, 2 sc in next st), 6 times. (42 sts)

Round 12 :

(Sc 20, 2 sc in next st), 2 times. (44 sts)

Round 13 :

(Sc 20, dec 1), 2 times. (42 sts)

Round 14 :

(Sc 5, dec 1), 6 times. (36 sts)

Round 15 :

(Sc 4, dec 1), 6 times. (30 sts)

Round 16 :

(Sc 3, dec 1), 6 times. (24 sts)

Round 17 :

(Sc 2, dec 1), 6 times. (18 sts)

Round 18 :

(Sc 4, dec 1), 3 times. (15 sts)

Info :

Fasten off, leaving a yarn tail for sewing on the nose. Begin stuffing the head. Then place the 12mm eyes between R13 and 14 on the head, with 6 sts between, and firmly press the washers onto the backs of the eyes.

Info :

With the leftover yarn tail from the head, sew a little nose between the eyes as pictured in the pattern photos.

β€” Ears :

Info :

Make 2 ears. With green yarn.

Round 1 :

Ch 2, 4 sc in first ch. (4 sts)

Round 2 :

Sc 1, 2 sc in next 2 sts, sc 1. (6 sts)

Round 3 :

Sc 2, 2 sc in next 2 sts, sc 2. (8 sts)

Round 4 :

(Sc 1, 2 sc in next st), 4 times. (12 sts)

Round 5 :

(Sc 3, 2 sc in next st), 3 times. (15 sts)

Round 6-13 :

Sc 15. (8 total rounds)

Info :

Fasten off, leaving a yarn tail for sewing. Do not stuff the ears. Your ear will have one side that bends up more than the other. This side should be at the bottom. The top of the ear will be more straight across. Bend down the tops of the ears to make them more ear-like, and sew them to the head in this bent position as pictured.

Info :

Sew the ears to Yoda's head 8-9 rounds down from the beginning circle of the head and 4-5 sts back from the eyes on either side. Wait to trim the excess yarn tail from sewing on the ears to make Yoda's eyelids.

β€” Eyelids :

Info :

Weave the excess yarn tail from sewing on an ear through the inside of the head, and sew 2 sts right above each eye as pictured. Then secure the yarn with a knot to the inside of Yoda's head.

Info :

Cut a strand of white yarn, insert it through the opening at the bottom of Yoda's head and out just below the eyes. Sew 1 white st below each eye as pictured. Secure with a knot to either the other end of the white strand or to the inside of the head.

β€” Body :

Round 1 :

Ch 2, 6 sc in first ch. (6 sts)

Round 2 :

2 sc in each st around. (12 sts)

Round 3 :

(Sc 1, 2 sc in next st), 6 times. (18 sts)

Round 4 :

(Sc 2, 2 sc in next st), 6 times. (24 sts)

Round 5 :

(Sc 3, 2 sc in next st), 6 times. (30 sts)

Round 6 :

(Sc 4, 2 sc in next st), 6 times. (36 sts)

Round 7 :

(Sc 5, 2 sc in next st), 6 times. (42 sts)

Round 8 :

Sc in BLO of the previous round. (42 sts)

Round 9 :

(Sc 19, dec 1), 2 times. (40 sts)

Round 10 :

Sc 40. (40 sts)

Round 11 :

(Sc 18, dec 1), 2 times. (38 sts)

Round 12 :

Sc 38. (38 sts)

Round 13 :

(Sc 17, dec 1), 2 times. (36 sts)

Round 14 :

Sc 36. (36 sts)

Round 15 :

(Sc 7, dec 1), 4 times. (32 sts)

Round 16 :

Sc 32. (32 sts)

Round 17 :

(Sc 6, dec 1), 4 times. (28 sts)

Round 18 :

Sc 28. (28 sts)

Round 19 :

(Sc 5, dec 1), 4 times. (24 sts)

Round 20 :

(Sc 6, dec 1), 3 times. (21 sts)

Round 21 :

(Sc 5, dec 1), 3 times. (18 sts)

Round 22 :

(Sc 4, dec 1), 3 times. (15 sts)

Info :

Fasten off, leaving a yarn tail for sewing. Stuff the body, but not too firmly. You want the body to hold its shape but still be squishy and sit flat on the bottom (enabling it to stand on its own). Sew the body to the head.

β€” Arms :

Info :

Make 2 arms. With green yarn.

Round 1 :

Ch 2, 6 sc in first ch. (6 sts)

Round 2 :

2 sc in first st, sc 5. (7 sts)

Round 3 :

Dec 1, sc 5. (6 sts)

Info :

Switch to dark brown yarn.

Round 4-7 :

Sc 6. (4 total rounds)

Info :

Now, before fastening off, chain 1 and then single crochet through both layers across the top of the arm to close it (2 sc sts across, as pictured). Fasten off, leaving a yarn tail for sewing. Weave in the ends from the color change.

Info :

Then attach the dark brown yarn to your crochet hook and insert it into the arm right at the color change. Sc 6 around the arm to form a cuff. Fasten off, and weave in the ends.

Info :

Sew the arms to the sides of the body, right below the head, as pictured in the pattern photos.

β€” Cowl :

Info :

Note: this cowl is crocheted in rows. With dark brown yarn.

Round 1 :

Ch 42, then starting in the 2nd ch from your hook, sc 41 across. (41 sts)

Round 2 :

Ch 1, sc 41. (41 sts)

Round 3-6 :

Repeat R2. (4 total rounds)

Info :

Fasten off, leaving a yarn tail for sewing. To attach the cowl, wrap it around Yoda's neck so that one end overlaps the other end by several stitches. Then with the yarn tail, sew the cowl together at the spot where the top end overlaps the bottom one. Sew from the top, inserting your yarn needle down through the top of the cowl and into the bottom end, and then up through the top piece.

Info :

Then position the cowl where you like it on Yoda and do a stitch in the front to attach it to Yoda's body, and then weave your yarn needle through the body and do a stitch to attach it to the back of the body as well. Secure the yarn tail to the body with a knot, cut, and weave in the end.

Info :

And there you go, you are done! Thank you so much for joining me in making a cute Yoda-inspired baby alien! Enjoy!

Assembly Instructions

  • Place the 12mm safety eyes between rounds 13 and 14 of the head with 6 stitches between them, then firmly press the washers onto the backs of the eyes.
  • Using the leftover yarn tail from the head, sew a small nose between the eyes and secure the yarn tail inside the head.
  • Sew the ears to the head 8-9 rounds down from the beginning circle and 4-5 stitches back from the eyes on either side, bending the tops to create a natural ear shape before securing.
  • Sew the arms to the sides of the body right below the head, matching placement on both sides and anchoring firmly so they sit naturally.
  • Attach the body to the head by sewing through the opening on the head and the top of the body, ensuring the body sits flat to enable the figure to stand.
  • Wrap the cowl around the neck so one end overlaps the other by several stitches, then sew the overlapped ends together and tack the cowl to the front and back of the body to secure.

Important Notes

  • πŸ’‘Work all parts in continuous rounds (do not join rounds) except for the cowl which is worked in rows.
  • πŸ’‘Do not stuff the ears; leave them unstuffed so they can be bent and shaped naturally when sewn to the head.
  • πŸ’‘Stuff the body lightly so it keeps shape but remains squishy enough to sit flat and stable on a surface.
  • πŸ’‘Place safety eyes carefully and double-check spacing before securing washers to avoid repositioning after fastening.
  • πŸ’‘Weave in ends from color changes and leave yarn tails for sewing to make assembly and finishing tidy.

This adorable Baby Alien pattern was designed to bring a tiny, characterful friend to life with easy shaping and a removable cowl. The pattern is perfect for gifting or for keeping as a sweet desk companion. Enjoy stitching the expressive ears and sleepy eyelids that give this little amigurumi so much personality. 🧢✨

You ask,

we answer.

FAQs

What size will the finished piece be?

The finished amigurumi measures approximately 5.5 inches (14 cm) tall when using the recommended worsted weight yarn and a 3.75mm hook.

Can I use different yarn weights for this pattern?

Yes, you can use different yarn weights but the final size and proportions will change; choose an appropriate hook for your yarn and expect a larger or smaller finished piece.

Do I need prior crochet experience for this pattern?

This pattern is rated intermediate, so basic knowledge of single crochet, increases, decreases and continuous rounds is recommended for best results.

How long does this project typically take to complete?

Most crocheters complete this project in 5-7 hours, though time may vary based on experience, speed and assembly detail.