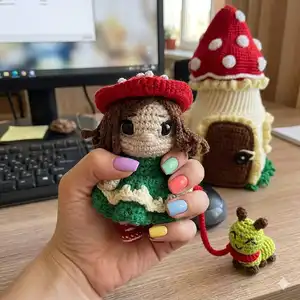
Create a charming mushroom house and matching doll with this detailed Amanita House amigurumi pattern. You will crochet a sturdy mushroom home with windows, a door, a removable roof with spots, and a little doll to live beside it. The pattern includes full step-by-step stitch instructions, materials, and assembly notes so you can recreate every detail. Perfect as a handmade gift or decorative piece to brighten a shelf.
Progress Tracker
0% Complete
— Base (walls) :
Info :
Crochet 1 piece in white and 1 piece in lemon color. Work in rows.
Round 1 :
Chain 41, From the second chain on the hook: 40sc, turn (40)
Round 2 :
Ch1, 25sc, 15sl st, turn (40)
Round 3 :
Ch1, 40sc, turn (40)
Round 4 :
Ch1, 25sc, 15sl st, turn (40)
Round 5 :
Ch1, 40sc, turn (40)
Round 6 :
Ch1, 25sc, 15sl st, turn (40)
Round 7 :
Ch1, 40sc, turn (40)
Round 8 :
Ch1, 25sc, 15sl st, turn (40)
Round 9 :
Ch1, 40sc, turn (40)
Round 10 :
Ch1, 25sc, 15sl st, turn (40)
Round 11 :
Ch1, 40sc, turn (40)
Round 12 :
Ch1, 25sc, 15sl st, turn (40)
Round 13 :
Ch1, 40sc, turn (40)
Round 14 :
Ch1, 25sc, 15sl st, turn (40)
Round 15 :
Ch1, 40sc, turn (40)
Round 16 :
Ch1, 25sc, 15sl st, turn (40)
Round 17 :
Ch1, 40sc, turn (40)
Round 18 :
Ch1, 25sc, 15sl st, turn (40)
Round 19 :
Ch1, 40sc, turn (40)
Round 20 :
Next, skip stitches for the window. Before skipping, make ch1 and push the part inside the loop (to get a knot). Fix all yarn tails at the end. Ch1, 10sc, skip 10sc, 5sc, 15sl st, turn
Round 21 :
Ch1, 20sc, skip 10sc, 10sc, turn
Round 22 :
Ch1,10sc, skip 10sc, 5sc, 15sl st, turn
Round 23 :
Ch1, 20sc, skip 10sc , 10sc, turn
Round 24 :
Ch1,10sc, skip 10sc , 5sc, 15sl st, turn
Round 25 :
Ch1, 20sc, skip 10sc , 10sc, turn
Round 26 :
Ch1,10sc, skip 10sc , 5sc, 15sl st, turn
Round 27 :
Ch1, 20sc, skip 10sc , 10sc, turn
Round 28 :
Ch1,10sc, skip 10sc , 5sc, 15sl st, turn
Round 29 :
Ch1, 20sc, skip 10sc , 10sc, turn
Round 30 :
Ch1, 10sc, ch10, 5sc, 15sl st, turn (40)
Round 31 :
Ch1, 20sc, 10sc on the chain , 10sc, turn (40)
Round 32 :
Ch1, 25sc, 15sl st, turn (40)
Round 33 :
Ch1, 40sc, turn (40)
Round 34 :
Ch1, 25sc, 15sl st, turn (40)
Round 35 :
Ch1, 40sc, turn (40)
Round 36 :
Ch1, 25sc, 15sl st, turn (40)
Round 37 :
Ch1, 40sc, turn (40)
Round 38 :
Ch1, 25sc, 15sl st, turn (40)
Round 39 :
Ch1, 40sc, turn (40)
Round 40 :
Ch1, 25sc, 15sl st, turn (40)
Round 41 :
Ch1, 40sc, turn (40)
Round 42 :
Ch1, 25sc, 15sl st, turn (40)
Round 43 :
Ch1, 40sc, turn (40)
Round 44 :
Ch1, 25sc, 15sl st, turn (40)
Round 45 :
Leave a hole for the door. Ch1, 20sc, turn (20)
Round 46 :
Ch1, 5sc, 15sl st, turn (20)
Round 47 :
Ch1, 20sc, turn (20)
Round 48 :
Ch1, 5sc, 15sl st, turn (20)
Round 49 :
Ch1, 20sc, turn (20)
Round 50 :
Ch1, 5sc, 15sl st, turn (20)
Round 51 :
Ch1, 20sc, turn (20)
Round 52 :
Ch1, 5sc, 15sl st, turn (20)
Round 53 :
Ch1, 20sc, turn (20)
Round 54 :
Ch1, 5sc, 15sl st, turn (20)
Round 55 :
Ch1, 20sc, turn (20)
Round 56 :
Ch1, 5sc, 15sl st, turn (20)
Round 57 :
Ch1, 20sc, ch21 (40)
Round 58 :
From the second chain on the hook: 25sc, 15sl st, turn (40)
Round 59 :
Ch1, 40sc, turn (40)
Round 60 :
Ch1, 25sc, 15sl st, turn (40)
Round 61 :
Ch1, 40sc, turn (40)
Round 62 :
Ch1, 25sc, 15sl st, turn (40)
Round 63 :
Ch1, 40sc, turn (40)
Round 64 :
Ch1, 25sc, 15sl st, turn (40)
Round 65 :
Ch1, 40sc, turn (40)
Round 66 :
Ch1, 25sc, 15sl st, turn (40)
Round 67 :
Ch1, 40sc, turn (40)
Round 68 :
Ch1, 25sc, 15sl st, turn (40)
Round 69 :
Ch1, 40sc, turn (40)
Round 70 :
Ch1, 25sc, 15sl st, turn (40)
Round 71 :
skip stitches for the window. Before skipping, make ch1 and push the part inside the loop (to get a knot). Fix all yarn tails at the end . Ch1, 20sc, skip 10 sc, 10sc, turn
Round 72 :
Ch1, 10sc, skip 10 sc, 5sc, 15sl st, turn
Round 73 :
Ch1, 20sc, skip 10sc, 10sc, turn
Round 74 :
Ch1, 10sc, skip 10 sc, 5sc, 15sl st, turn
Round 75 :
Ch1, 20sc, skip 10sc, 10sc, turn
Round 76 :
Ch1, 10sc, skip 10sc, 5sc, 15sl st, turn
Round 77 :
Ch1, 20sc, skip 10sc, 10sc, turn
Round 78 :
Ch1, 10sc, skip 10sc, 5sc, 15sl st, turn
Round 79 :
Ch1, 20sc, skip 10sc, 10sc, turn
Round 80 :
Ch1, 10sc, skip 10sc, 5sc, 15sl st, turn
Round 81 :
Ch1, 20sc, ch10, 10sc, turn
Round 82 :
Ch1, 10sc, 10sc on the chain, 5sc, 15sl st, turn (40)
Round 83 :
Ch1, 20sc, 40sc, turn (40)
Round 84 :
Ch1, 25sc, 15sl st, turn (40)
Round 85 :
Ch1, 40sc, turn (40)
Round 86 :
Ch1, 25sc, 15sl st, turn (40)
Round 87 :
Ch1, 40sc, turn (40)
Round 88 :
Ch1, 25sc, 15sl st, turn (40)
Round 89 :
Ch1, 40sc, turn (40)
Round 90 :
Ch1, 25sc, 15sl st, turn (40)
Round 91 :
Ch1, 40sc, turn (40)
Round 92 :
Ch1, 25sc, 15sl st, turn (40)
Round 93 :
Ch1, 40sc, turn (40)
Round 94 :
Ch1, 25sc, 15sl st, turn (40)
Round 95 :
Ch1, 40sc, turn (40)
Round 96 :
Ch1, 25sc, 15sl st, turn (40)
Round 97 :
Ch1, 40sc, turn (40)
Info :
Fold in half and make 40sl st through both sides. Cut the yarn.
Info :
Connect the walls. Cut threads on the windows and fix them.
Info :
Cut a rectangle out of plastic according to the size of the resulting parts. Connect the pieces on the bottom. Insert the lemon-colored piece inside the white part. Attach the white yarn to the corner of the door and crochet: 85sc, insert the plastic between the pieces, do not cut the yarn
Info :
Next, crochet 58sc along the doorway. Fasten off. Cut holes for the windows in the plastic. Crochet the windows around, connecting the pieces (white and lemon). Attach the white yarn to the window and crochet 44sc. Fasten off. Connect the pieces at the top. Attach white yarn and crochet 84sc. Fasten off.
— Bottom :
Round 1 :
6sc in MR Place row marker here.
Round 3 :
(1sc, inc) *6 (18)
Round 4 :
(2sc, inc) *6 (24)
Round 5 :
(3sc, inc) *6 (30)
Round 6 :
(4sc, inc) *6 (36)
Round 7 :
(5sc, inc) *6 (42)
Round 8 :
(6sc, inc) *6 (48)
Round 9 :
(7sc, inc) *6 (54)
Round 10 :
(8sc, inc) *6 (60)
Round 11 :
(9sc, inc) *6 (66)
Round 12 :
(10sc, inc) *6 (72)
Round 13 :
(11sc, inc) *6 (78)
Round 14 :
(12sc, inc) *6 (84)
Round 15 :
(13sc, inc) *6 (90)
Round 16 :
(14sc, inc) *6 (96)
Round 17 :
(15sc, inc) *6 (102)
Info :
Continue crocheting from one brown piece. Cut a circle from cardboard and put it between the parts. Apply the brown part and crochet with brown yarn in a circle: 102sc. Do not cut the yarn.
— Connect the base to the bottom :
Round 1 :
Ch1, 86sc (through both pieces), 15sc along the free edge of the bottom (without turning)
Round 2 :
Change color to green and crochet 86 loop stitches. Fasten off.
— Decoration :
Info :
Attach the lemon yarn to the top of the house (see photo) Crochet 'frills' : ch2, 86dc-inc, sl st (172). Cut the yarn.
— Windows :
Round 1 :
44sl st, turn (44)
Round 2 :
ch2, 44dc-inc, sl st (88). Fasten off, cut the yarn, weave in the ends.
— Door frame :
Round 1 :
Move about 4 mm from the door and crochet the doorjamb around with lemon yarn: 58sl st, turn (58)
Round 2 :
ch1, 58dc-inc (116). Fasten off, cut the yarn, weave in the ends.
Info :
Embroider window frame: make 3-4 stitches with a brown thread across the window, wind them as rococo stitches. Embroider along the window.
— Door :
Info :
Crochet 2 pieces in brown color. Work in rows.
Round 1 :
Chain 17. Start from the second chain on the hook: 16sc, turn (16)
Round 2-15 :
Ch1, 16sc, turn (14 rows)
Round 16 :
ch1, dec, 12sc, dec, turn (14)
Round 17-18 :
Ch1, 14sc, turn (2 rows)
Round 19 :
ch1, dec, 10sc, dec, turn (12)
Round 20-21 :
Ch1, 12sc, turn (2 rows)
Info :
Continue crocheting from one beige piece. Cut a rectangle from the cardboard and put it between the pieces. Apply the beige part and crochet with beige yarn: 20sc through both pieces, inc in the corner, 14sc through both pieces, inc in the corner, 32sc through both pieces, inc in the corner, 26sc through both pieces, inc in the corner, 10sc, inc in the corner, 28sc. Fasten off, cut the yarn, weave in the ends.
Info :
Sew the door from the inner side as shown in the photo.
— Roof :
Round 1 :
With red yarn. 6sc in MR Place row marker here.
Round 4 :
(1sc, inc) *6 (18)
Round 6 :
(2sc, inc) *6 (24)
Round 8 :
(3sc, inc) *6 (30)
Round 10 :
(4sc, inc) *6 (36)
Round 12 :
(5sc, inc) *6 (42)
Round 14 :
(6sc, inc) *6 (48)
Round 15 :
(7sc, inc) *6 (54)
Round 17 :
(8sc, inc) *6 (60)
Round 18 :
(9sc, inc) *6 (66)
Round 20 :
(10sc, inc) *6 (72)
Round 21 :
(11sc, inc) *6 (78)
Round 23 :
(12sc, inc) *6 (84)
Round 24 :
(13sc, inc) *6 (90)
Round 26 :
(14sc, inc) *6 (96)
Round 27-30 :
96sc (4 rounds)
Round 31 :
BLO (14sc, dec) *6 (90)
Round 32 :
(13sc, dec) *6 (84). Leave long tail for sewing.
— Spots (12 pieces) :
Round 1 :
With white yarn 6sc in MR. Place row marker here.
Round 2 :
6inc (12). Leave long tail for sewing.
Info :
Attach the spots to the roof with pins in chess order at the same distance. 1st row - 6 pieces. 2nd and 3rd rows - 3 pieces each. Sew the spots to the roof.
Info :
Return to round 31 of the roof and work with white yarn through front loops: 96 reverse sc. Cut the yarn and fasten off.
Info :
Sew the cap to the top of the house.
This Amanita House pattern brings a tiny enchanted home to life with a removable spotted roof and cozy interior details. 🧶
Follow the step-by-step sections to crochet walls, windows, door, bottom and roof, and to assemble with cardboard and plastic reinforcements for a sturdy finish. ✨
Perfect as a special handmade gift or shelf decoration that delights both makers and recipients. 🍄