About This Woof the Dog Amigurumi Pattern
This pattern creates a stretchy dog toy with a square body, long elastic limbs and cute embroidered features. It combines small amigurumi pieces with flat crocheted panels for a playful, tactile result. You will crochet limbs, ears, eyes, and two flat body panels before joining and finishing the toy.
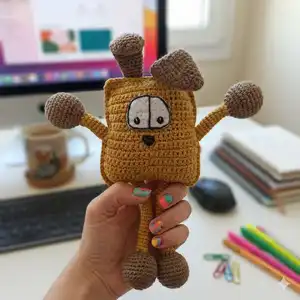
Techniques include single crochet in rounds and rows, simple increases and decreases, and sewing pieces together. The finished toy measures about 30 cm from ears to feet using the recommended materials.
Why You'll Love This Woof the Dog Amigurumi Pattern
I absolutely love this pattern because it combines simple shaping with a fun stretchy construction that surprises everyone who plays with it. I enjoy how the long limbs add personality and movement, making each finished toy expressive and playful. Sewing the flat body panels together gives a satisfying assembly step where the character comes to life. The design is versatile, so I often experiment with colors and facial expressions to create unique friends.
Switch Things Up
I love how easy it is to change the character by switching yarn colors; try pastel tones for a softer look or high-contrast colors for a bolder toy.
I sometimes use a thicker yarn and a larger hook to make a chunky, more huggable version of this dog.
For a mini keychain version, pick a thinner yarn and a smaller hook and reduce the body rows proportionally.
I like adding wire inside the limbs to make them poseable; just cover the wire with tape before inserting to protect the yarn.
Try embroidery variations for the face — changing eye shape or mouth expression gives each toy a unique personality.
I often replace safety eyes with embroidered eyes for toys intended for very young children to make them safer.
Add tiny crocheted accessories like a scarf or hat to create seasonal or themed variations.
Experiment with felt for the eyes contour instead of crocheting the white piece; glue or sew it in place for a different texture.
I recommend making a set in complementary colors to create a family of characters — siblings or collectible friends.
Finally, try surface crochet or a contrasting slip-stitch border around the body panel to add definition and a custom finish.
Common Mistakes & How to Fix Them
✗ Skipping stitch markers at the start of rounds can cause you to lose track of the beginning; mark the first stitch consistently to keep your rounds aligned.
✗ Not stuffing the brown foot head tightly will make the limb tips collapse and look uneven; stuff the spherical foot portion firmly before continuing to the leg shaft.
✗ Changing colors without securing tails can make your work unravel later; weave in color change tails neatly or carry yarn inside if possible.
✗ Forgetting to insert the arm-leg piece between the correct body rows will shift placement; follow the instruction to place the arm-leg between rows 11 and 15 to ensure symmetry.
✗ Counting rows only at the end of long straight sections risks mistakes; count and check at the end of each instructed range (for example after rows 14-65) to stay accurate.


