About This Wolf Hand Puppet Amigurumi Pattern
This pattern creates a 27 cm (10") wolf hand puppet worked mostly in continuous rounds with super-bulky plush yarn. It includes step-by-step instructions for the head, muzzle, nose, ears, arms and body, plus tips for eye indentation and assembly. The puppet is soft, expressive and ideal for storytelling or gifts.
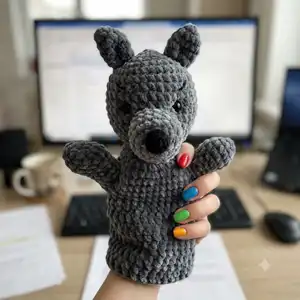
Photos accompany many stages to help you match shaping and placement. The pattern uses simple increases, decreases and joining techniques suitable for intermediate crocheters.
Why You'll Love This Wolf Hand Puppet Amigurumi Pattern
I absolutely love this pattern because it turns soft, plush yarn into a character full of personality. I enjoy how quickly the pieces come together and how satisfying the shaping is when you place the muzzle and eyes. I designed the puppet to be both tactile and expressive so it delights children and adults alike. Working with super-bulky yarn gives such a cozy, huggable finish that I always find irresistible.
Switch Things Up
I love how easy it is to customize this wolf—change the plush yarn color to make foxes, bears or bunnies using the same shaping.
You can adjust size by swapping yarn weight and hook: bulky yarn with a larger hook makes a chunkier puppet, while thinner yarn yields a mini version.
I often add embroidered mouths or felt accessories to give each puppet a unique personality and story.
Try using safety eyes for a polished look or embroider small eyes for a fully child-safe toy.
I like to add tiny crocheted scarves or hats to match seasons or holidays—small accessories make the puppet gift-ready.
For a poseable version, consider inserting thin wire into the arms so you can bend them into gestures for storytelling.
I sometimes make a whole forest set—wolf, fox and bear—in different colors so children can play with a cast of characters.
Try contrasting yarn for the muzzle and inner ears to create more visual interest and character definition.
If you prefer a flatter puppet for little hands, reduce the stuffing slightly in the head and muzzle while maintaining secure seams.
I recommend experimenting with eyebrow shapes and placement to change expressions from friendly to surprised or mischievous.
Common Mistakes & How to Fix Them
✗ Forgetting to place eyes at the correct rounds causes off-center placement; fix this by positioning eyes between rounds 10 and 11 from the head's top and spacing them 7 single crochet stitches apart.
✗ Overstuffing the head and muzzle will distort the shape and make sewing difficult; stuff gradually, use small amounts of fiber filler, and shape as you go to keep the proportions correct.
✗ Skipping stitch counts in increase or decrease rounds leads to uneven shaping; count after each round and mark the start of rounds with a stitch marker to avoid mistakes.
✗ Not leaving long tails for sewing makes assembly harder; always leave the recommended 20 cm or more tails on muzzle, nose and ears to give enough thread for secure sewing.
✗ Crocheting too tightly with plush yarn can close stitches and make sewing parts together difficult; use the recommended hook sizes (4.5 mm for plush yarn, 2.0 mm for cotton details) and maintain relaxed tension.


