๐Ÿงถ Beautiful โœจ Detailed ๐Ÿ’ Adorable

Wallace and Wanda Whales Amigurumi Pattern

Wallace and Wanda Whales Amigurumi Pattern
4.8โ˜… Rating
5-7 Hours Time Needed
2.0K Made This
โœ‚๏ธ

Intermediate Level

Ideal for those with basic crochet experience, featuring slightly more advanced stitches and techniques to expand your skills.

โฑ๏ธ

Weekend Treat

Takes 5-7 hours, making it an enjoyable project to finish over a couple of days.

๐Ÿงธ

Cute Companion

An adorable friend to cherish, handcrafted with love to bring comfort and joy for years to come.

About This Wallace and Wanda Whales Amigurumi Pattern

This pattern teaches you how to crochet Wallace and Wanda, two small whale amigurumi with a rounded body and removable fins. It includes the option to add a fair isle color-dot scheme for Wallace and plain color for Wanda. The PDF contains full round-by-round instructions, finishing steps, and assembly tips to ensure a neat final toy.

Wallace and Wanda Whales Amigurumi Pattern crochet pattern - detailed view of completed project

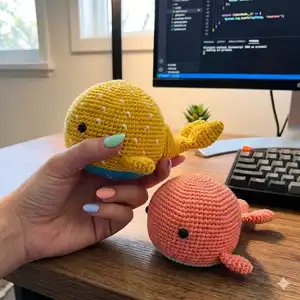
You will work the body top-down in continuous rounds and make the fins and tail separately before joining. The pattern uses DK weight cotton yarn and 8 mm safety eyes for a tidy, professional finish.

Why You'll Love This Wallace and Wanda Whales Amigurumi Pattern

I absolutely love this pattern because it combines simple shaping with a playful color-dot option that really makes the design pop. I enjoy the top-down construction since it makes stuffing and shaping easy as you go, and the separate fins and tail give you creative placement freedom. The fair isle dot technique is a fun way to practice carrying yarn on the wrong side without cutting strands every time. I find these whales sew up quickly and make adorable gifts that always get compliments.

Wallace and Wanda Whales Amigurumi Pattern step 1 - construction progress Wallace and Wanda Whales Amigurumi Pattern step 2 - assembly progress Wallace and Wanda Whales Amigurumi Pattern step 3 - details and accessories Wallace and Wanda Whales Amigurumi Pattern step 4 - final assembly and finishing

Switch Things Up

I love how easy it is to customize these whales by changing colors; try soft pastels for a nursery version or bold brights for a playful toy.

You can make a mini keychain version by using fingering yarn and a smaller hook to create a tiny, portable whale.

I often add embroidered eyelashes or a small smile to give the whales more personality before attaching the fins.

Try substituting safety eyes with French knots for a baby-safe option if you intend the toy for very young children.

If you want a chunkier whale, use worsted weight yarn and a larger hook; the shape will stay the same but scale up nicely.

Mix and match yarn texturesโ€”cotton for a firm shape or acrylic for a plusher, softer finish depending on the intended use.

I like to add surface crochet dots after finishing for an extra texture option if carrying floats feels tricky with tiny yarn.

Experiment with placement of the side fins to create different expressionsโ€”move them slightly forward for a curious look or back for a relaxed pose.

For collectors, make a whole pod of whales in coordinated colors and arrange them as a decorative set or mobile for a nursery.

You can also make seasonal versions by adding tiny crocheted accessories like a bow, scarf, or party hat to personalize each whale.

I sometimes add a small loop at the top of the tail so the whale can hang as an ornament or baby mobile piece.

Common Mistakes & How to Fix Them

โœ— Skipping the stitch marker when working continuous rounds will make it difficult to find the start of each round; use a marker at the first stitch and move it every round to maintain accurate stitch counts. โœ— Forgetting to stuff as you go results in lumps and poor shaping; stuff the body gradually and overstuff slightly before closing to let stuffing settle into shape. โœ— Not securing color changes for the fair isle dots can cause loose strands; carry the unused color on the wrong side and crochet over it every few stitches as instructed to keep strands tidy. โœ— Using the wrong hook size will change the finished size too much; use the recommended 2.75 mm hook with DK cotton or adjust yarn weight and hook proportionally while checking gauge. โœ— Pulling decreases too tightly can cause an obvious gap in the fabric; use an invisible decrease technique and maintain consistent tension to avoid gaps.

Wallace and Wanda Whales Amigurumi Pattern

Make two charming whale friends with this detailed crochet pattern. You will create a round, squishy whale body with optional color-dot fair isle detailing, matching fins, and a tail. The pattern includes step-by-step round instructions, colorwork guidance for Wallace, and clear assembly directions so you can finish with confidence. Perfect for gifting or keeping as a cuddly handmade companion.

Intermediate 5-7 Hours

Materials Needed for Wallace and Wanda Whales Amigurumi Pattern

โ€” Main Fabric

  • 01
    Rico creative Ricorumi DK cotton - Color A Tangerine - 2 x 0.9 oz balls (DK weight)
  • 02
    Rico creative Ricorumi DK cotton - Color B White - 1 x 0.9 oz ball (DK weight)

โ€” Tools Required

  • 01
    Crochet hook size 2.75 mm (US size C)
  • 02
    Fiberfill for stuffing
  • 03
    Safety eyes 8 mm (2 pieces)
  • 04
    Tapestry needle
  • 05
    Stitch marker

Progress Tracker

0% Complete

โ€” Fair Isle Color Dot Pattern :

Info :

Follow for the color dot whale (Wallace) only.

Round 1 :

sc in color A around

Round 2 :

sc in color A around

Round 3 :

(5 sc in color A, 1 sc in color B) around

Round 4 :

sc in color A around

Round 5 :

sc in color A around

Round 6 :

2 sc in color A, (1 sc in color B, 5 sc in color A) around until last four stitches. End with 1 sc in color B, 3 sc in color A.

Info :

Repeat Rounds 1-6 for the color dot pattern.

โ€” Body :

Info :

Using the color A (Tangerine) yarn, begin with an MR

Round 1 :

6 sc in MR [6]

Round 2 :

(inc in each st) x 6 [12]

Round 3 :

(sc, inc) x 6 [18]

Round 4 :

(2 sc, inc ) x 6 [24]

Round 5 :

(3 sc, inc) x 6 [30]

Round 6 :

(4 sc, inc) x 6 [36]

Round 7 :

(5 sc, inc) x 6 [42]

Round 8 :

(6 sc, inc) x 6 [48]

Round 9 :

(7 sc, inc) x 6 [54]

Round 10 :

(8 sc, inc) x 6 [60]

Round 11 :

sc in each st around [60]

Round 12 :

(9 sc, inc) x 6 [66]

Round 13 :

(10 sc, inc) x 6 [72]

Round 14-24 :

sc in each st around [72]

Round 25 :

(10 sc, dec) x 6 [66]

Info :

Insert the safety eyes between rounds 17 and 18, approx 13 sts apart. Stuff and shape the body as you work.

Info :

F/O color A (Tangerine) yarn, join and continue in color B (White) yarn.

Round 26 :

sc in each st through BLO around [66]

Round 27 :

(9 sc, dec) x 6 [60]

Round 28 :

(8 sc, dec) x 6 [54]

Round 29 :

(7 sc, dec) x 6 [48]

Round 30 :

(6 sc, dec) x 6 [42]

Round 31 :

(5 sc, dec) x 6 [36]

Round 32 :

(4 sc, dec) x 6 [30]

Round 33 :

(3 sc, dec) x 6 [24]

Round 34 :

(2 sc, dec) x 6 [18]

Round 35 :

(1 sc, dec) x 6 [12]

Round 36 :

(dec) x 6 [6]

Info :

Fill the body with fiberfill firmly. F/O and thread tail end of yarn onto a tapestry needle, insert the needle in and out of the remaining sts, pull tight to close, and weave in end.

โ€” Tail :

Info :

Start by making two fins (these will be joined together later in the pattern to complete the tail).

Info :

Using the color A (Tangerine) yarn, begin with an MR

Round 1 :

6 sc in MR [6]

Round 2 :

(sc, inc) x 3 [9]

Round 3 :

sc in each st around [9]

Round 4 :

(2 sc, inc) x 3 [12]

Round 5 :

(3 sc, inc) x 3 [15]

Round 6 :

(4 sc, inc) x 3 [18]

Round 7 :

sc in each st around [18]

Round 8 :

(4 sc, dec) x 3 [15]

Round 9 :

(3 sc, dec) x 3 [12]

Round 10 :

(1 sc, dec) x 4 [8]

Info :

For the first fin you make, F/O and cut the yarn. For the second fin, stop after round 10 and follow the joining instructions given on the next page below.

Round 11 :

Joining round Insert your hook into the st next to the closing st of the first fin and draw up a loop and yarn through as you would for any sc stitch. Mark this as the first sc of this round and continue crocheting around through both fins. You should have 16 sts by the end of this round.

Round 12 :

(2 sc, dec) around [12]

Round 13 :

sc in each st around [12]

Round 14 :

(inc) x 2; sc in next 9 sts; inc around [15]

Round 15 :

(1 sc, inc) x 2; sc in next 10 sts; inc around [18]

Round 16 :

(2 sc, inc) around [24]

Round 17 :

sc in each st around [24]

Round 18 :

(inc) x 6 times; sc in next 18 sts around [30]

Round 19 :

(inc, 2 sc) x 4; sc in next 4 sts; hdc in next 10 sts; sc in next 4 sts around [34]

Round 20 :

sc in next 20 sts; hdc in next 10 sts; sc in next 4 sts around [34]

Info :

Sl st into the next stitch and F/O leaving a long tail for sewing.

โ€” Side Fins (Make 2) :

Info :

Using the color A (Tangerine) yarn

Round 1 :

6 sc in MR [6]

Round 2 :

(1 sc; inc) x 3 [9]

Round 3 :

(2 sc, inc) x 3 [12]

Round 4 :

(3 sc, inc) x 3 [15]

Round 5 :

sc in each st around [15]

Round 6 :

(3 sc, dec) x 3 [12]

Round 7 :

(1 sc, dec) x 4 [8]

Round 8 :

sc in each st around [8]

Info :

Sl st into the next stitch and F/O leaving a long tail for sewing. Do not stuff the fins.

โ€” Assembly :

Step 1 :

Position the fins evenly on each side of the body. I have placed them on rounds 24 and 25 beginning from the top. Before sewing the fins on, ensure that they are symmetrically placed and are parallel to the eyes.

Step 2 :

The side with hdc is the bottom side of the tail. Use fiberfill to stuff the front of the tail (not the fins). Using the side fins as a guide pin the tail centrally to the back of the body. Sew the tail neatly and carefully.

Assembly Instructions

  • Position the side fins evenly on each side of the body around rounds 24 and 25 (counting from the top), then pin and sew them in place so they are parallel to the eyes.
  • Align the tail centrally at the back of the body using the side fins as a guide, stuff the front of the tail (not the fins), and sew the tail neatly and securely to the body.
  • Insert safety eyes between rounds 17 and 18, approximately 13 stitches apart, before stuffing the head area to ensure correct placement.
  • Use an invisible decrease to close shaping rounds and avoid gaps; when closing the final stitches, thread the tail through remaining sts, pull tight, and weave in the end for a seamless finish.
  • Pin each piece in place and check symmetry before permanently sewingโ€”this helps ensure the whale sits and looks balanced.

Important Notes

  • ๐Ÿ’กWork in continuous rounds without joining with a slip stitch unless directed to do so, and use a stitch marker to mark the beginning of each round.
  • ๐Ÿ’กStuff firmly as you work and overstuff slightly before finishing the section so the filling settles into shape once crocheting is complete.
  • ๐Ÿ’กI recommend using an invisible decrease to avoid getting a gap in the stitches when decreasing.
  • ๐Ÿ’กFor the color-dot whale (Wallace) carry the yarn on the wrong side instead of cutting and rejoining a new strand each time to keep floats neat.
  • ๐Ÿ’กThe pattern can be made with any DK or worsted weight yarn but the final size will vary with hook and yarn choice.

Thank you for making Wallace and Wanda with loveโ€”these little whales bring instant charm to any shelf or nursery. ๐Ÿงถ Sew the fins and tail with care, and share your photos with #loveandstitchco to join our maker community. ๐ŸŒŠ Happy crocheting and enjoy your handmade companions! ๐Ÿ‹

You ask,

we answer.

FAQs

What size will the finished piece be?

The whale is approximately 6.5 inches long (15.24 cm) when using the recommended DK cotton yarn and 2.75 mm hook.

Can I make the whale without the color-dot pattern?

Yes, Wanda is made without the color-dot fair isle pattern. Simply follow the basic body rounds in color A only and skip the Fair Isle Color Dot instructions.

Where should I place the safety eyes?

Insert the safety eyes between rounds 17 and 18, approximately 13 stitches apart, before stuffing the body to secure correct placement.

Do I need to stuff the side fins?

No, do not stuff the side fins. Leave them flat and sew them to the body with a long tail for sewing as instructed.

Can I use a different yarn weight or hook size?

Yes, you can use other yarns and hooks but the finished size will change. Adjust your hook size to suit the yarn and check gauge as needed.