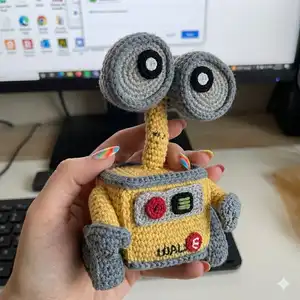
Make your own adorable Wall-E amigurumi with this complete crochet pattern. You will work simple stitches, sew felt details and add a small internal wire for a posable neck. The finished toy measures approximately 15 cm and is perfect as a handmade gift or display piece. Clear step-by-step instructions and photos guide you through every piece and the final assembly.
Progress Tracker
0% Complete
— Body Panels :
Round 1 :
Large Panel (Make 4 of these) 1. 18 ch, start from the 2nd stitch from the hook, 17 sc,1 ch and turn, star from the 2th stitch from the hook(17)
Round 2-13 :
17 sc, 1 Ch,and turn, start from the 2nd stitch from the hook (17)
Round 14 :
17 sc, fasten off. (17)
Round 1 :
Small Panel (Make 2 of these) 1. 16 ch, start from the 2nd stitch from the hook, 15 sc,1 ch and turn, start from the 2nd stitch from the hook(15)
Round 2-13 :
15 sc, 1 Ch,and turn, start from the 2nd stitch from the hook (17)
Round 14 :
15 sc, fasten off. (17)
— Arm :
Info :
THE ARM IS DIVIDED INTO TWO PARTS
Round 1 :
First part (shoulder)(make 2) 1. MR 7sc (7)
Round 2-3 :
7 sc, fasten off and leave a long tail (7)
Round 1 :
Second part (arm) (make 2) 1. MR 7sc (7)
Info :
*FILL THE ARMS A LITTLE BIT
Round 12 :
Flatten the arm and make 3 slst, Fasten off and leave a long tail.
— Arm Union :
Info :
take the first and second part With the long tail that we left on the arm, we will join it to what will be the shoulder so that it looks like this.
— Fingers :
Round 1 :
10 ch, start from the 2nd stitch from the hook, 9 sc,1 ch, and turn star from the 2nd stitch from the hook. (9)
Round 2 :
9 sc, fasten off.
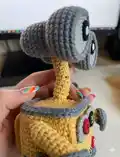
— Neck :
Round 2-15 :
6 sc (6) fasten off and leave a long tail
Info :
Cut a piece of wire that is 2 cm longer than the neck.
Info :
Cover your wire with tape on the top, so that it does not come out of the neck
Info :
Introduce the wire to the neck, the part that does not have a tape, will help us secure the neck inside the body
Info :
*FILL THE NECK A LITTLE BIT
— Eyes :
Info :
For the eyes we will use this mold, we make 2 of cardboard and 2 of gray felt (the cardboard helps the eye to be firm). Size 4.3 cm x 2.8 cm. glue the felt to the cardboard and add the pupil
— Eyes - Front Part :
Round 3 :
(1 sc, 1 inc) x6 (18)
Round 4 :
(2 sc, 1 inc) x6 (24)
Round 5 :
(3 sc, 1 inc) x6 (30)
Round 7-9 :
30 sc, fasten off.
— Eyes - Back Part :
Round 3 :
(1 sc, 1 inc) x6 (18)
Round 5-8 :
18 sc fasten off and cut the yarn leaving a long tail
— Eyes - Middle Part :
Info :
Stuff with fiber and fasten off.
— Glasses Chain :
Round 1 :
1. 40 Ch Fasten off , and cut the yarn leaving a long tail for assembly.
— Eye Assembly :
Info :
I recommend you follow the steps as indicated. Insert the chain in the middle of the back and secure it on the inside. You can secure yourself inside with a very large knot. Do the same with the other eye.
Info :
Fill the eyes a little bit. Put glue first and then the filling. Glue the lenses to the inside edge.
— Wheels :
Round 1 :
1. 40 ch, start from the 2nd stitch from the hook, 39 sc,1 ch and turn, star from the 2nd stitch from the hook (39)
Round 2 :
39 sc, 1 Ch,and turn, start from the 2nd stitch from the hook (39)
Round 3 :
39 sc, fasten off and leave a long tail. (39)
Info :
PARTS OF THE WHEELS, THERE WILL BE TWO SIZES
Round 1 :
LARGE PARTS X 2 1. MR 6 sc (6)
Round 4 :
6 Dec (6) Fasten off
Round 1 :
SMALL PARTS X 4 1. MR 8 sc (8)
Info :
WHEELSET: cut 3 rectangles out of cardboard and 3 out of felt. Join both and then glue them to what will be your wheel (guide yourself by the image)
Info :
With the tail of your wheel you will join the edge forming a triangle, inside the wheel glue 2 small parts and 1 large
— Details :
Round 1 :
SMALL FRONT PANEL 1. 17 ch, start from the 2nd stitch from the hook, 16 sc,1 ch and turn, start from the 2nd stitch from the hook(16)
Round 2-3 :
16 sc, 1 Ch,and turn, start from the 2nd stitch from the hook (16)
Round 4 :
16 sc, fasten off. (16)
Round 1 :
LOWER CORNERS X4 1. 8 ch, start from the 2nd stitch from the hook, 3sc , skip 1 ch, 3sc . Fasten off
Round 1 :
UPPER EDGE 1. 61 ch ,start from the 2nd stitch from the hook, 60 sc (60) fasten off.
— Body Assembly :
Info :
It's time to start putting together all the pieces of our WALL-E
Info :
Arms: the arms will be sewn to the small panels. Use the image as a guide, it should be sewn 3 rounds down. 3 ch separation. Finish off.
Info :
Neck: take 1 large panel and sew the neck the wire that you left at the beginning in the neck, insert it into the panel
Info :
Position it 3 rows down and as centered as you can. Bend the wire tip this way, this will help the neck to be better secured.
Info :
We reserve the parts for the final assembly: after all pieces are ready, sew panels together to create the box body, attach arms, glue wheels and attach eyes and front details as in photos.
This delightful Wall-E amigurumi captures the charm of the little robot with crochet panels, felt lenses and tiny wheel details. Make one as a gift or a special shelf companion — it stands at approximately 15 cm tall and is full of personality. Enjoy the mix of crochet, sewing and a little cardboard construction to achieve a professional finish. 🧶🤖✨