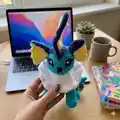
Create a charming Vaporeon-inspired amigurumi with this detailed crochet pattern. You will work through the head, neck, body, legs, tail and distinctive fins using clear round-by-round instructions. This pattern highlights color placement and shaping to capture Vaporeons elegant silhouette — perfect for gifting or adding to your Pokecraft collection.
Progress Tracker
0% Complete
— Head :
Light blue Round 1 :
CH2, SCx6 in the 2nd stitch from the hook (6)
Light blue Round 2 :
2SCx6 (12)
Light blue Round 3 :
[2SC, SC]x6 (18)
Light blue Round 4 :
[2SC, SCx2]x6 (24)
Light blue Round 5 :
[2SC, SCx3]x6 (30)
Light blue Round 6 :
[2SC, SCx4]x6 (36)
Light blue Round 7 :
[2SC, SCx5]x6 (42)
Light blue Round 8 :
[2SC, SCx6]x6 (48)
Light blue Round 9 - 13 :
SCx48 (48, 5 rounds)
Light blue Round 14 :
SCx42, 2SC, SCx5 (49)
Light blue Round 15 :
SCx42, 2SCx2, SCx5 (51)
Light blue Round 16 :
SCx44, 2SCx3, SCx4 (54)
Light blue Round 17 :
[SC2tog, SCx7]x6 (48)
Light blue Round 18 :
[SC2tog, SCx6]x6 (42)
Light blue Round 19 :
[SC2tog, SCx5]x6 (36)
Light blue Round 20 :
[SC2tog, SCx4]x6 (30)
Light blue Round 21 :
[SC2tog, SCx3]x6 (24)
Info :
Stuff firmly and make sure the nose point is in the right place.
Light blue Round 22 :
[SC2tog, SCx2]x6 (18)
Light blue Round 23 :
[SC2tog, SC]x6 (12)
Light blue Round 24 :
SC2togx6 (6)
Info :
Sew the head closed and leave a long tail to sew the head to the neck later on.
Dark Blue Round 1 :
CH2, SCx6 in the 2nd stitch from the hook (6)
Dark Blue Round 2 :
2SCx6 (12)
Dark Blue Round 3 :
[2SC, SC]x6 (18)
Dark Blue Round 4 :
[2SC, SCx2]x6 (24)
Dark Blue Round 5 :
[2SC, SCx3]x6 (30)
Dark Blue Round 6 :
[2SC, SCx4]x6 (36)
Dark Blue Round 7 :
[2SC, SCx5]x6 (42)
Dark Blue Round 8 :
[2SC, SCx6]x6 (48)
Dark Blue Round 9 - 12 :
SCx48 (48, 4 rounds)
Dark Blue Row 1 :
SCx7 chain and turn (7)
Dark Blue Row 2 :
SC2tog, SCx5, chain and turn (6)
Dark Blue Row 3 :
SC2tog, SCx4 (5)
Dark Blue Row 4 :
SC2tog, SCx3 (4)
Dark Blue Row 5 :
SC2tog, SCx2 (3)
Dark Blue Row 5 (alt) :
SC2tog, SC (2)
Dark Blue Row 6 :
SC2tog (1)
Info :
Sew the blue onto the back of the head with the point towards the nose. Add on the eyes, mouth and nose features the way you wish.
— Neck :
Neck Info :
Light blue Chainx18 and then joint it into a loop with a SS into the first chain. Then continue to crochet in the round.
Neck Round 1 - 2 :
SCx18 (18, 2 rounds)
Neck Round 3 :
[2SC, SCx2]x6 (24)
Neck Round 3 (continued) :
SCx24
Info :
Leave a long tail to sew the neck to the body.
— Body :
Body Info :
Light blue Starting from the tail end first.
Body Round 1 :
CH2, SCx6 in the 2nd stitch from the hook (6)
Body Round 3 - 5 :
SCx12 (12, 3 rounds)
Body Round 6 :
[2SC, SCx3]x3 (15)
Body Round 7 - 9 :
SCx15 (15, 3 rounds)
Body Round 10 :
[2SC, SCx4]x3 (18)
Body Round 11 - 16 :
SCx18 (18, 6 rounds)
Body Round 17 :
[2SC, SCx5] (21)
Body Round 18 - 23 :
SCx21 (21, 6 rounds)
Body Round 24 :
[2SC, SCx6] (24)
Body Round 25 - 27 :
SCx24 (24, 3 rounds)
Body Round 28 :
[2SC, SCx3]x6 (30)
Body Round 29 - 31 :
SCx30 (30, 3 rounds)
Info :
Stuff lightly and then continue to the next round.
Body Round 32 :
[2SC, SCx4]x6 (36)
Body Round 32 - 36 :
HDCx12, SCx 24 (36, 5 rounds)
Body Round 37 - 48 :
SCx36 (36, 12 rounds)
Info :
Stuff firmly and then continue with the next round.
Body Round 49 :
[2SC, SCx5]x6 (42)
Body Round 50 - 54 :
SCx42 (42, 5 rounds)
Body Round 55 :
[2SC, SCx6]x6 (48)
Body Round 56 - 63 :
SCx48 (48, 8 rounds)
Body Round 64 :
[SC2tog, SCx6]x6 (42)
Body Round 65 :
[SC2tog, SCx5]x6 (36)
Body Round 66 :
[SC2tog, SCx4]x6 (30)
Body Round 67 :
[SC2tog, SCx3]x6 (24)
Body Round 68 :
[SC2tog, SCx2]x6 (18)
Body Round 69 :
[SC2tog, SC]x6 (12)
Body Round 70 :
SC2togx6 (6)
Info :
Sew closed and then end off. Sew the neck piece onto the body.
— Collar :
Collar Info :
Make two. One in light blue and one in white. For the blue, leave a long tail at the start, for the white, leave a long tail at the end.
Collar Round 1 - 2 :
Chainx27 and then joint it into a loop with a SS into the first chain. Then continue to crochet in the round. SCx27 (27, 2 rounds)
Collar Round 3 :
[2SC, SCx8]x3 (30)
Collar Round 4 :
[2SC, SCx9]x3 (33)
Collar Round 5 :
[2SC, SCx10]x3 (36)
Collar Round 6 :
[2SC, SCx5]x6 (42)
Collar Round 7 :
[2SC, SCx6]x6 (48)
Collar Round 8 :
[2SC, SCx7]x6 (54)
Collar Round 9 :
[2SC, SCx8]x6 (60)
Collar Round 10 :
[2SC, SCx9]x6 (66)
Collar Round 11 :
[2SC, SCx10]x6 (72)
Collar Round 12 :
[2SC, SCx11]x6 (78)
Collar Round 13 :
[2SC, SCx12]x6 (84)
Collar Round 14 :
[2SC, SCx13]x6 (90)
Collar Round 15 :
[SC, HDC, DCx2, HDC, SC]x15 (90)
Collar Round 16 :
[SCx2, DC, chain, DC, SCx2]x15 (105)
Info :
Turn the white piece inside out so the good side is on the inside. Then lay the white inside the blue and sew the white piece around the outside edge. Then use the blue tail and sew onto the body around the neck piece. Stuff the neck piece and sew the head down onto that.
— Front Legs :
Front Legs Info :
(make 2)
Front Legs Round 1 :
CH2, SCx6 in the 2nd stitch from the hook (6)
Front Legs Round 2 :
2SCx6 (12)
Front Legs Round 3 :
[2SCx3, SCx3]x2 (18)
Front Legs Round 4 :
[2SC, SC]x3, SCx3 [2SCx SC]x3, SCx3 (24)
Front Legs Round 5 :
SCx24 back loop only (this makes a nice flat base for the foot. If you want a rounded foot then crochet in both loops as normal) (24)
Front Legs Round 6 :
SCx24 in both loops (24)
Front Legs Round 7 :
[SC2tog, SC]x3, SCx15 (21)
Front Legs Round 8 :
[SC2tog, SC]x3, SCx12 (18)
Front Legs Round 9 - 23 :
SCx18 (18, 15 rounds)
Info :
Finish off and leave a long tail to sew the leg to the body. Fold over the inside part of the leg just slightly so it sits nicely against the body. Stuff lightly into the foot, making sure to not overstuff to hold the shape and then firmly stuff up the leg so that there's enough support to hold up the plush.
— Back Legs :
Back Legs Round 1 :
CH2, SCx6 in the 2nd stitch from the hook (6)
Back Legs Round 2 :
2SCx6 (12)
Back Legs Round 3 :
[2SCx3, SCx3]x2 (18)
Back Legs Round 4 :
[2SC, SC]x3, SCx3 [2SCx SC]x3, SCx3 (24)
Back Legs Round 5 :
SCx24 back loop only (this makes a nice flat base for the foot. If you want a rounded foot then crochet in both loops as normal) (24)
Back Legs Round 6 :
SCx24 in both loops (24)
Back Legs Round 7 :
[SC2tog, SC]x3, SCx15 (21)
Back Legs Round 8 :
[SC2tog, SC]x3, SCx12 (18)
Back Legs Round 9 :
SCx18 (18)
Back Legs Round 10 - 17 :
SSx7, SCx9, SSx2 (18, 8 rounds)
Back Legs Round 18 - 20 :
SSx9, SCx9 (18, 3 rounds)
Back Legs Round 21 :
[2SC, SCx2]x6 (24)
Back Legs Round 22 :
[2SC, SCx3]x6 (30)
Back Legs Round 23 - 27 :
SCx30 (30, 5 rounds)
Back Legs Round 28 :
[SC2tog, SCx3]x6 (24)
Back Legs Round 29 :
[SC2tog, SCx2]x6 (18)
Info :
Stuff the leg and foot portion quite firmly but in the upper rounded leg part, half stuff as the leg is sewn on at an angle like the front leg. Sew onto the body with a long tail.
— Back Spikes :
Back Spikes Info :
HDC Shell stitch Chainx57
Back Spikes Row 1 :
From 2nd chain from the hook, SCx56 (56)
Back Spikes Row 2 :
Chain 1 and turn. [Skip 1 stitch, HDCx5, Skip 1 stitch, SS] repeat until the end
Info :
Leave a long tail and then sew down the back.
— Tail :
Tail Round 1 :
CH2, SCx6 in the 2nd stitch from the hook (6)
Tail Round 3 :
2SCx2, SCx4 (8)
Tail Round 5 :
[2SC, SC]x2, SCx4 (10)
Tail Round 6 :
[2SC, SCx2]x2, SCx4 (12)
Tail Round 7 :
[2SC, SCx3]x2, SCx4 (14)
Tail Round 8 :
[2SC, SCx4]x2, SCx4 (16)
Tail Round 7 (alt) :
[2SC, SCx5]x2, SCx4 (18)
Tail Round 8 - 11 :
SCx18 (18, 4 rounds)
Tail Round 12 :
[SC2tog, SC]x6 (12)
Info :
Stuff lightly so that it can still be slightly flattened to make a fin shape.
Tail Round 13 :
SC2togx6 (6)
Info :
Use one of the long tails to sew the two fin pieces together. Then use the other tail to sew to the tail end of the vaporeon.
— Head Fins (side) :
Head Fins (side) blue Make 2 Round 1 :
CH2, SCx6 in the 2nd stitch from the hook (6)
Head Fins (side) blue Round 2 :
SCx6 (6)
Head Fins (side) blue Round 3 :
[2SC, SC]x3 (9)
Head Fins (side) blue Round 4 - 5 :
SCx9 (9, 2 rounds)
Head Fins (side) blue Round 6 :
[2SC, SCx2]x3 (12)
Head Fins (side) blue Round 7 - 9 :
SCx12 (12, 3 rounds)
Head Fins (side) blue Round 10 :
[2SC, SCx3]x3 (15)
Head Fins (side) blue Round 11 - 12 :
SCx15 (15, 2 rounds)
Head Fins (side) Yellow :
Make 2
Head Fins (side) Yellow Chain 4 Row 1 :
From the 2nd chain from the hook, SCx3 (3)
Head Fins (side) Yellow Row 2 :
Chain and turn, 2SCx3 (6)
Head Fins (side) Yellow Row 3 - 4 :
Chain and turn, SCx6 (6, 2 rows)
Head Fins (side) Yellow Row 5 :
Chain and turn, [2SC, SC]x3 (9)
Head Fins (side) Yellow Row 6 - 8 :
Chain and turn, SCx9 (9, 3 rows)
Head Fins (side) Yellow Row 9 :
Chainx2 and turn, DC, SCx2, TC, Chainx1, SCx2, TC, Chainx1, [2SC and TC in the same last stitch]
Info :
Finish off with a long tail. Surface crochet or chain a row of yellow and stitch onto the front of the piece for the raised embellishment. I chained one row of 20 and sewed it as a V shape onto the ear piece. Sew onto the blue portion and onto the head.
— Head Fin (top) :
Head Fin (top) Yellow Info :
Start by leaving a long tail, then Chainx14 (You can start by not leaving the long tail but I leave a long tail at the start of this fin because I don't like weaving in short tails at the end)
Head Fin (top) Row 1 :
From the 2nd chain from the hook, SCx13 (13)
Head Fin (top) Row 2 :
Chain and turn, SCx11, SC2tog (12)
Head Fin (top) Row 3 :
Chain and turn, SCx10, SC2tog (11)
Head Fin (top) Row 4 :
Chain and turn, SCx11 (11)
Head Fin (top) Row 5 :
Chain and turn, SCx9, SC2tog (10)
Head Fin (top) Row 6 - 7 :
Chain and turn. SCx10 (10)
Head Fin (top) Row 8 :
Chain and turn, SC2tog, SCx8 (9)
Head Fin (top) Row 9 :
Chain and turn, SCx9 (9)
Head Fin (top) Row 10 :
Chain and turn. SCx8, 2SC (10)
Head Fin (top) Row 11 :
Chain and turn, SCx10 (10)
Head Fin (top) Row 12 :
Chain and turn, SC2tog, SCx6, SC2tog (8)
Head Fin (top) Row 13 :
Chain and turn, SCx8 (8)
Head Fin (top) Row 15 :
Chain and turn, SC2tog, SCx6 (7)
Head Fin (top) Row 16 :
Chain and turn, SC2tog, SCx3, SC2tog (5)
Head Fin (top) Row 17 :
Chain and turn, SCx5 (5)
Head Fin (top) Row 18 :
Chain and turn, SC2tog, SC, SC2tog (3)
Head Fin (top) Row 19 :
Chain and turn. SCx3 (3)
Head Fin (top) Row 20 :
Chain and turn, SC3tog
Head Fin (top) Blue :
Round 1: CH2, SCx6 in the 2nd stitch from the hook (6)
Head Fin (top) Blue Round 2 - xx :
SCx6
Info :
Continue crocheting in the round until there is a long blue tube which is long enough to be sewn to the front of the fin and leave a tail. Use the long tail from the tip of the fin to sew to tube. Finish off that yellow. Then use the blue tail to sew the tube part to the head and the remaining yellow tail (the original starting tail of the fin) to sew the remainder of the fin to the head.
This Vaporeon amigurumi pattern is crafted to capture the elegant fins and flowing tail of the beloved water Pokemon. The layered collar and sculpted head fins make this plush stand out with character and charm. Perfect as a handmade gift or a special addition to your amigurumi collection. 🧶🧵