๐Ÿงถ Beautiful โœจ Detailed ๐Ÿ’ Adorable

Twinkletoes the Tiny Gecko Amigurumi Pattern

Twinkletoes the Tiny Gecko Amigurumi Pattern
4.3โ˜… Rating
2-3 Hours Time Needed
1.9K Made This
โœ‚๏ธ

Beginner Friendly Level

Perfect for those just starting their crochet journey, with clear instructions and simple techniques

โฑ๏ธ

Bite-Sized Project

Finishes in 2-4 hoursโ€”perfect for an afternoon of creative relaxation.

๐ŸŽ

Tiny Treasure

Small, sweet, and gift-worthy creations that fit perfectly in the palm of your hand with detailed charm.

About This Twinkletoes the Tiny Gecko Amigurumi Pattern

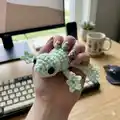
Twinkletoes is a tiny gecko amigurumi designed to be quick, cute, and no-sew. The design is crocheted in one piece starting at the head and finishing at the tail for an easy assembly. Youโ€™ll find a special leg/toe stitch with a dedicated photo tutorial to make the adorable sticky toes. This pattern uses continuous rounds and includes placement guidance for safety eyes and finishing the tail curl.
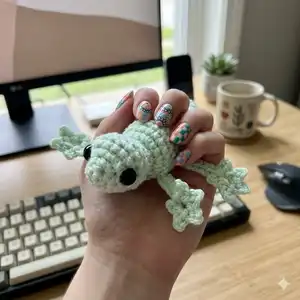
Twinkletoes the Tiny Gecko Amigurumi Pattern crochet pattern - detailed view of completed project

Ideal for makers who want a fast, satisfying project that still has charming detail. Perfect for gifts, decorations, or a pocket-sized companion.

Why You'll Love This Twinkletoes the Tiny Gecko Amigurumi Pattern

I absolutely love this pattern because it combines a very simple construction with a playful, characterful result that makes you smile. I enjoy how the special leg stitch creates those distinctive sticky toes without complicated sewing. I love that it is a true no-sew design โ€” everything is crocheted in one piece which saves time and gives a clean finish. I also appreciate that itโ€™s beginner-friendly yet yields a polished little toy you can customize.

Twinkletoes the Tiny Gecko Amigurumi Pattern step 1 - construction progress Twinkletoes the Tiny Gecko Amigurumi Pattern step 2 - assembly progress Twinkletoes the Tiny Gecko Amigurumi Pattern step 3 - details and accessories Twinkletoes the Tiny Gecko Amigurumi Pattern step 4 - final assembly and finishing

Switch Things Up

I love experimenting with color changes to give each Twinkletoes their own personality; try polka dots or gradient yarns for fun effects.

I often change yarn weight and hook size to adjust finished size; a bulkier yarn creates a chunky, squishy gecko while fine yarn makes a tiny keychain version.

I sometimes replace safety eyes with embroidered eyes for a softer, child-safe option โ€” this also changes the expression slightly.

I add a small loop at the top of the head if I want to turn Twinkletoes into a keychain or bag charm.

I like to embroider little spots or stripes on the back using contrasting yarn to make personalized designs.

If I want a poseable gecko I insert craft wire into the limbs before stuffing to allow light posing of the legs and tail.

I sometimes stitch tiny felt leaves or a miniature accessory to the gecko for seasonal themes or play sets.

I recommend trying different eye sizes for varied expressions โ€” larger eyes make a cuter, cartoon look while small eyes look more realistic.

I also experiment with stuffing amounts; less stuffing gives a floppy look while more stuffing keeps the body firm and rounded.

For gifts I attach a small tag with the recipient's name or a tiny crocheted accessory like a scarf to finish the look.

Common Mistakes & How to Fix Them

โœ— Skipping the stitch marker during continuous rounds leads to losing your round start; place a marker at the beginning of each round and move it as you work. โœ— Not stuffing gradually causes lumps or uneven shape; stuff the head and body lightly as you go and add small amounts to shape smoothly. โœ— Forgetting to count stitches after increases or decreases results in missed shaping; count your stitches at the end of each round to ensure accuracy. โœ— Crocheting the leg chains too tightly will make toes curl awkwardly; keep an even, slightly loose tension on the leg chain so the toe slip-stitches move easily. โœ— Placing safety eyes without checking spacing can look unbalanced; use the stitch marker placed at round 6 as a visual guide and place eyes between rounds 3 and 4 with 4-5 stitches visible between them.
Twinkletoes the Tiny Gecko Amigurumi Pattern

Make an adorable Twinkletoes tiny gecko with this beginner-friendly amigurumi pattern. Youโ€™ll enjoy simple continuous rounds, a cute leg-toe special stitch tutorial, and no-sew construction. Perfect for quick gifts, keychains, or a playful pocket pal you can finish in an afternoon. Follow the full step-by-step rounds and photo-assisted leg tutorial to create your own tiny gecko.

Beginner Friendly 2-3 Hours

Materials Needed for Twinkletoes the Tiny Gecko Amigurumi Pattern

โ€” Main Fabric

  • 01
    Medium weight yarn (recommended for Tiny Twinkletoes)
  • 02
    Premier Parfait Chunky (recommended for Chunky Twinkletoes)
  • 03
    Fiber fill stuffing
  • 04
    10mm safety eyes (for medium version)
  • 05
    14mm safety eyes (for chunky version)

โ€” Tools Required

  • 01
    Crochet hook size 4.0mm
  • 02
    Crochet hook size 5.0mm (for chunky option)
  • 03
    10mm safety eyes (2 pieces)
  • 04
    14mm safety eyes (2 pieces for chunky)
  • 05
    Scissors
  • 06
    Yarn needle for sewing and finishing
  • 07
    Stitch markers
  • 08
    Polyester stuffing (fiber fill)

Progress Tracker

0% Complete

โ€” Body :

Info :

Special stitch: Leg *picture tutorial on page 5* โ€ข Ch 10, sl st in 2nd ch from hook and the third ch. That third ch will be your 'base chain'. โ€ข *Ch 2, sl st in 2nd ch from hook, sl st in base stitch* โ€ข Repeat * * 3 more times, for a total of 5 toes โ€ข Sl st in the 7 stitches back down the chain, then continue on with the round

Round 1 :

Make 4 sc in a mc (4)

Round 2 :

Inc x 4 (8)

Round 3 :

*inc, 3 sc* x 2 (10)

Round 4 :

Inc x 5, 5 sc (15)

Round 5 :

3 sc in the next st, 8 sc, 3 sc in the next st, 5 sc (19)

Round 6 :

Sc in each st (19) *Place a SM between the 6th & 7th sc of this row. This is a guide for the center/top of the body.* (Pink SM)

Round 7 :

Sc in in each st (19)

Info :

Insert safety eyes between r3 & r4, with 4 or 5 st visible in between them. Use the SM from r6 as a visual guide to place each eye equal distance away from the SM.

Round 8 :

Dec x 6, 7 sc (13)

Info :

Stuff head

Round 9 :

Dec x 4, 5 sc (9)

Round 10 :

3 sc in the next st, inc x 3, 3 sc in the next st, 4 sc (16)

Round 11 :

Leg, sc, inc, *2 sc, inc* x 2, sc, inc, leg, 6 sc (20)

Round 12-14 :

Sc in each st (20) *Make sure to move the limbs outward and be careful not to sc in the chain stitch from the leg*

Round 15 :

Leg, sc, *dec, sc* x 4, sc, leg, 6 sc (16)

Round 16 :

*2 sc, dec* x 3, 4 sc (13)

Info :

Stuff body

Round 17 :

*sc, dec* x 4, sc (9)

Info :

You will now be making the tail - Stuff the tail lightly as you go, until it gets too narrow to stuff

Round 18 :

Sc in each st (9)

Round 19 :

*dec, sc* x 2, 3 sc (7)

Round 20 :

Sc in each st (7)

Round 21 :

Dec, 5 sc (6)

Round 22 :

Sc in each st (6)

Round 23 :

Dec, 4 sc (5)

Round 24 :

Sc in each st (5)

Round 25 :

Dec, 3 sc (4)

Round 26 :

Sc in each st (4)

Info :

Fasten off and leave a long tail

Info :

Sew the hole closed, keep the yarn on your needle.

Info :

Slightly curve the tip of the gecko-tail to the side so that the tip of the gecko-tail is beside R23/R24. Pic A

Info :

Insert your needle between the rounds to bring the tip of the gecko-tail to it. Pic B

Info :

Weave the yarn-tail through the stitches a few more times, to secure the curl. Pic C

Info :

*Don't weave the yarn-tail to the opposite side, it will give it an indent!* Pic D

โ€” Leg Tutorial :

Step 1 :

Ch 10

Step 2 :

Sl st in 2nd ch from hook and the third ch. That third ch will be your "base chain".

Step 3 :

Ch 2

Step 4 :

sl st in 2nd ch from hook, sl st in base stitch

Step 5 :

Ch 2

Step 6 :

sl st in 2nd ch from hook, sl st in base stitch

Step 7 :

Ch 2

Step 8 :

sl st in 2nd ch from hook, sl st in base stitch

Step 9 :

Ch 2

Step 10 :

sl st in 2nd ch from hook, sl st in base stitch

Step 11 :

Sl st in the 7 stitches back down the chain

Step 12 :

Finished view of R10

Assembly Instructions

  • Sew the hole at the tail closed using the long yarn tail, keep the yarn on your needle while you shape and secure the curl.
  • Curve the tip of the tail slightly to the side so the tip is beside rounds 23/24, then insert your needle between rounds to pull and secure the curl.
  • Place safety eyes between rounds 3 and 4 with 4 or 5 stitches visible between them; use the stitch marker placed at round 6 as a guide for even placement.
  • Weave the yarn tail through several stitches to secure the curl and avoid pulling to the opposite side which will create an indent.
  • Pin limbs outward before finalizing stitch placement to ensure symmetry and sew any small gaps closed as needed.

Important Notes

  • ๐Ÿ’กThis pattern is written in US crochet terminology.
  • ๐Ÿ’กThe stitch count at the end of the round does not include the limbs.
  • ๐Ÿ’กThis design is made all in one piece; it starts at the head and finishes at the tail.
  • ๐Ÿ’กThis pattern is worked in continuous rounds unless otherwise specified; place a stitch marker at the beginning of each round.

Twinkletoes is a tiny, pocket-sized gecko that brings a little handmade joy to your day. Make a single Twinkletoes as a sweet gift or crochet a whole family of colors for playful decor. Small, quick, and endlessly cuteโ€”this pattern is perfect for gifts and quick makes. ๐ŸฆŽ๐Ÿงถ

You ask,

we answer.

FAQs

What size will the finished piece be?

The finished Tiny Twinkletoes measures approximately the size of your palm when made with medium weight yarn and a 4.0mm hook; chunky version will be larger.

Can I use different yarn weights for this pattern?

Yes, you can use different yarn weights; switching yarn weight and hook size will change the finished size. Use a 5.0mm hook for the chunky yarn option.

Do I need prior crochet experience for this pattern?

This is a beginner-friendly pattern but familiarity with single crochet, increases, decreases, and slip stitches is recommended.

How long does this project typically take to complete?

Most crocheters finish this tiny gecko in a couple of hours (2-3 hours) depending on experience and whether you make the chunky version.