Make a charming top-hat wearing teddy with clear step-by-step instructions and helpful photos. This pattern walks you through crocheting the body, head, snout, ears, legs, and accessories with assembly tips. Customize colors and felt details to make each teddy unique for gifts or decor. Perfect for improving your amigurumi skills while creating a cuddly handmade friend.
Progress Tracker
0% Complete
— Body :
Round 3 :
(Sc, inc) x6 (18)
Round 4 :
sc, inc, (sc 2, inc) x5, sc (24)
Round 5 :
(sc 3, inc) x6 (30)
Round 6 :
Sc 2, inc, (sc 4, inc) x5, sc 2 (36)
Round 7 :
(sc 5, inc) x6 (42)
Round 8 :
Sc 3, inc, (sc 6, inc) x6, sc 3 (48)
Round 9 :
(sc 7, inc) x6 (54)
Round 10 :
Sc 24, sc 13, sc 17 (54)
Round 11 :
Sc 23, sc 15, sc 16 (54)
Round 12 :
Sc 22, sc 17, sc 15 (54)
Round 13 :
Sc 22, sc 17, sc 15 (54)
Round 14 :
(sc 7, dec) x2, sc 4, sc 3, dec, sc 7, dec, sc 3, sc 4, dec, sc 7, dec (48)
Round 15 :
Sc 21, sc 13, sc 14 (48)
Round 16 :
Sc 3, dec, (sc 6, dec) x2, sc 6, dec, sc 5, sc, dec, sc 6, dec, sc 3 (42)
Round 17 :
Sc 18, sc 12, sc 12 (42)
Round 18 :
(sc 5, dec) x2, sc 4, sc, dec, sc 5, dec, sc 2, sc 3, dec, sc 5, dec (36)
Round 19 :
Sc 17, sc 8, sc 11 (36)
Round 20 :
Sc 17, sc 8, sc 11 (36)
Round 21 :
Sc 2, dec, (sc 4, dec) x2, sc 2, sc 2, dec, sc 4, dec, 2sc (30)
Round 23 :
(sc, dec) x10 (20)
Info :
Make a slip stitch and fasten off, leaving a long tail for sewing later. Stuff and put the finished body off to the side, and move onto the snout.
— Snout :
Info :
Use 'Mushroom' for Top Hat Teddy (4mm), or 'Winter White' for Rockstar Top Hat Teddy (6mm).
Info :
Ch 11 and work in a continuous spiral around both sides of the chain.
Round 1 :
Starting in the 2nd ch from hook - inc, sc 8, inc. Now flip your work and continue onto the other side of the ch, your first sc will be in the same ch you just worked in, just on the opposite side- inc, sc 8, inc (24)
Info :
TIP: For this pattern, I crochet into the front and back loop of each chain, so on the first side, I will be crocheting into all 10 front loops. When I flip to the other side, I am crocheting into ALL 10 back loops of the chain. (ignoring the 11th chain)
Round 2 :
Sc, inc, sc 8, (sc, inc) x2, sc 9, inc (28)
Round 3 :
Sc 2, inc, sc 8, (sc 2, inc) x2, sc 10, inc (32)
Round 5 :
Sc 3, inc, sc 8, (sc 3, inc) x2, sc 11, inc (36)
Round 6 :
Sc 4, inc, sc 8, (sc 4, inc) x2, sc 12, inc (40)
Info :
Finish off with a slip stitch and then fasten off your piece. Leave a long tail for sewing. Set aside for now.
— Head :
Round 3 :
(Sc, inc) x6 (18)
Round 4 :
Sc, inc, (sc 2, inc) x5, sc (24)
Round 5 :
(sc 3, inc) x6 (30)
Round 6 :
Sc 2, inc, (sc 4, inc) x5, sc 2 (36)
Round 7 :
(sc 5, inc) x6 (42)
Round 8 :
Sc 3, inc, (sc 6, inc) x5, sc 3 (48)
Round 9 :
(sc 7, inc) x6 (54)
Round 10-15 :
Sc around (54) 6 ROUNDS
Round 16 :
Sc, inc, (sc 2, inc) x17, sc (72)
Round 17 :
(sc 3, inc) x18 (90)
Round 19 :
(sc 3, dec) x18 (72)
Round 21 :
Sc, dec, (sc 2, dec) x17, sc (54)
Round 23 :
(sc 7, dec) x 6 (48)
Round 25 :
Sc 3, dec, (sc 6, dec) x5, sc 3 (42)
Round 27 :
(sc 5, dec) x6 (36)
Round 28 :
Sc 2, dec, (sc 4, dec) x5, sc 2 (30)
Info :
Pause here and follow the steps on pg. 11 for Top Hat Teddy or pg. 13 for Rockstar Top Hat Teddy.
Round 29 :
(sc 3, dec) x6 (24)
Round 30 :
Sc, dec, (sc 2, dec) x5, sc (18)
Round 31 :
(Sc, dec) x6 (12)
Info :
Stuff a little more.
Info :
Fasten off, and set aside for assembly later on.
— For Top Hat Teddy :
Step 1 :
I add stuffing temporarily to make sure I like the way everything looks before I secure the safety eyes. Place 18mm safety eyes between rounds 15-16, making them about 9-10 stitches apart, but don't secure them just yet. I like to have my snout ready to put on at this point to make sure I like the placement of the eyes in congruence with the snout. The top of the snout gets sewn on between rounds 16-17, and stretches down 8 rounds, ending between rounds 24-25. Make sure to stuff the snout before closing it off.
Step 2 :
Add all of the snout details. You can see more detailed instructions on this in step 13 (pg. 18) of the Rockstar Top Hat Teddy section below. Then unstuff the head enough to secure the safety eyes and add the eye details. To do this, start with white yarn on your yarn needle and insert your needle anywhere in the head, then bring it out between rounds 15-16 just in front of the safety eye. Put your needle back into the same row on the opposite side of the safety eye. This will create the whites of the eyes. Using the same strand of yarn, do this for the other eye as well. Then tie off the yarn and tuck it into the head.
Step 3 :
Using black yarn, bring your yarn and needle between rounds 14-15 in the stitch just next to the safety eye. Then insert your needle between rounds 16-17 in the stitch just next to the eye. Using the same strand of black yarn, do this to the other eye as well. And then tie off the yarn and tuck it into the head.
Step 4 :
Sew on the eyebrows. They start between rounds 11-12 and then end between rounds 12-13, and are about 4-5 stitches in length. They are about 7 stitches away from each other. Make the eyebrows about 5-6 layers thick, or until they're your desired thickness. Tie off your yarn tails and tuck them into the head. Continue onto round 29 (pg. 10).
Step 5 :
At this point, I add any additional small details like buttons on the belly or a small bow tie, and ensure snout and eye placement match my visual preference before permanently sewing everything in place.
— For Rockstar Top Hat Teddy (Felt Face Assembly) :
Step 1 :
Stuff the head temporarily, as this makes the process of mapping out the face easier. Don't worry about securing the safety eyes yet; we will unstuff the head later to secure them. Place 30mm safety eyes where you want them to be. Mine are between rounds 15-16, about 9-10 stitches apart.
Step 2 :
Place your snout at the bottom of a piece of blue felt to get the visual of how you want your face design to look above the snout. Using a marker, draw out the design you want. Make sure you purposefully make this design larger than you want it. You will be trimming it down in step 4.
Step 3 :
Cut out your felt piece. The shape of the bottom does not matter because we are going to cut it out along the snout later.
Step 4 :
Fold the felt piece in half, and trim it down to make it completely symmetrical.
Step 5 :
Remove your safety eyes, and place sewing pins down in their place to mark which holes you want your safety eyes to be in.
Step 6 :
Line up your felt piece where you want it and then use the safety pins you just put into the head to feel for where you want the safety eyes to go through the felt, and mark the felt with 2 more sewing pins. This will tell us where we need to cut a hole for the safety eyes to go through.
Step 7 :
Where you just placed the sewing pins, cut slits into the felt piece for the eyes to go through.
Step 8 :
Make sure you like the placement of the eyes and that they're an even distance from the edges of your felt piece. Line up the two bumps at the top of your face piece around rounds 11-12. You can then place your snout as a visual to make sure everything looks the way you want it and move onto step 9.
Step 9 :
Pin your blue face piece to a sheet of red felt and use it as a guideline to cut out the same shape of a larger size. This will be the red outline of the face piece. The shape at the bottom still doesn't matter at this point, we will be cutting that later on.
Step 10 :
With the felt pieces still pinned together, cut a slit through the red piece in the same spot as the blue piece. Insert your safety eyes into both layers of felt and then into the head as well. This is just to double check that everything lines up correctly before we sew everything together. We ideally want our felt piece to lay perfectly flat with no bumps.
Step 11 :
Now map out where you want the eyebrows to start. Mine start between rounds 11-12 and then end between rounds 12-13, and are 5 stitches long, and 7 stitches apart. This ensures your felt piece is at an appropriate spot before we commit to sewing everything on.
Step 12 :
Now that we know the felt pieces are the way we want them, we want to sew on the snout. The top of the snout is sewn between rounds 16-17, and is 8 rounds vertical. The bottom of the snout is sewn between rounds 24-25.
Step 13 :
Find the center of your snout and use a couple sewing pins to mark it. Use this center point to find your middle 5 stitches between the eyes and this is where we'll begin sewing on the nose. Put the nose between the 1st and 2nd rounds from the top of the snout. Go over the nose about 10-11 times to get desired thickness. Then bring your needle down between the 6th-7th row from the top of the snout to make the line of the mouth. Make the three freckles on each side of the snout all 1 stitch in length as shown in the reference photos for placement.
Step 14 :
***MAKE SURE YOUR BLUE FELT PIECE IS TURNED TO THE BACKSIDE THAT ALREADY HAS MARKER ON IT FOR THIS STEP***. We will be marking it up again to trim it.
Step 15 :
Place your felt pieces back where you want them (you may want to pin them down), and with a marker trace out the snout now that it's sewn in place. This is where we will cut out the felt along the shape of the snout. I drew my line a little further out to make sure I didn't initially cut off too much.
Step 16 :
Sew the blue felt piece on top of the red felt piece with light blue embroidery thread. No need to sew the bottom part down just yet.
Step 17 :
Place eyes in the eye holes and figure out how you want to position the whites of the eyes. Use sewing needles to make holes in the felt where you want them to be. Put the holes slightly underneath the safety eyes to hide the holes. Then insert the safety eyes through the felt and into the head and secure them. Trim the felt bottom to match snout and finish sewing felt to head. Tuck thread tails and clean up the piece when finished.
— Assembly / Final Steps :
Info :
Fasten off all pieces leaving tails for sewing. Pin parts for placement before sewing and weave in all ends as you go. Attach the top hat brim and hat top to each other with hot glue or sewing and add cardboard for support if desired.
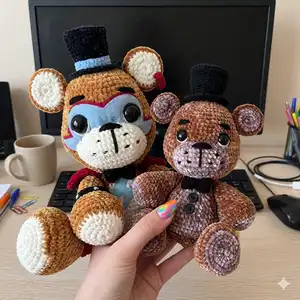
Thank you for choosing the Top Hat Teddy pattern — a lovable amigurumi you can customize and cherish! 🧸
This pattern includes two styles and step-by-step photos to guide your assembly and felt applique work. ✨
Have fun mixing colors, felt details, and accessories to make a teddy that's truly yours. 🧶