🧢 Beautiful ✨ Detailed πŸ’ Adorable

Toby - The Siamese Cat Amigurumi Pattern

Toby - The Siamese Cat Amigurumi Pattern
4.1β˜… Rating
5-7 Hours Time Needed
2.6K Made This
βœ‚οΈ

Intermediate Level

Ideal for those with basic crochet experience, featuring slightly more advanced stitches and techniques to expand your skills.

⏱️

Weekend Treat

Takes 5-7 hours, making it an enjoyable project to finish over a couple of days.

🧸

Cute Companion

An adorable friend to cherish, handcrafted with love to bring comfort and joy for years to come.

About This Toby - The Siamese Cat Amigurumi Pattern

This pattern creates Toby, a small Siamese cat amigurumi with contrasting mask and paws, adorable whiskers, and a decorative collar and bell. The design features color changes and shaping to form the characteristic facial mask and compact body. Clear round-by-round instructions and helpful photos guide you through assembly and finishing.

Toby - The Siamese Cat Amigurumi Pattern crochet pattern - detailed view of completed project

You will work the head, body, legs, ears, tail and collar in continuous spirals with detailed stitch counts provided for each round. Perfect as a charming gift or a keepsake, Toby finishes at approximately 4.3 inches tall.

Why You'll Love This Toby - The Siamese Cat Amigurumi Pattern

I absolutely love this pattern because it balances sweet detail with a compact size that makes it quick and satisfying to crochet. I enjoy the clever color changes that create Toby's signature mask and paws, which always make the finished toy look full of personality. Sewing the tiny ears and adding the collar and bell is one of my favorite finishing touches and really brings the character to life. I hope you feel the same joy assembling Toby and gifting or displaying this little handmade companion.

Toby - The Siamese Cat Amigurumi Pattern step 1 - construction progress Toby - The Siamese Cat Amigurumi Pattern step 2 - assembly progress Toby - The Siamese Cat Amigurumi Pattern step 3 - details and accessories Toby - The Siamese Cat Amigurumi Pattern step 4 - final assembly and finishing

Switch Things Up

I love changing the color palette to give Toby a fresh personality; try pastel creams and greys for a softer look or rich contrasting browns for a more realistic Siamese effect.

I often make a miniature keychain version by using a finer yarn and a 1.5mm hook to create a tiny Toby that fits on a bag or keys.

I sometimes swap the safety eyes for embroidered eyes for a softer, child-safe finish; use French knots or tiny satin stitches to create expressive eyes.

I like to experiment with the collar by crocheting different edging stitches or using beads and charms instead of a bell for added flair.

I recommend adding wire inside the tail or limbs for posability if you want Toby to hold small props or to pose on a shelf.

I sometimes personalize the face by moving the whisker placement slightly and changing the mouth shape to give Toby different expressions.

I enjoy making matching accessories like a tiny blanket or hat using leftover yarn to create a set that complements the cat's colors.

I also try substituting the YarnArt Jeans with a cotton DK yarn for a slightly firmer texture and clearer stitch definition.

I like to sew a small felt patch inside the collar with a name or small embroidered initial to make each Toby unique and gift-ready.

I often vary the stuffing amount to change the firmness and posture; slightly less stuffing makes a more floppy, cuddly cat while more stuffing keeps shapes crisp.

Common Mistakes & How to Fix Them

βœ— Skipping stitch markers when joining the body to the head leads to misaligned seams; place and check stitch markers each time you change sections to maintain alignment. βœ— Forgetting to insert safety eyes at the specified rounds causes placement errors; insert the safety eyes between rounds 18-19 with 7 sts apart before stuffing the head. βœ— Overstuffing the head or body can distort shaping and make sewing difficult; stuff gradually and shape as you go to maintain smooth curves. βœ— Not securing color changes properly results in loose ends or gaps; weave in or secure color change tails as you go and stitch color joins tightly to avoid gaps.

Toby - The Siamese Cat Amigurumi Pattern

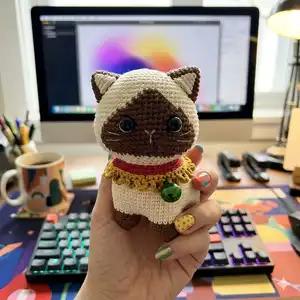
Make your own Toby, a charming Siamese cat amigurumi, with clear step-by-step rounds, photos, and finishing tips. This pattern uses YarnArt Jeans and a small 2.0mm hook to create a compact, high-detail toy. You will enjoy shaping the little face, sewing tiny ears, and adding a sweet collar and bell for personality.

Intermediate 5-7 Hours

Materials Needed for Toby - The Siamese Cat Amigurumi Pattern

β€” Main Fabric

  • 01
    YarnArt Jeans yarn (160m/50g) - Brown (70) - approx 20-30g
  • 02
    YarnArt Jeans yarn (160m/50g) - Light brown (40) - approx 10-20g
  • 03
    YarnArt Jeans yarn (160m/50g) - Cream (05) - approx 50-70g (main body)
  • 04
    YarnArt Jeans yarn (160m/50g) - White (01) - small amounts for eyelid details
  • 05
    YarnArt Jeans yarn (160m/50g) - Honey (84) - small amount for collar edging
  • 06
    YarnArt Jeans yarn (160m/50g) - Red (51) - small amount for collar base
  • 07
    YarnArt Jeans yarn (160m/50g) - Black (53) - tiny amount for eyelid detail and whisker accents

β€” Tools Required

  • 01
    Crochet hook size 2.0mm
  • 02
    Safety eyes blue ocean 9mm (pair)
  • 03
    One bell 13mm
  • 04
    One wooden button 10mm
  • 05
    Scissors
  • 06
    Yarn needle for sewing
  • 07
    Stitch markers
  • 08
    Polyester fiberfill for stuffing
  • 09
    Pins for assembly (optional)

Progress Tracker

0% Complete

β€” Head :

Round 1 :

8sc into magic ring (8)

Round 2 :

8inc (16)

Round 3 :

(sc, inc)*8 (24)

Round 4 :

(2sc, inc)*8 (32)

Round 5 :

(3sc, inc)*8 (40)

Round 6 :

(4sc, inc)*8 (48)

Round 7 :

(5sc, inc)*8 (56)

Round 8 :

56sc (56)

Round 9 :

(6sc, inc)*8 (64)

Round 10 :

64sc (64)

Round 11 :

36sc, 3sc, 25sc (64)

Round 12 :

35sc, 5sc, 24sc (64)

Round 13 :

34sc, 7sc, 23sc (64)

Round 14 :

33sc, 9sc, 22sc (64)

Round 15 :

31sc, 13sc, 20sc (64)

Round 16 :

30sc, 15sc, 19sc (64)

Round 17 :

15sc, (sc, inc)*7, sc, inc, 14sc, sc, inc, (sc, inc)*7, 3sc (80)

Round 18 :

35sc, 6sc, mark the point, 9sc, mark the point, 6sc, 24sc (80)

Round 19 :

34sc, 23sc, 23sc (80)

Round 20-22 :

33sc, 25sc, 22sc (80)

Round 23 :

(8sc, dec)*3, 3sc, 5sc, dec, 8sc, dec, 8sc, dec, (8sc, dec)*2 (72)

Round 24 :

(7sc, dec)*3, 4sc, 3sc, dec, 7sc, dec, 7sc, dec, (7sc, dec)*2 (64)

Round 25 :

(6sc, dec)*3, 5sc, sc, dec, 6sc, dec, 6sc, dec, (6sc, dec)*2 (56)

Round 26 :

(5sc, dec)*4, sc, 4sc, dec, 4sc, sc, dec, (5sc, dec)*2 (48)

Round 27 :

(4sc, dec)*8 (40)

Round 28 :

BLO (3sc, dec)*8 (32)

Info :

Insert the safety eyes between round 18-19 with 7 sts apart. Stuff the head. Use white yarn to sew mouth and whiskers between round 20-22. Use white and black yarn to sew eyelid. Use orange blush on the nose. Now continue to crochet body.

β€” Body :

Round 1 :

Make a chain of 10ch, start in the 2nd chain from hook, place the stitch marker after crocheting the 1st stitch, this is the 1st stitch of round 1 of body: inc, 8sc, 32sc on the head, work on the other side of the chain: 8sc, inc. (photo 4, 5) (52)

Round 2 :

2inc, 48sc, 2inc (56)

Round 3 :

(sc, inc)*2, 15sc, inc, 16sc, inc, 15sc, (sc, inc)*2 (62)

Round 4 :

(sc, inc, sc)*2, 7sc, inc, 34sc, inc, 7sc, (sc, inc, sc)*2 (68)

Round 5 :

(3sc, inc)*2, 52sc, (3sc, inc)*2 (72)

Round 6 :

(11sc, inc)*6 (78)

Round 7 :

(12sc, inc)*6 (84)

Round 8-13 :

84sc (84)

Round 14 :

(12sc, dec)*6 (78)

Round 15-17 :

78sc (78)

Info :

Don't cut the yarn, now we start to crochet the legs.

β€” Legs (4) :

Setup :

2sc, chain 10, skip 14sts, 7sc, chain 10, skip 14sts, 4sc, chain 10, skip 14sts, slst. Fasten off, weave in the yarn end. There are 4 holes and we crochet 4 legs in there. Start with the 1st leg.

Round 1 :

14sc, 10sc on the chain (24)

Round 2-4 :

Change to light brown yarn 24sc (24)

Round 5 :

Change to brown yarn 24sc (24)

Round 6 :

(sc, dec)*8 (16)

Round 7 :

8dec (8)

Info :

Fasten off, leaving a long tail about 15cm for sew the FLO of each remaining stitches and pull it tight to close. Weave in end. Crochet the remaining legs similar to the 1st leg.

β€” Stomach :

Round 1 :

Attach yarn to the 1st stitch next the front leg. (photo 17) 7sc, 1ch, turn (7)

Round 2 :

7sc, 1ch, turn (7)

Round 3 :

7sc, 7ch, rotation (photo 19) (7)

Round 4 :

Start in the 2nd loop from hook: 13sc, 7ch, rotation (13)

Round 5 :

Start in the 2nd loop from hook: 19sc, 1ch, turn (19)

Round 6 :

19sc, 1ch, turn (19)

Round 7 :

13sc, 1ch, turn (13)

Round 8-10 :

7sc, 1ch, turn (7)

Info :

Fasten off, leaving a long tail about 50cm for sewing. Stuff while sewing.

β€” Ears (2) :

Round 1 :

4sc into magic ring (4)

Round 2 :

4inc (8)

Round 3 :

(sc, inc)*4 (12)

Round 4 :

2sc, inc, 2sc, inc, (2sc, inc)*2 (16)

Round 5 :

3sc, inc, 2sc, sc, inc, (3sc, inc)*2 (20)

Round 6 :

4sc, inc, 2sc, 2sc, inc, (4sc, inc)*2 (24)

Round 7 :

5sc, inc, 2sc, 3sc, inc, (5sc, inc)*2 (28)

Round 8 :

9sc, 5sc, 14sc (28)

Info :

Stuff the ears. Fasten off, leave a long tail for sewing.

β€” Tail :

Round 1 :

5sc into magic ring (5)

Round 2 :

5inc (10)

Round 3 :

(sc, inc)*5 (15)

Round 4-16 :

15sc (15)

Info :

Fasten off, leave a long tail for sewing. Stuff the tail.

β€” Collar :

Round 1 :

Make a chain of 42ch, start from the 7th chain from the hook: (hdc, hdc inc)*18, turn (54)

Round 2 :

Change to honey yarn ch, 54sc, turn (54)

Round 3 :

(ch6, sk2, slst)*18 (126)

Info :

Fasten off, weave in the yarn end. Sew the button and the bell to the collar. Wear collar for the cat.

β€” Sewing :

Item :

Sew ears to the head between round 4-11. Sew tail to the body between round 1-5.

Assembly Instructions

  • Attach safety eyes between head rounds 18-19, spacing them 7 stitches apart and secure the washers tightly before stuffing the head.
  • Sew the ears to the head between rounds 4 and 11, aligning the base of each ear to the marked positions and whipstitch in place securely.
  • Sew the tail to the back of the body between body rounds 1-5, using the long tail left from the tail to stitch through the body and secure firmly.
  • Position and sew legs to the bottom of the body, ensuring even spacing so the cat sits level; weave in all tails and tuck ends neatly inside the body.
  • Sew collar button and bell to the finished collar, then fasten the collar around the cat's neck and secure with a few stitches so it stays in place.

Important Notes

  • πŸ’‘Use stitch markers to mark the first stitch of rounds and points used for color changes to keep shaping accurate.
  • πŸ’‘Stuff firmly but not too tightly for the best shape and structure; overstuffing can distort the face and seams.
  • πŸ’‘Weave in ends and secure color change tails as you go to avoid bulky or loose joins later.
  • πŸ’‘Insert safety eyes before the head is fully closed to guarantee correct placement and safe attachment.

Toby the Siamese Cat is a compact, lovable amigurumi designed with sweet details and a tiny decorative collar. This pattern walks you through head shaping, body construction, leg placement, and final assembly so you can create a charming companion. Whether you keep Toby for yourself or gift him to a friend, he will bring a smile and handmade warmth. 🧢🐱

You ask,

we answer.

FAQs

What size will the finished piece be?

The finished doll size is approximately 4.3 inches tall when using YarnArt Jeans and a 2.0mm hook.

Can I use different yarn weights for this pattern?

Yes, you can use different yarn weights, but this will affect the final size; choose an appropriate hook size to maintain gauge and proportions.

Do I need prior crochet experience for this pattern?

This pattern is rated intermediate, so basic knowledge of single crochet, increases, decreases, and working in continuous spirals is recommended for best results.

How long does this project typically take to complete?

Most crocheters complete this project in 5-7 hours, though time may vary depending on experience and pace.