About This Tishka the Cat Amigurumi Pattern
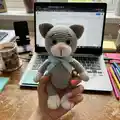
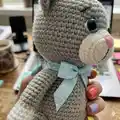
This pattern creates a fluffy standing cat named Tishka with a sculpted white muzzle, embroidered details, and brushed yarn for a fur-like finish. You will crochet the head, body, muzzle, ears, paws, tail, and assemble them with plastic joints for poseable limbs. The pattern uses small hook sizes and furry yarn to achieve that soft, plush appearance.

Clear step-by-step rounds are included for each part along with material and tool lists, shaping notes, and decoration instructions. Perfect for intermediate crocheters who enjoy shaping and finishing techniques.
Why You'll Love This Tishka the Cat Amigurumi Pattern
I absolutely love this pattern because it combines simple amigurumi construction with sculpting and combing techniques that bring the character to life. I enjoy the process of crocheting small parts and assembling them into a charming, poseable figure. The sculpted muzzle and brushed yarn create a lot of personality with relatively small effort. It is highly rewarding to watch the toy transform as you add eyes, muzzle, and groom the fur.
Switch Things Up
I love how easy it is to change the look by swapping yarn colors — try pastel shades for a soft nursery buddy or bold colors for a playful take.
You can change the final size by using different yarn weights and hook sizes: bulky yarn with a larger hook makes a chunky cuddly cat, while thin yarn makes a mini keychain version.
I often swap the glass eyes for safety eyes or embroidered eyes for a more child-safe toy or a vintage look.
Try adding tiny crocheted accessories like a scarf, bow, or tiny hat to personalize each cat and make a set with different outfits.
For more poseability, I sometimes use wire armatures inside the limbs instead of—or in addition to—the plastic joints so I can pose the cat in different positions.
You can experiment with muzzle shaping: slightly larger muzzle halves give a rounder face, while smaller halves make a daintier look.
Instead of combing to create the fur effect, you can use eyelash or specialty faux fur yarn for a different texture without trimming.
I recommend practicing the muzzle sculpting on a spare pair of white halves until you get the eye socket depth and muzzle curve you like.
To make a set, vary eye sizes and shapes — larger eyes give a cuter appearance; smaller, more realistic eyes give a classic stuffed-animal vibe.
Embroider different expressions or mouth lines for personality; a small upward curve or slight tilt of the eyebrows changes the whole mood of the toy.
Common Mistakes & How to Fix Them
✗ Skipping the marker placement for the head and body will make shaping and joining difficult; place and align markers as instructed (middle of back side) to maintain symmetry.
✗ Not inserting the plastic joint at the correct row can lead to poorly positioned limbs; lock the plastic joint in the 7th row of the body as directed before continuing.
✗ Forgetting to stuff gradually causes lumps and misshapen parts; stuff little by little during decreases and shaping so the parts keep a smooth contour.
✗ Crocheting too loosely with bulky fur yarn makes the stitches visible and the fabric floppy; keep a small hook (2.0 mm) and maintain consistent tension for neat shaping.
✗ Joining muzzle halves incorrectly flattens the muzzle shape; connect the two white muzzle parts with slip stitches and then crochet a round of single crochet around them (do not sc into the sl st) to keep the shape defined.