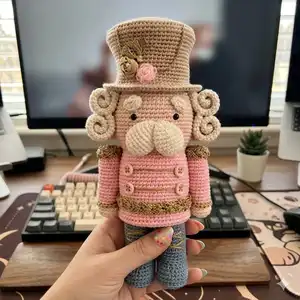
Make a charming Theo the Nutcracker amigurumi with detailed step-by-step instructions and clear photos. This pattern walks you through every piece — head, body, hat, boots, curls and accessories — so you can create a beautiful handmade holiday keepsake. Perfect as a thoughtful gift or festive decor, the pattern highlights cute detailing like embroidered flowers and twisted gold laces. Follow the complete materials list and assembly notes to finish a polished toy you�ll be proud to display.
Progress Tracker
0% Complete
— Head and Body :
Round 1 :
With nude color 7 sc in a magic ring, close.
Round 3 :
(1 sc, 1 inc) x7. /21sts
Round 4 :
(2 sc, 1 inc) x7. /28sts
Round 5 :
(3sc, 1 inc) x7. /35sts
Round 6 :
2 sc, 1 inc, (4 sc, 1 inc) x6, 2 sc. /42sts
Round 7 :
(5 sc, 1 inc) x7. /49sts
Round 8 :
3 sc, 1 inc, (6 sc, 1 inc) x6, 3 sc. /56sts
Round 9 :
(7 sc, 1 inc) x7. /63sts
Round 10 to 25 :
63sc per round.
Round 26 :
(7sc, 1 dec) x7. /56sts
Round 27 :
3sc, 1 dec, (6sc, 1 dec) x6, 3sc. /49sts
Info :
Place safety eyes between rounds 18 and 19 with 10sc separation between them.
Round 28 :
Change to pink and crochet a round of slip stitches along the blo.
Round 29 :
For the bloo 49 sc.
Round 30 :
(6sc, 1 inc) x7. /56sts
Round 31 :
(7 sc, 1 inc) x7. /63sts
Round 32 to 47 :
63sc per round.
Info :
Cut the thread and close with a needle. Fill out.
— Body Base (2) :
Round 1 :
With pink color 7 sc in a magic ring, close.
Round 3 :
(1 sc, 1 inc) x7. /21sts
Round 4 :
(2 sc, 1 inc) x7. /28sts
Round 5 :
(3 sc, 1 inc) x7. /35sts
Round 6 :
2 sc, 1 inc, (4 sc, 1 inc) x6, 2 sc. /42sts
Round 7 :
(5 sc, 1 inc) x7. /49sts
Round 8 :
3 sc, 1 inc, (6 sc, 1 inc) x6, 3 sc. /56sts
Round 9 :
(7 sc, 1 inc) x7. /63sts
Info :
Cut the thread and close with a needle.
Info :
To join both bases you must first trace one of them on a cardboard that will serve as firmness between both pieces, cut the cardboard and reserve it.
Info :
Join both bases with the right sides facing you and anchor the pink strand at any point on the front base (take it completely), and take only the floo from the back base, also at any point.
Info :
Crochet 63 slip stitches, when finished cut the yarn and make an invisible closure with a needle, hide the yarn.
Info :
To finish we will join the base to the body, to do this we are going to position the body with the opening facing up, fill it and put the cover base with the right side facing out, we are going to sew point by point taking the floo of the base and the floo of the body, at the end hide the thread with a needle.
— Arms (X2) :
Round 1 :
With nude color 7sc inside a magic ring and close the ring. /7sts
Round 3 :
(1 sc, 1 inc) x7. /21sts
Round 4 and 5 :
21 sc per round. /21sts
Round 6 :
Change to pink color and crochet 21 slip stitches. /18sts
Round 7 :
21sc for the bloo. /21sts
Round 8 to 20 :
21 sc per round.
Info :
Cut the strand leaving it long to join. Fill the arm completely.
— Arm Closure (X2) :
Round 1 :
With pink color, mount 7sc in a magic ring and close the ring. /7sts
Round 3 :
(1 sc, 1 inc) x7. /21sts
Info :
Cut the thread and make an invisible closure with a needle.
Info :
To close the arm you must trace the circumferences on cardboard and cut them to use as a shape. Place the arm next to its cover and join with a needle point by point, taking both floos. When finished, hide the thread with a needle.
Info :
With gold embroidery thread, knit a round of crab stitch edging in the available pink floo, then hide the thread with a needle.
— Shoulder Epaulettes (X2) :
Round 1 :
With gold embroidery thread make 2 ch in a magic ring and 9hdc, close the ring.
Round 2 :
2ch, 9 hdc inc, 1hdc at the base of the first ch, close with slipped stitch in the second ch.
Round 3 :
slip stitch for the bloo throughout the round.
Round 4 :
By bloo (3ch, 2hdc pineapple stitch, skip 2 stitches and crochet a slip stitch in the next stitch) x 6, 2 slipped stitches.
Info :
Cut the strand leaving it long and then join it.
— Belt :
Row 1 :
In a magic ring cast on 3ch, 1dc, 1ch, 2dc, close the ring and rotate.
Row 2 :
1 slip stitch along the bloo and 1 slip stitch in the ch space, 3ch , 1dc, 1ch, 2dc, rotate.
Info :
Repeat row 2 as many times as necessary until it covers the circumference of Theo's body, cut the thread leaving it long and then sew to the other end and form the belt.
— Soles (X4) :
Round 1 :
With lead color work 10ch and cast on from the second ch from the crochet 8sc, inc 3sc, 8sc on the opposite part of the chains and inc 3sc. /22sts
Round 2 :
8 sc, 3 inc, 8 sc, 3 inc. /28sts
Round 3 :
7sc, (1sc, 1 inc) x2, (1 inc, 1sc) x2, 6sc, (1sc, 1 inc) x2, 1 inc, 1sc, 1 inc. /36sts
Round 4 :
9sc, (1sc, 1 inc) x2, (1 inc, 1sc) x2, 10sc, (1sc, 1 inc) x2, (1 inc, 1sc) x2, 1sc. /44sts
Info :
Cut the thread and close with a needle.
— Soles Joint (X2) :
Info :
With crochet and lead thread we are going to join both soles with a piece of cardboard in between, this way we will give firmness to the boot.
Info :
To do this, first trace a sole, in this case we use cardboard, cut out and reserve. Position both soles with the right side facing you, one on top of the other and we will begin to join using slip stitch, starting at point 39 of both soles and taking the backloop of the outer sole and both points of the inner sole, before closing, insert the cardboard.
Info :
When finished, cut the thread and make an invisible closure with a needle.
— Boots (X2) and Joint :
Round 1 :
With lead color work 24 ch, anchor in the first ch with a slipped stitch and work 5 ch. /29 sts
Round 2 :
1 sc from the second ch from the crochet, 3 sc cast on in the following chains, 24 sc, 4 sc in the chains, 1 triple inc in the last ch. /35sts
Round 3 :
32 sc, 3 inc. /38sts
Round 4 :
32 sc, 6 inc. /44sts
Round 5 to 8 :
44sc per round. /44sts
Info :
Cut the thread and close with a needle.
Info :
To crochet the upper part of the boot, anchor the lead thread in the back with a slip stitch and crochet 9 rounds of 24 sc. Cut the thread and close it with needl.
— Hat Base (X2) :
Round 1 :
With Beige color crochet 7 sc in a magic ring, close.
Round 3 :
(1 sc, 1 inc) x7. /21sts
Round 4 :
(2 sc, 1 inc) x7. /28sts
Round 5 :
(3sc, 1 inc) x7. /35sts
Round 6 :
2 sc, 1 inc, (4 sc, 1 inc) x6, 2 sc. /42sts
Round 7 :
(5 sc, 1 inc) x7. /49sts
Round 8 :
3 sc, 1 inc, (6 sc, 1 inc) x6, 3 sc. /56sts
Round 9 :
(7 sc, 1 inc) x7. /63sts
Round 10 :
4 sc, 1 inc, (8 sc, 1 inc) x6, 4 sc. /70sts
Round 11 :
(9sc, 1 inc) x7. /77sts
Info :
To join we are going to use round 12 of one of the bases, therefore, you only have to cut the thread and close with a needle in one of them. Trace one of the cardboard bases, cut it and put it between them, you must position both bases with the right side facing you and then crochet the next round:
Round 12 :
77sc taking both bloo and remember to put the cardboard in the middle of both bases before finishing closing.
— Top and Edge :
Round 14 :
(9sc, 1 dec) x7. /70sts
Round 15 to 17 :
70 sc per round.
Round 18 :
4sc, 1 dec, (8sc, 1 dec) x6, 4sc. /63sts
Round 19 to 26 :
63 sc per round.
Round 27 :
By floo work 4 sc, 1 inc, (8 sc, 1 inc) x6, 4 sc. /70sts
Round 28 :
(9sc, 1 inc) x7. /77sts
Round 29 :
5 sc, 1 inc, (10 sc, 1 inc) x6, 5 sc, slipped stitch in the next stitch. /84sts
Round 30 :
Change the direction as shown in photo 3, crocheting from the purl side we make a round of slip stitches along the blo. Cut, make an invisible closure with a needle and hide the thread.
— Hair Curler (X12) :
Round 1 :
With winter white color, mount 6sc in a magic ring, close the ring. /6 sts
Round 3 :
(1 sc, 1 inc) x6. /18sts
Round 4 to 26 :
18 sc per round.
Info :
Cut the strand leaving it long and then join it.
— Eyebrows (X2) :
Info :
With winter white, cast 3 ch in a magic ring, then make a pineapple stitch of 3 double treble crochet (dtr) and close everything with a slipped stitch, close the magic ring. Cut the strand leaving it long to then join.
— Mustache (X2) :
Round 1 :
With winter white color, 6sc in a magic ring, close the ring. /6sts
Round 3 :
(1 sc, 1 inc) x6. /18sts
Round 4 to 8 :
18sc per round.
Round 9 :
(1 sc, 1 dec) x6. /12sts
Info :
Close with a needle and cut the thread, leaving it long to then join.
This nutcracker pattern brings a timeless holiday classic to life with modern pastels and elegant details. Create Theo with love and patience, and you�ll have a charming handmade decoration or thoughtful gift. Enjoy the assembly and embroidery touches—each step makes your piece uniquely special. 🧶🎀