This festive collection walks you through multiple holiday projects — oversized crochet-covered ornaments, layered ombre trees, playful garlands, and a reusable gift bag. Youll use stash yarn, simple stitch repeats, and easy assembly techniques to create charming seasonal decor. The patterns are adaptable so you can customize colors, sizes, and embellishments to suit your holiday style.
Progress Tracker
0% Complete
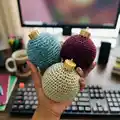
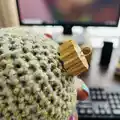
— Ornaments (Crochet-Covered Foam Balls) :
Info :
Working in the CONTINUOUS Round: I do not join and chain, but continue to work in the next stitch. Use a stitch marker so you dont lose your place.
Item Notes :
Materials: foam craft balls (6"), ornament toppers, 4-ply worsted weight yarn; hold two strands together for thicker fabric if desired; use K/6.5mm hook for these examples.
Starting/Increasing :
Chain 2. Single crochet 6 in the second chain from the hook and work over your starting tail. Starting in the first sc make 2 sc in that stitch and in each stitch around. (12) *Still work over the starting tail. After getting done with all 12 sc for that round, pull the starting tail to cinch up the opening. You can now trim that tail or weave it in or just leave it if it will be on the inside of your work. You want to move your stitch marker to the last stitch of each round so you know when you get to the end.
Round 3 :
(Make 1 sc in next stitch, make 2 sc in the next stitch) repeat around (18)
Round 4 :
(Make 1 sc in next 2 stitches, make 2 sc in the next stitch) repeat around (24)
Round 5 :
(Make 1 sc in next 3 stitches, make 2 sc in the next stitch) repeat around (30)
Round 6 :
(Make 1 sc in next 4 stitches, make 2 sc in the next stitch) repeat around (36)
Round 7 :
(Make 1 sc in next 5 stitches, make 2 sc in the next stitch) repeat around (42)
Round 8 :
(Make 1 sc in next 6 stitches, make 2 sc in the next stitch) repeat around (48)
Round 9 :
(Make 1 sc in next 7 stitches, make 2 sc in the next stitch) repeat around (54)
Rounds 10-17 :
1 sc in each stitch around (54)
Info :
When you get to this part you want to have your crochet fit just a little larger than your ball. Fold it around the top of your ball and see how it fits — it should look 'loose' around the edges. If you need to continue increases, follow the increase pattern above; if it is too large, pull back a row.
Round 18 :
To go from 54 to 48: (Make 1 sc in next 7 stitches, make an inv dec over the next two stitches) repeat around
Round 19 :
To go from 48 to 42: (Make 1 sc in next 6 stitches, make an inv dec over the next two stitches) repeat around
Round 20 :
To go from 42 to 36: (Make 1 sc in next 5 stitches, make an inv dec over the next two stitches) repeat around
Round 21 :
To go from 36 to 30: (Make 1 sc in next 4 stitches, make an inv dec over the next two stitches) repeat around
Info :
***Once I got here to 30 stitches around, I inserted my foam ball. If you are using balls like mine and they have a hole make sure you put the hole facing you. It might be a little tight — just stretch it and pop it in. You will have to do the rest of the decreases with the foam inserted. Just pull out the stitches a little as you work into them.
Round 22 :
To go from 30 to 24: (Make 1 sc in next 3 stitches, make an inv dec over the next two stitches) repeat around
Round 23 :
To go from 24 to 18: (Make 1 sc in next 2 stitches, make an inv dec over the next two stitches) repeat around
Round 24 :
To go from 18 to 12: (Make 1 sc in next stitch, make an inv dec over the next two stitches) repeat around
Round 25 :
Make one sc in each stitch around (12) and leave a tail to weave opening shut. I use only one of my two tails to weave shut and then when you come back around tie the two together and hide tails with your needle under a few stitches.
Info :
This blue and teal ball is worked with the exact same pattern as above, but worked in the Back Loop Only (BLO) all the way around for a ribbed effect.
— Trees: 'Deck the Halls with Boughs of Holly' (Discs and Topper) :
Materials/Hook Info :
Yarn: 4-ply worsted scraps; For discs use I/5.5mm hook (discs), for the topper use H/5.0mm hook; cardboard cones for cores; steam iron or garment steamer for shaping discs.
Info :
First decide how many layers/discs your tree will have (example: small tree 6 discs, large tree 7 discs). Chains for discs were made in multiples of 5 in the example.
Disc Start :
Chain the number of chains you want for the base circumference where the disc will sit on the cone. Join to form a circle. Chain up 3 (chain 3 counts as a double crochet). Double crochet around in each chain, join to the top of the chain 3 to complete the first round.
Round 2 :
Chain up 3 and make 2 dc in each double crochet around. Join to the top of the chain 3 and chain up 3 again (do this for each round).
Round 3 :
Double crochet one double crochet in double crochet around.
Info :
You can alternate increase rounds (Round 2) and straight rounds (Round 3) to create the wavy, ruffled discs. Most example discs had 5 rounds and a final round of half double crochet to finish the edge.
Steam/Assemble Info :
Steam all discs to relax and shape them; painting the cone and steaming while paint dries produced nicer drape and lay for each disc. Glue gun optional to secure discs on the cone permanently.
— Top of the Tree (Topper) :
Topper Start :
Starting with your smaller hook, chain 2. In the 2nd chain from the hook make 4 sc (this forms the very tip).
Round 2 :
Join and chain up 1 and make 1 sc in each stitch around. (4 sc)
Round 3 :
Join and chain up 1 and make 2 sc in the 1st sc and then sc in each of the rest of the stitches around. (5 sc)
Round 4 :
Join and chain up 1 and make a sc in each stitch around. (5)
Round 5 :
Join and chain up 1 and make 2 sc in the 1st sc and then sc in each of the rest of the stitches around. (6 sc)
Round 6 :
Join and chain up 1 and make a sc in each stitch around. (6 sc)
Round 7 :
Join and chain up 1 and make 2 sc in the 1st sc and then sc in each of the rest of the stitches around. (7 sc)
Round 8 :
Join and chain up 1 and make 2 sc in the 1st sc and then sc in each of the rest of the stitches around. (8 sc)
Round 9 :
Join and chain up 1 and make 2 sc in the 1st sc and then sc in each of the rest of the stitches around. (9 sc)
Round 10 :
Join and chain up 1 and make 2 sc in the 1st sc and then sc in each of the rest of the stitches around. (10 sc)
Round 11 :
Join and chain up 1 and make 2 sc in the 1st sc and then sc in each of the rest of the stitches around. (11 sc)
Round 12 :
Join and chain up 1 and make 2 sc in the 1st sc and then sc in each of the rest of the stitches around. (12 sc)
Round 13 :
Join. Chain up 3 and make 2 dc in each double crochet around. Join to the top of the chain 3 and chain up 3 again (do this for each round) (24 dc)
Round 14 :
Double crochet one double crochet in double crochet around. (24)
Round 15 :
Repeat Round 13 *you may decide you dont want to increase again and just work straight up.
Round 16 :
Repeat Round 14 *repeat this row for the length you want (this creates the tall cone shape for the tree top).
Assemble :
I cant STRESS enough how much difference it makes to steam your discs. It makes your cheap, 4-ply old yarn into a soft, fluffy, nice draping tree. Paint your cone if you like and steam discs while paint dries. Use glue gun or pins to secure discs as desired.
— Garlands :
Ideas/Materials :
String beads before you start for beaded garlands, add fluffy yarn for a snow effect, or metallic yarn for tinsel. Use stash yarn and pony beads for quick results.
Garland #1 :
I grabbed green and red metallic yarn, held two strands together, and used a yarn needle to thread pony beads. I threaded 250 pony beads onto both strands held together. I used L/8mm hook: chain 10, pull up a bead, chain 10, pull up a bead and repeat down the strand until all beads were used. Fold or twist or knot along the length to create thickness.
Garland #2 :
Held two skeins together and used L/8mm hook. Worked simple back and forth rows starting with a chain 5 and then 4 hdc in each row. Worked until you run out of yarn. Steam and stretch to lengthen and straighten the garland.
Garland #3 :
Use two leftover strands held together and J/6mm hook. Start with chain 10 then hdc back down/up the chain, then repeat this: (chain 25, slip on 3 beads, hdc in the 3rd chain from the hook and in the next 13-15 chains) to create dangling curls and beads pattern. This creates curly, decorative pieces.
Garland #4 :
I chained 20, slipped up a bead and repeated until my stash was gone to use remaining beads and yarn; fold in half and tie knots to create a faux popcorn effect if desired.
— Gift Bag #2 (Formula for Custom Reusable Bag) :
Overview :
Gift Bag #2 is a formula rather than an exact pattern. Use any yarn (two strands of 4-ply held together recommended) and J/6mm hook for a sturdy bag. You will need plastic canvas or thick cardboard for the bottom support.
Materials :
Two strands of 4-ply worsted weight yarn held together (or yarn you prefer), J/6mm hook, plastic canvas or cardboard for bottom support, yarn needle, scissors.
Step 1 - Decide Measurements :
Decide the width (left to right), depth (front to back), and height you want. Chain the desired width. Note: your chain will grow as much as 1/2 an inch after you start crocheting stitches into it. Example: for a 10" wide bag start with a 9.5" chain and see how that goes.
Step 2 - Crochet Fabric :
Work in half double crochet (hdc) or single crochet, two strands held together, chain 1 and turn after each row. Crochet a long piece of fabric that will be height x 2 + the depth of the bottom. Example in the pattern: to make a 12" high bag with 6" depth add 12+12+6+30 (first piece of fabric needs to be 30" high in that example). Lay flat and measure as you go.
Step 3 - Second Piece (Depth) :
The second piece is worked in rows and the width of this piece equals the depth of the bag. Example: for a 6" depth the starting chain is ~5.5" and you work the number of rows equal to the depth measurement.
Step 4 - Plastic Canvas Insert :
Measure and cut your plastic canvas/cardboard slightly smaller than the side/gusset piece so it sits between two overlapping bottom layers and wont poke through. Trim jagged edges and smooth sides. Position canvas between bottom layers for support.
Step 5 - Secure Insert :
Add a few running stitches or small dots of hot glue to hold the canvas in place while you stitch layers together. Use matching yarn and sew along sides to secure temporarily; final secure stitching comes later.
Step 6 - Stitch Bottom and Sides :
Flip the side piece with the plastic canvas attached under your main piece. Pin all 4 sides evenly and stitch the bottom pieces together first (all four sides). Then sew up the sides. You can use contrasting yarn to make visible decorative stitches if desired.
Step 7 - Handles :
Make handles by creating strips and braiding or knotting: make 6 strips (3 per side), pull them through and knot or braid; pull through three stitches on the opposite side and knot to secure.
Finishing :
Weave in ends, trim excess canvas if needed, and add any decorative drawstring or lining if desired. The bag can be used as a gift bag, tote, or purse depending on final size and reinforcement.
These festive projects are all about using what you already have and creating something special for the holidays. Mix and match colors, hold strands together for a chunkier look, and add beads or metallic yarn for extra sparkle. Whether youre making giant ornaments, a tiered ombre tree, or a sturdy reusable gift bag, you can finish these projects quickly and with lots of personality. 🌟 Happy crafting and stash-busting this holiday season! 🎁