🧢 Beautiful ✨ Detailed πŸ’ Adorable

The Little Sheep Amigurumi Pattern

The Little Sheep Amigurumi Pattern
4.4β˜… Rating
2-4 Hours Time Needed
3.2K Made This
βœ‚οΈ

Intermediate Level

Ideal for those with basic crochet experience, featuring slightly more advanced stitches and techniques to expand your skills.

⏱️

Bite-Sized Project

Finishes in 2-4 hoursβ€”perfect for an afternoon of creative relaxation.

🧸

Cute Companion

An adorable friend to cherish, handcrafted with love to bring comfort and joy for years to come.

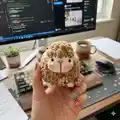
About This The Little Sheep Amigurumi Pattern

This pattern makes a small, round amigurumi sheep with a textured bobble-style body and a separate crocheted face/head. It uses chunky velvet-type yarn to create a plush, squishy finish and includes bobble and X-stitch techniques for the woolly texture. You will make the body and the head separately, then sew them together and add simple embroidered facial details.

The Little Sheep Amigurumi Pattern crochet pattern - detailed view of completed project

Includes clear round-by-round instructions for the body and head, plus assembly and finishing notes. Video links are provided to help with tricky steps like weaving in ends and sewing the head.

Why You'll Love This The Little Sheep Amigurumi Pattern

I absolutely love this pattern because it turns simple stitches into a wonderfully textured, huggable toy. I love how quickly the chunky yarn builds up into a plush body β€” it is instantly satisfying to watch it grow. The little embroidered face gives each sheep so much personality, and I enjoy the finishing steps that make it look handmade and unique. Sharing this pattern allows me to pass on techniques I use for soft toys, and I hope it brings you the same joy it gives me.

The Little Sheep Amigurumi Pattern step 1 - construction progress The Little Sheep Amigurumi Pattern step 2 - assembly progress The Little Sheep Amigurumi Pattern step 3 - details and accessories The Little Sheep Amigurumi Pattern step 4 - final assembly and finishing

Switch Things Up

I love customizing this little sheep by changing the yarn color β€” try pastel shades for a nursery-friendly set or deep jewel tones for a modern shelf display.

If you want a bigger or smaller sheep, change your yarn weight and hook size; bulky yarn with a larger hook makes a super-squishy large version, while sport weight and a smaller hook gives a tiny collectible sheep.

I often use safety embroidery eyes or felt cutouts instead of safety eyes for a softer child-safe toy β€” both give very different expressions.

Experiment with different bobble stitch sizes: using bo2 or bo4 in different rounds changes the woolly texture and makes each sheep unique.

Try adding tiny accessories like a crocheted scarf, a bell collar, or a felt flower to personalize your sheep for gifts.

I sometimes embroider freckles or different mouth shapes to give each sheep a distinct personality β€” small changes in eye placement completely alter the expression.

To make a keychain version, use thinner yarn and a smaller hook and attach a keyring to the top of the head before stuffing and closing.

Consider making a family set with matching but color-coordinated sheep for a charming display or gift box set.

For a seasonal twist, use small yarn pom-poms or tiny crocheted pumpkins as props when photographing your sheep for social media or gift tags.

I like to mix yarn textures β€” a smooth face with a textured, fuzzy body really emphasizes the woolly look and creates lovely contrast.

Common Mistakes & How to Fix Them

βœ— Skipping stitch markers during rounds with increases or decreases can lead to uneven shaping; place a marker at the start of each round and move it as you go to stay accurate. βœ— Not stuffing gradually causes lumps or poor shaping inside the toy; add fiberfill a little at a time while checking the shape and firmness frequently. βœ— Using the wrong yarn weight for the bobble stitch will change texture and size; use chunky velvet-style yarn of similar thickness and the recommended hook to match the pattern gauge. βœ— Pulling the yarn too tight on decreases will distort the piece and close gaps awkwardly; maintain a relaxed, consistent tension and use invisible decreases for a neater finish.

The Little Sheep Amigurumi Pattern

Make a sweet, squishy little sheep with this detailed crochet pattern. You will create a cuddly amigurumi using chunky velvet-style yarn and simple shaping techniques. The pattern includes step-by-step rounds, head and body instructions, and assembly guidance so you can finish a charming toy. Perfect as a handmade gift or a cozy desk companion.

Intermediate 2-4 Hours

Materials Needed for The Little Sheep Amigurumi Pattern

β€” Main Fabric

  • 01
    Chunky velvet-style yarn size suitable for 4-5mm hook (e.g., Himalaya Velvet, Himalaya Dolphin Baby) - main color approximately 30-60g
  • 02
    Chunky yarn contrast color (cream/white) for face and feet - approximately 20-40g
  • 03
    Optional accent yarn (brown) for embroidered nose and mouth - small scraps

β€” Tools Required

  • 01
    Crochet hook size 4mm
  • 02
    4.5mm toy safety eyes
  • 03
    Needle for sewing
  • 04
    Toy stuffing (fiberfill)
  • 05
    Stitch marker
  • 06
    Scissors
  • 07
    Yarn needle for weaving ends and sewing pieces together
  • 08
    Powder blush (optional) for cheeks

Progress Tracker

0% Complete

β€” Body :

Info :

Start in white yarn. (Note: Use cream yarn in pink word, white yarn in black word)

Round 1 :

Rnd 1: 8sc in MR [8]

Round 2 :

Rnd 2: 8inc [16]

Round 3 :

Rnd 3: (sc, inc) x 8 [24]

Round 4 :

Rnd 4: (3sc, inc) x 6 [30]

Round 5 :

Rnd 5: 11sc, bo4, 4sc, bo4, 13 sc [30]

Round 6-9 :

Rnd 6 - 9 (4 rounds): 30sc [30]

Round 10 :

Rnd 10: 11sc, bo4, 4sc, bo4, 13 sc [30]

Round 11 :

Rnd 11: (3sc, dec) x 6 [24]

Round 12 :

Rnd 12: (sc, dec) x 8 [16]

Info :

Stuff the body firmly with fiberfill.

Round 13 :

Rnd 13: 8dec [8]

Info :

Fasten off, leaving the yarn tail. Using the yarn needle, weave the yarn tail through the front loop of each remaining stitch and pull it tight to close.

β€” Head :

Info :

Start in cream yarn. Ch 4. Stitches are worked in both sides of the foundation chain.

Round 1 :

Rnd 1: Skip the first ch on the hook, inc in next ch, sc in next ch, 4sc in next ch. Continue on the other side of the foundation chain, sc in next ch, inc in next ch [10]

Round 2 :

Rnd 2: 2inc, sc, 4inc, sc, 2inc [18]

Round 3 :

Rnd 3: 18sc [18]

Round 4 :

Rnd 4: (ch 4 , skip 3 ch from the hook, slst in next ch), sc in next st of the base, dec, (sc, dec) x 2, (ch 4, skip 3 ch from the hook, slst in next ch), sc in next st of the base, dec, (sc, dec) x 2 [12]

Info :

Change to white yarn.

Round 5 :

Rnd 5: (sc, bo2) x 6 [12]

Info :

Stuff the head firmly with fiberfill.

Round 6 :

Rnd 6: 6dc-dec [6]

Info :

Fasten off, leaving the yarn tail. Using the yarn needle, weave the yarn tail through the front loop of each remaining stitch and pull it tight to close.

β€” Assembly :

Infos :

Insert the 4.5mm safety eyes between rounds 3 and 4, 4 stitches apart. Embroider the nose with brown threads. Sew the head to the body. Use powder blush for the cheeks.

Info :

Video tutorials: How to crochet the sheep's head (from rnd 4 to 6): https://youtu.be/85tKbY9tJMk

Info :

How to embroider the sheep's face: https://youtu.be/_t3-pnZa54M

Info :

How to sew the head to the body: https://youtu.be/lLMfpMLDcvU

Assembly Instructions

  • Insert the 4.5mm safety eyes between rounds 3 and 4 on the head, spacing them 4 stitches apart and secure the washers tightly behind the eyes.
  • Embroider the nose and mouth with brown thread before attaching the head to the body, following the photos as a guide for placement and expression.
  • Sew the head to the body by aligning the base of the head with the top opening of the body and using a yarn needle to whipstitch securely all around.
  • Use powder blush lightly on the cheeks after assembly to add soft color; apply sparingly for a natural look.
  • Weave the yarn tail through the front loops of the remaining stitches and pull tight to close openings, then weave ends into the body to secure.

Important Notes

  • πŸ’‘Make the invisible decrease stitches to have a better results.
  • πŸ’‘Add toy stuffing according to instruction of each part rather than stuffing all at once to keep shape smooth.
  • πŸ’‘Stitches should be close together so that when the finished toy is stuffed, the stuffing doesn't come out through gaps in the stitches.
  • πŸ’‘The pattern includes color change techniques, bobble stitch technique and the X stitch technique for single crochet stitch; practice these techniques to match the finished look.
  • πŸ’‘Finished size: the finished toy is approximately 7cm (~ 2.75 inch) high.

Congratulations on finishing your Little Sheep β€” what a delightful handmade friend you made! This fluffy amigurumi is perfect for gifting or keeping on your shelf as a cozy companion. Try making a herd in different colors for a charming set everyone will adore. πŸ§ΆπŸ‘βœ¨

You ask,

we answer.

FAQs

What size will the finished piece be?

The finished amigurumi measures approximately 7 cm (~2.75 inches) high when using the recommended chunky velvet-style yarn and a 4mm hook.

Can I use different yarn weights for this pattern?

Yes, you can use different yarn weights, but this will change the final size and texture; choose an appropriate hook for your yarn and be aware the bobble stitch effect may differ.

Do I need prior crochet experience for this pattern?

This pattern is rated intermediate due to bobble stitches and shaping techniques; basic knowledge of single crochet, increases, decreases, and reading rounds is recommended.

How long does this project typically take to complete?

Most crocheters complete this project in 2-4 hours, depending on experience and how much time you spend on finishing details like embroidery and assembly.

Where should I place the safety eyes?

Insert the 4.5mm safety eyes between rounds 3 and 4 on the head, approximately 4 stitches apart, before stuffing and finishing the head.