🧢 Beautiful ✨ Detailed πŸ’ Adorable

Starfish Amigurumi Pattern

Starfish Amigurumi Pattern
4.2β˜… Rating
2-3 Hours Time Needed
1.6K Made This
βœ‚οΈ

Intermediate Level

Ideal for those with basic crochet experience, featuring slightly more advanced stitches and techniques to expand your skills.

⏱️

Bite-Sized Project

Finishes in 2-4 hoursβ€”perfect for an afternoon of creative relaxation.

🎁

Tiny Treasure

Small, sweet, and gift-worthy creations that fit perfectly in the palm of your hand with detailed charm.

About This Starfish Amigurumi Pattern

This pattern teaches you how to crochet a soft, squishy starfish using purple yarn with easy shaping for each arm. You will make a belly and back, join them to form the arms, stuff as you go, and add adorable facial details. It uses basic amigurumi stitches with increases and decreases for shaping. The result is a cute little starfish perfect for gifts or seaside decor.

Starfish Amigurumi Pattern crochet pattern - detailed view of completed project

Step-by-step rounds and helpful photos guide you through assembly and finishing. Embroidery accents and eye placement are included to personalize your starfish.

Why You'll Love This Starfish Amigurumi Pattern

I absolutely love this pattern because it turns a few simple rounds into a delightful, textured starfish that feels handmade and special. I enjoy the way the belly and back join creates natural arms with lovely definition. The pattern is compact but satisfying, so you can finish one in an afternoon and make a whole school of starfish in different colors. I also love adding tiny embroidered details that give each starfish its own personality.

Starfish Amigurumi Pattern step 1 - construction progress Starfish Amigurumi Pattern step 2 - assembly progress Starfish Amigurumi Pattern step 3 - details and accessories Starfish Amigurumi Pattern step 4 - final assembly and finishing

Switch Things Up

I love changing the color palette to make each starfish unique; try soft pastels for a nursery-friendly set or bright neons for playful decor.

I sometimes use a smaller hook and fingering-weight yarn to make tiny keychain versions that are perfectly portable.

If you want a chunkier, cuddlier starfish I choose a bulkier chenille yarn and a larger hook for a plush finish.

I often add contrasting embroidery along the arm edges to create a dotted or striped spike effect for more texture.

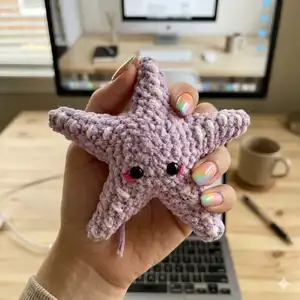
Try using safety eyes of different sizes to change the expression from cute to curious β€” always position them between rows 3 and 4 with four stitches between.

I occasionally stitch felt cheeks or tiny sequins for extra sparkle when making starfish as gifts for kids.

To make a themed set, vary the embroidery colors β€” coral pink, sunny orange, or ocean blue all look great together.

I like to add a small hanging loop at the top of one arm so the starfish can double as an ornament or bag charm.

If you want posable arms, consider weaving a thin piece of wire into each arm before stuffing for gentle shaping.

I recommend experimenting with little accessories like a tiny crocheted shell or bow to personalize each starfish and make them extra special.

Common Mistakes & How to Fix Them

βœ— Skipping the magic ring or starting chain can leave a hole in the center; always begin with a tight MR and pull the tail to close the opening. βœ— Not joining the belly and back properly can cause lopsided arms; align rounds carefully and stitch evenly when joining at Row 6 as instructed. βœ— Overstuffing the arms or body makes the starfish stiff and distorts the points; stuff gradually and lightly while shaping each arm. βœ— Placing the safety eyes in the wrong rows will change the expression; attach the eyes between rows 3 and 4 with four stitches between them as directed.

Starfish Amigurumi Pattern

Make a charming starfish amigurumi using soft purple yarn and simple shaping techniques. This pattern walks you through the belly and back construction, joining, stuffing, and finishing touches so you can create a cuddly ocean friend. Perfect for gifting, decorating, or building your amigurumi collection. Follow the step-by-step rounds and photos to achieve a neat, professional result.

Intermediate 2-3 Hours

Materials Needed for Starfish Amigurumi Pattern

β€” Main Fabric

  • 01
    Purple plush/chenille yarn (main color) - small amount, approximately 30-50g depending on size
  • 02
    Pink embroidery thread - small amount for mouth/blush
  • 03
    Orange embroidery thread - small amount for spikes/details
  • 04
    Small amounts of white or contrasting yarn for tiny highlights (optional)

β€” Tools Required

  • 01
    Crochet hook (recommended 3.5mm ergonomic hook as pictured)
  • 02
    Yarn needle for sewing and weaving ends
  • 03
    Scissors
  • 04
    Stitch markers (optional)
  • 05
    Safety eyes (2 pieces) - size of your choice
  • 06
    Polyester stuffing
  • 07
    Embroidery needle for facial details

Progress Tracker

0% Complete

β€” Starfish's Belly :

Row 1 :

5SC in an MR (5)

Row 2 :

5 INC (10)

Row 3 :

10 INC (20)

Row 4 :

(SC, INC) 10 times (30)

Info :

Cut the yarn.

β€” Starfish's Back :

Row 1 :

6SC in an MR (6)

Row 2 :

6INC (12)

Row 3 :

(SC, INC) 6 times (18)

Row 4 :

(2SC, INC) 6 times (24)

Row 5 :

(3SC, INC) 6 times (30)

Info :

From this row, crochet together the abdominal part to create the arms of the starfish.

Row 6 :

6SC (starfish's back), 6SC (starfish's belly) (12)

Row 7 :

12SC (12)

Row 8 :

(2SC, DEC) 3 times (9)

Row 9 :

9SC (9)

Row 10 :

2SC, DEC, 3SC, DEC (7)

Row 11 :

7SC (7)

Row 12 :

DEC, SC, DEC, 2SC (5)

Row 13 :

5SC (5)

Info :

Cut the yarn.

Info :

*Stuffing*

Info :

Crochet the remaining 4 arms similarly as above. Fasten off and cut the yarn.

β€” Finishing :

Info :

Attach the eyes between rows 3 and 4, with 4 stitches between them.

Info :

Embroider pink and orange for the mouth and spikes. Complete the product.

Assembly Instructions

  • Join the belly and back starting at Row 6 by crocheting the back and belly stitches together as indicated to form the first arm and beginning of the body.
  • Stuff each arm lightly while you crochet them; continue crocheting each arm by following Rows 7-13 for each point, then fasten off and cut the yarn.
  • Attach safety eyes between rows 3 and 4, leaving 4 stitches between the eyes to ensure correct spacing and expression.
  • Embroider small pink accents for the mouth/blush and orange stitches for spikes along the arms as shown in the photos, using an embroidery needle.
  • Sew in any remaining loose ends with a yarn needle and adjust stuffing as needed to ensure even shape and symmetry.

Important Notes

  • πŸ’‘Work with consistent tension to keep all five arms the same size and maintain symmetry across the starfish.
  • πŸ’‘Stuff each arm gradually as you shape it to avoid lumps or overstuffing which can distort the points.
  • πŸ’‘Cut and secure yarn tails after finishing each arm and weave in ends to prevent unraveling during play or display.

This adorable starfish amigurumi is designed to be quick, cute, and irresistibly squishy. Make a whole collection in soft pastels or bold ocean hues to brighten any room. Add embroidered spikes and a tiny mouth to give each starfish its own personality. 🧢🌊✨

You ask,

we answer.

FAQs

What size will the finished piece be?

The finished starfish size depends on your yarn and hook choice; with plush/chenille yarn and a 3.5mm hook it will be roughly palm-sized (around 10-12 cm across).

Can I use different yarn weights for this pattern?

Yes, you can use different yarn weights but this will change the final size; adjust your hook accordingly and remember stuffing amounts will vary.

Do I need prior crochet experience for this pattern?

This pattern is rated intermediate because it involves joining two pieces, shaping with increases/decreases, and attaching eyes and embroidery details.

How long does this project typically take to complete?

Most crocheters finish this small starfish in 2-3 hours, though time may vary depending on experience level and how many decorative details you add.