🧢 Beautiful ✨ Detailed πŸ’ Adorable

Star Dreamcatcher Pattern

Star Dreamcatcher Pattern
4.4β˜… Rating
2-3 Hours Time Needed
1.4K Made This
βœ‚οΈ

Intermediate Level

Ideal for those with basic crochet experience, featuring slightly more advanced stitches and techniques to expand your skills.

⏱️

Bite-Sized Project

Finishes in 2-4 hoursβ€”perfect for an afternoon of creative relaxation.

🏑

Cozy Accent

A warm touch for your space that transforms ordinary corners into inviting nooks filled with handmade charm.

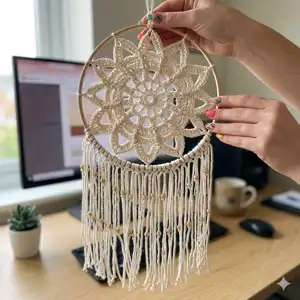
About This Star Dreamcatcher Pattern

This pattern creates a double star mandala designed to be mounted inside a wooden or wire hoop to make a stylish dreamcatcher. The mandala is worked in 8 rounds with one round crocheted on the wrong side so both faces have pretty texture. The instructions include a chart, written rounds, a photo tutorial and clear joining instructions for finishing inside a hoop.

Star Dreamcatcher Pattern crochet pattern - detailed view of completed project

You will learn special stitches such as 3dc cluster, front-post treble variations and front-post half double crochet. This quick, decorative project is ideal for gifts and home decor.

Why You'll Love This Star Dreamcatcher Pattern

I absolutely love this pattern because it transforms simple stitches into a delicate, double-sided mandala that looks beautiful from both sides. I enjoy the little challenge of working one round on the wrong side to create reversible texture. The finished dreamcatcher is lightweight and versatile, perfect for customizing with beads, shells or ribbons. It is also a satisfying quick project that yields a gorgeous piece you can display or gift.

Star Dreamcatcher Pattern step 1 - construction progress Star Dreamcatcher Pattern step 2 - assembly progress Star Dreamcatcher Pattern step 3 - details and accessories Star Dreamcatcher Pattern step 4 - final assembly and finishing

Switch Things Up

I love customizing this mandala with different yarn weights and colors to create unique textures and sizes.

I sometimes switch to a finer thread and smaller hook to create lace-like, delicate mandalas perfect for small hoops.

Using a bulkier cotton yarn with a larger hook gives a chunky, rustic look that works well in larger 20 cm hoops.

I often add beads on the joins before securing the mandala to the hoop for a subtle embellishment.

You can replace some of the ribbon tails with shells or wooden beads for a coastal vibe.

Try dyeing your finished mandala with tea or diluted paint for a vintage effect.

I like to experiment with asymmetric decorationsβ€”grouping feathers and shells on one side only for an artistic look.

For a modern style, use monochrome colors and metallic thread wrapped around the hoop.

If you want a sturdier hanging, add a thin wire inside the yarn loops for more structural support in the hoop.

I also create mini sets in graduated sizes to hang together; changing hoop diameter and yarn weight is an easy way to achieve this.

Common Mistakes & How to Fix Them

βœ— Skipping the slip stitch join at the end of rounds can make it hard to identify the start of the next round; always join rounds as instructed and mark the first stitch with a stitch marker. βœ— Not paying attention to Right Side (RS) and Wrong Side (WS) instructions will reverse the texture; follow the RS/WS notes carefully and work round 7 on the Wrong Side as specified. βœ— Neglecting to count repeats in rounds with repeated sections often results in missing petals; count your repeats (for example the 11 repeats in rounds 3-6) after completing each round to ensure accuracy. βœ— Pulling yarn too tightly when joining the mandala to the hoop will distort the shape; leave a little tension and arrange the mandala centrally before tightening and securing. βœ— Forgetting to use the correct hook size for your chosen yarn changes finished size and tension; match the recommended hook to your yarn or adjust and make a test mandala to confirm the fit.

Star Dreamcatcher Pattern

Create a delicate double-sided star mandala that becomes a beautiful dreamcatcher for your home. This pattern walks you through an 8-round mandala worked on the right side with one round on the wrong side to give texture on both faces. You will learn special front-post stitches and how to join and decorate the mandala inside a hoop for a charming hanging piece.

Intermediate 2-3 Hours

Materials Needed for Star Dreamcatcher Pattern

β€” Main Fabric

  • 01
    Scheepjes Maxi Sweet Treat - 140 m per 25 g (use with 1.75 - 2 mm hook) - suitable for 10 cm hoop
  • 02
    Scheepjes Linnen Soft - 135 m per 50 g (use with 2.5 - 3 mm hook) - suitable for 15 cm hoop
  • 03
    Scheepjes Catona - 125 m per 50 g (use with 2.5 - 3 mm hook) - suitable for 15 cm hoop
  • 04
    Huisje van katoen Barbante M - 100 m per 250 g (use with 3.5 - 4 mm hook) - suitable for 20 cm hoop
  • 05
    You can use any similar cotton yarn in the listed weights and amounts depending on hoop diameter

β€” Tools Required

  • 01
    Crochet hook size 1.75 - 2.0 mm (for Maxi Sweet Treat)
  • 02
    Crochet hook size 2.5 - 3.0 mm (for Linnen Soft or Catona)
  • 03
    Crochet hook size 3.5 - 4.0 mm (for Barbante M)
  • 04
    Wooden or wire rings (hoops) 10 cm, 15 cm or 20 cm diameter
  • 05
    Scissors
  • 06
    Tapestry needle to weave in ends
  • 07
    Pins and blocking board (for spray blocking)
  • 08
    Sisal twine or yarn to wrap hoop
  • 09
    Beads, shells, ribbon, feathers or other decorative items for finishing
  • 10
    Stitch markers (recommended)

Progress Tracker

0% Complete

Infos :

*...* Repeat the section inside. [...] group of sts worked in the same st/sp. RS Right Side. WS Wrong Side.

β€” Mandala :

Round 1 :

Start: ch6 join with sl st in first ch to form a ring. Ch1 (doesn't counts as a stitch) 12 sc in the ring. Join in ch1. (12 sc)

Round 2 :

Sl st in 1st sc, ch5, (counts as 1st dc ch2), dc ch2 in every sc. Join in the 3rd ch of initial ch5. (12 dc, 12 ch2-sp)

Round 3 :

Sl st in ch2-sp, ch2 2dc cl (counts as 3dc cl), ch3. Work 11 times: *3dc cl, ch3* in every ch2-sp. Join in the top of 1st 3dc cluster. (12 3dc cl, 12 ch3-sp)

Round 4 :

Sl st in ch3-sp, ch3 (counts as 1st dc), 3 dc in the same ch3-sp, skip 3dc cl. Work 11 times: *ch1, 4 dc in ch3-sp, skip 3dc cl*. Join with hdc in 3rd ch of initial ch3. (48 dc, 12 ch1-sp)

Round 5 :

Ch1 (counts as sc) ch6. Work 11 times: *sc in ch1-sp, ch6*. Join in 1st ch1 (counting as 1st sc). (12 ch6-sp, 12 sc)

Round 6 :

Ch1 (doesn't counts as a stitch), 5 hdc in ch6-sp, fptr around 3dc cluster from round 3. Work 11 times: *5 hdc in ch6 sp, fptr around 3dc cluster from round 3*. Join in ch1. (60 hdc, 12 fptr)

Round 7 :

Turn to the Wrong Side, sl st between fptr and 1st hdc, ch8, sl st between 5th hdc and fptr, fptr around 3dc cl in round 3, sl st between fptr and hdc. Work 11 times: *ch8, sl st between 5th hdc and fptr, fptr around 3dc cl in round 3, sl st between fptr and 1st hdc*. No join, turn your work around. (12 ch8-sp, 12 fptr, 24 sl st)

Round 8 :

Work on the Right Side, ch1 (doesn't counts as a stitch), work [5 hdc, ch2, 5 hdc] in ch8-sp, fphdc around fptr in round 6. Work 11 times: *[5 hdc, ch2, 5 hdc] in ch8-sp, fphdc around fptr in round 6*. Join in ch1. Double Star Mandala for a Dreamcatcher is ready. (120 hdc, 12 ch2-sp, 12 fphdc)

Assembly Instructions

  • Cover the wire or wooden ring by wrapping sisal twine or yarn around the hoop tightly until the entire ring is covered (photo reference B).
  • Place and sew each mandala into the hoop: fold a yarn tail of about 20 cm in half to create a loop, place the loop under the crocheted middle piece and pull the loop to the front; thread the ends of the yarn through the loop and pull tight to secure. Repeat around the mandala to attach it in four or more evenly spaced places.
  • Position the mandala centrally in the hoop and tie the middle piece to the hoop at the top, bottom and both sides; continue with the remaining corners of the middle piece until the mandala is secure.
  • Weave in all ends into the crocheted mandala and trim excess yarn; tie decorative items (beads, shells, feathers, ribbons) to the bottom of the hoop and make a loop at the top for hanging.
  • Decorate with ribbon tails by folding each ribbon piece in half and pulling the loop through the bottom of the hoop, then pulling the loose ends through the loop to form tassels; thread beads onto ribbon or string and secure with small knots as desired.

Important Notes

  • πŸ’‘Choose an option to start the mandala; start with a magic ring or with a ring of chains secured with a slip stitch.
  • πŸ’‘Please make yourself familiar with front post stitches (fptr and fphdc) before you start the pattern.
  • πŸ’‘You can finish off each round with a slip stitch; follow the chart on page 3 and start every round by the mark 'start' and the number of round on the chart.
  • πŸ’‘Pay attention in round 7 that you crochet on the Wrong Side; the coloured stitches in the chart indicate which side they are made on.
  • πŸ’‘Use stitch markers and blocking to shape the mandala before joining it to the hoop for best results.

This Star Dreamcatcher pattern guides you from the first chain to the finished double-sided star mandala ready for hanging. Let your creativity flow with beads, shells, ribbons or tassels to personalize each piece. Make a set in different sizes and colors for a beautiful gallery wall or a thoughtful handmade gift. 🧢✨

You ask,

we answer.

FAQs

What size will the finished piece be?

The finished mandala diameter depends on yarn and hook size and the hoop you use; recommended hoops are 10 cm, 15 cm or 20 cm and the pattern yarn suggestions correspond to those sizes.

Can I use different yarn weights for this pattern?

Yes, you can use different yarn weights, but that will change the finished size and texture; match your hook size to the yarn and consider a test mandala to ensure it fits your hoop.

Do I need prior crochet experience for this pattern?

This pattern is rated intermediate; you should be comfortable with basic stitches plus front-post stitches and reading a crochet chart for best results.

How long does this project typically take to complete?

Most crocheters complete the mandala and basic finishing in 2-3 hours, though adding decorations and joining to the hoop may take a bit longer.