🧢 Beautiful ✨ Detailed πŸ’ Adorable

Sponge Square Amigurumi Pattern

Sponge Square Amigurumi Pattern
4.1β˜… Rating
5-7 Hours Time Needed
2.5K Made This
βœ‚οΈ

Intermediate Level

Ideal for those with basic crochet experience, featuring slightly more advanced stitches and techniques to expand your skills.

⏱️

Weekend Treat

Takes 5-7 hours, making it an enjoyable project to finish over a couple of days.

🧸

Cute Companion

An adorable friend to cherish, handcrafted with love to bring comfort and joy for years to come.

About This Sponge Square Amigurumi Pattern

This pattern creates a square sponge-style amigurumi featuring a rectangular body, felt details for the eyes and teeth, and a little sailor-style hat. It includes instructions for the body, pants and shirt, legs, arms, hat, and accessories with clear rounds and color changes. You will use simple increases, back-loop work, and small felt pieces to finish the face and tie.

Sponge Square Amigurumi Pattern crochet pattern - detailed view of completed project

The design focuses on maintaining a rectangular shape using acetate inside the body and careful stuffing. The pattern is modular so you can make each piece separately and glue or sew them together for a neat finish.

Why You'll Love This Sponge Square Amigurumi Pattern

I absolutely love this pattern because it combines simple crochet techniques with playful, characterful details that really bring the toy to life. I enjoy the rectangular shaping challenge and the satisfaction of adding felt eyes and tiny teeth for personality. The hat and clothing pieces let me experiment with color and small embellishments, so each finished piece feels unique. Making this pattern is relaxing and rewardingβ€”every step adds charm and character.

Sponge Square Amigurumi Pattern step 1 - construction progress Sponge Square Amigurumi Pattern step 2 - assembly progress Sponge Square Amigurumi Pattern step 3 - details and accessories Sponge Square Amigurumi Pattern step 4 - final assembly and finishing

Switch Things Up

I love customizing this pattern by changing the color palette to make different characters and seasonal versions.

I often try pastel shades to make a softer, baby-friendly version that looks sweet on a nursery shelf.

To create a mini keychain version I use thinner yarn and a smaller hook, then attach a keyring through the hat or belt.

I sometimes embroider different facial expressions to give each doll a unique personalityβ€”just move the eyes or change the eyelash placement.

If you want a sturdier shape, I add a small cardboard or thicker acetate piece inside the body instead of a thin acetate.

Try swapping the felt tie for a tiny crocheted bow or scarf to give the toy a handmade accessory look.

For a more playful finish, I sew tiny buttons onto the blouse or add a removable crocheted hat in contrasting colors.

Use metallic or variegated yarn for the belt or hat band for a sparkly, decorative touch that stands out in photos.

I recommend experimenting with different stuffing levels; a slightly firmer fill keeps geometric shapes crisp while softer stuffing gives a cuddlier feel.

Finally, personalize each one with initials or a small embroidered message on the back for a heartfelt gift.

Common Mistakes & How to Fix Them

βœ— Skipping the acetate reinforcement will let the body lose its rectangular shape; glue a piece of acetate to the left side as instructed to help maintain the shape. βœ— Stuffing too quickly or too firmly can distort the rectangular profile; stuff little by little and check shape frequently while you work. βœ— Not aligning the white arm round with the blouse white round can make the blouse seam look uneven; position the arms so the first white round on the arm aligns with the last white round on the blouse. βœ— Forgetting to switch to BLO rounds where indicated will change the look of stripes; follow the BLO (back loop only) instructions exactly for the sock and cuff details.

Sponge Square Amigurumi Pattern

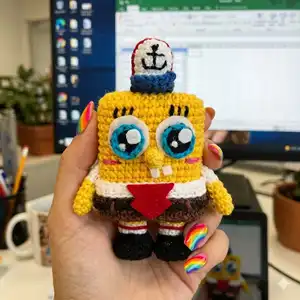
Make a charming square sponge amigurumi with this step-by-step crochet pattern. You will enjoy shaping the rectangular body and adding cute facial details like felt eyes, teeth, and a tiny hat. This pattern uses color changes and simple assembly to bring the character to life. Perfect as a handmade gift or a delightful desktop companion.

Intermediate 5-7 Hours

Materials Needed for Sponge Square Amigurumi Pattern

β€” Main Fabric

  • 01
    Yellow yarn - main body color (use small amounts as needed)
  • 02
    Brown yarn - pants and skirt color
  • 03
    White yarn - blouse, collar, hat details, socks
  • 04
    Black yarn - belt details and sock base
  • 05
    Turquoise yarn - eye outer color
  • 06
    Blue yarn - small hat detail
  • 07
    Red felt - tie
  • 08
    White felt - eyes and teeth pieces

β€” Tools Required

  • 01
    Crochet hook size 2 mm
  • 02
    Polyester stuffing
  • 03
    Glue for fabric and acetate
  • 04
    Small piece of acetate (to help the rectangular body shape)
  • 05
    White felt and red felt
  • 06
    Scissors
  • 07
    Yarn needle for sewing and weaving in ends
  • 08
    Embroidery needle and black yarn for eyelashes and anchor
  • 09
    Pins for positioning pieces before gluing

Progress Tracker

0% Complete

Info :

Stuff it little by little. Be careful not to lose the rectangular shape

β€” Body :

Info :

Using YELLOW. Make 8ch and start the 1st round in the 2nd ch from the hook

Round 1 :

1 inc, 5sc, triple inc, 6sc (16)

Round 2 :

sc, triple inc, 5sc, triple inc, sc, triple inc, 5sc, triple inc (24)

Round 3 :

2sc, triple inc, 7sc, triple inc, 3sc, triple inc, 7sc, triple inc, sc (32)

Round 4 :

3sc, triple inc, 9sc, triple inc, 5sc, triplo inc, 9sc, triple inc, 2sc (40)

Info :

To help maintain the rectangular shape, glue a piece of acetate to the left side

Round 5-14 :

40sc (40)

Info :

Cut the yarn and fasten off

β€” Pants + Shirt :

Info :

Using BROWN. Make 9ch and start the 1st round in the 2nd ch from the hook

Round 1 :

1 inc, 6sc, triple inc, 7sc (18)

Round 2 :

sc, triple inc, 6sc, triple inc, sc, triple inc, 6sc, triple inc (26)

Round 3 :

2sc, triple inc, 8sc, triple inc, 3sc, triple inc, 8sc, triple inc, sc (34)

Round 4 :

3sc, triple inc, 10sc, triple inc, 5sc, triple inc, 10sc, triple inc, 2sc (42)

Round 5-7 :

42sc (42)

Info :

Change to WHITE

Round 8 :

42slst BLO (42)

Round 9 :

42sc BLO (42)

Info :

Cut the yarn and fasten off. Glue the body inside this Pants + Blouse piece

β€” Legs :

Info :

Using BLACK

Round 1 :

8s in MR (8)

Round 2 :

8inc (16)

Info :

Glue acetate, or something similar, to the back of this piece

Round 3 :

16sc BLO (16)

Round 4 :

16sc (16)

Round 5 :

2sc, (dec, sc)*3, dec, 3sc (12)

Info :

Change to WHITE

Round 6 :

12slst BLO (12)

Round 7 :

12sc BLO (12)

Info :

Change to YELLOW

Round 8 :

12slst BLO (12)

Round 9 :

12slst BLO (12)

Info :

Cut the yarn and fasten off. Embroider the red detail on the sock. Make two identical pieces. Glue below the body (Picture 1)

β€” Arms :

Info :

Using YELLOW

Round 1 :

7sc in MR (7)

Round 2-5 :

7sc (7)

Info :

Change to WHITE

Round 6 :

7slst BLO (7)

Round 7 :

7sc BLO (7)

Info :

Cut the yarn and fasten off. Make two identical pieces. Glue to the sides of the body, aligning the first white round on the arm with the last white round on the Blouse

β€” Belt :

Item Name (P1) :

Using BLACK, but choose a thinner yarn. Make 49ch. Cut the yarn and fasten off. Glue it on the pants. With the color BROWN, embroider the details of the belt (Picture 2)

β€” Eye :

Info :

Cut 2 circles of white felt, approximately 2cm in diameter each. Glue it to the head, according to Picture 2

Round 1 :

Using the same black yarn that you used for the belt. Make 8sc in MR

Round 2 :

Using the same yarn as above, but in TURQUOISE color. Make 8slst BLO

Info :

Cut the yarn and fasten off. Cut small circular pieces of white felt and glue it to the eye (Picture 2). If you prefer, embroider instead of using felt. Embroider the eyelashes and cheeks, according to Picture 2

β€” Teeth :

Item Name (P1) :

Use White Felt to make two little teeth, approximately 0.4cm wide each. Glue them on the face according to Picture 2

β€” Nose :

Info :

Using YELLOW

Round 1 :

Make 4ch and start the 2st round in the 2nd ch from the hook. 1 3slst (3). Make 1ch and turn

Round 2 :

3slst BLO (3).

Info :

Cut the yarn and fasten off. Glue between the eyes, according to Picture 2

β€” Tie and Collar :

Item Name (P1) :

Use red felt for the tie, and white for the collar (Picture 2)
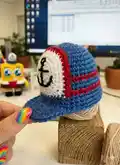
β€” Hat :

Info :

Using white.

Round 1 :

6 sc in MR (6)

Round 2 :

6 inc (12)

Round 3 :

(3sc,inc)*3 (15)

Round 4-6 :

(3 rounds). 15 sc (15)

Info :

Change to black.

Round 7 :

15 slst BLO (15)

Round 8 :

15 slst BLO (15)

Info :

Change to blue.

Round 9 :

5 sc FLO (5)

Round 10 :

Make 1 ch and turn. 5 sc (5)

Round 11 :

Make 1 ch and turn. 5 sc (5)

Info :

Make 1 ch and turn. Cut the yarn and fasten off. Embroider or paint the red lines. Embroider or paint the anchor.

Assembly Instructions

  • Glue a thin piece of acetate to the left side of the body to help maintain the rectangular shape, before stuffing fully.
  • Place the finished body inside the Pants + Blouse piece and glue it securely so the blouse edge aligns with the body top.
  • Glue the two legs below the body, spacing them evenly and ensuring the sock stripes face forward (see Picture 1).
  • Attach the two arms to the sides of the body, aligning the first white round on the arm with the last white round on the blouse.
  • Glue the belt (49ch strip) around the pants and embroider brown details over it; attach felt tie and collar to the front.

Important Notes

  • πŸ’‘Stuff the body little by little and adjust frequently to preserve the rectangular silhouette.
  • πŸ’‘Glue a piece of acetate inside the body to stabilize the rectangular shape before final stuffing.
  • πŸ’‘Make two identical pieces for arms and legs so the finished toy is symmetrical and balanced.
  • πŸ’‘Use felt for eyes and teeth as instructed or embroider them if you prefer a sewn finish.

This adorable square sponge friend is perfect for gifting or displaying as a cheerful keepsake. The small felt details and tiny hat make each piece full of personality and charm. Follow the clear rounds and glue-on assembly for a tidy finish that stands up to handling. 🧢 Have fun stitching! ❀️

You ask,

we answer.

FAQs

What size will the finished piece be?

The finished amigurumi measures approximately 10-12 cm tall when using the recommended small hook and yarn weight; size will vary with yarn and hook choice.

Can I change yarn weights to make different sizes?

Yes, use thicker yarn and a larger hook for a chunkier version, or thinner yarn and a smaller hook for a mini version; adjust stuffing and assembly accordingly.

Do I need to use acetate inside the body?

Using acetate is recommended to help maintain the rectangular shape, but if you prefer, a firm cardboard or layered felt can be used instead.

Is this pattern suitable for beginners?

This pattern is rated intermediate due to shaping, color changes, and assembly; beginners with basic crochet skills can try it but should be comfortable with increases and BLO techniques.