🧢 Beautiful ✨ Detailed πŸ’ Adorable

Sorting bees Amigurumi Pattern

Sorting bees Amigurumi Pattern
4.8β˜… Rating
5-7 Hours Time Needed
3.1K Made This
βœ‚οΈ

Intermediate Level

Iο»Ώdeal for those with basic crochet experience, featuring slightly more advanced stitches and techniques to expand your skills.

⏱️

Weekend Treat

Takes 5-7 hours, making it an enjoyable project to finish over a couple of days.

🧸

Cute Companion

An adorable friend to cherish, handcrafted with love to bring comfort and joy for years to come.

About This Sorting bees Amigurumi Pattern

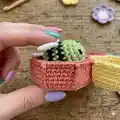
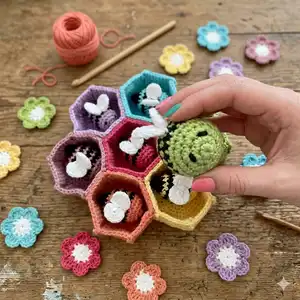
This pattern creates a colorful educational sorting toy made of seven hexagon bowls, seven little bees and seven flowers with magnetic connections. It includes step-by-step round instructions, special increases for polygonal bowls, and guidance for inserting magnets safely. You will make each piece using simple stitches and assemble them into a compact, playful set suitable for kids and adults alike.

Sorting bees Amigurumi Pattern crochet pattern - detailed view of completed project

The pattern is written in US terminology and worked in continuous rounds with helpful photos and tips. Materials, abbreviations and safety notes are included so you can make a safe, durable toy set.

Why You'll Love This Sorting bees Amigurumi Pattern

I absolutely love this pattern because it combines simple amigurumi techniques with a playful, educational purpose that kids adore. I enjoy the color possibilitiesβ€”making a rainbow of bowls and matching bees and flowers is so satisfying. The design uses small magnets for a tactile sorting experience, which adds an interactive element that brings the toy to life. I also love that the pattern teaches a special increase to form clean hexagon sides, a small technique that gives a big visual payoff.

Sorting bees Amigurumi Pattern step 1 - construction progress Sorting bees Amigurumi Pattern step 2 - assembly progress Sorting bees Amigurumi Pattern step 3 - details and accessories Sorting bees Amigurumi Pattern step 4 - final assembly and finishing

Switch Things Up

I love how easy it is to customize this pattern by changing colorsβ€”try pastel shades for a soft nursery set or bright neons for a bold learning toy.

You can make it bigger or smaller by swapping yarn weight and hook size; bulky yarn and a larger hook create chunky toys while thinner yarn makes cute mini versions.

I often add embroidered faces or felt details to change the expression and personality of each bee, giving every toy a unique character.

Want to adapt it for non-magnetic play? Skip the magnets and use velcro dots or sew the bees directly into pockets for a stationary playboard.

I sometimes make matching activity cards with colored stickers to encourage color recognition and sorting games during playtime.

For a classroom set, use different textures of yarn for the bowls so children can explore tactile differences while sorting.

I recommend trying different magnet sizes and strengths; stronger magnets mean fewer pieces needed, while smaller magnets are better for compact designs.

You can also turn this into a keyring or bag charm by making a single bee with an added loop and attaching a keyring or clip.

If you enjoy sewing, try joining the hexagons in alternate layouts to make larger mats, coasters or decorative displays from the same basic bowl pattern.

I like to package mine as a travel set, sewing a small zip pouch that fits all bees and flowers securely for on-the-go play.

Common Mistakes & How to Fix Them

βœ— Skipping stitch markers during rounds can cause you to lose track of the start of each round; place a stitch marker and move it each round to keep counting accurate. βœ— Not inserting magnets securely can create a choking hazard or loose parts; always sew the magnet cover firmly with several passes and test the magnet direction before final assembly. βœ— Forgetting to stuff evenly will produce lumpy bees or misshapen bodies; stuff gradually as you go and check shape frequently while adding small amounts of fiberfill. βœ— Changing colors incorrectly when making stripes can leave an awkward join; make the last half of the stitch with the old color and finish with the new color as described to create neat color changes. βœ— Overtightening your tension makes pieces stiff and hard to assemble; maintain consistent relaxed tension so hexagon bowls and bees fit together well.

Sorting bees Amigurumi Pattern

Create a colorful magnetic sorting toy set of little bees, flowers and hexagon bowls that encourages play and fine motor skills. This pattern guides you through making seven bowls, seven bees and seven flowers with full round-by-round instructions and assembly tips. You will learn a special increase for polygonal bowls and how to safely insert magnets for secure play. Perfect for gifting or classroom activities, this set is bright, tactile and endlessly fun to sort.

Intermediate 5-7 Hours

Materials Needed for Sorting bees Amigurumi Pattern

β€” Main Fabric

  • 01
    280 grams total yarn (10 ply): 35 g for each rainbow color (7 colors)
  • 02
    20 g white for wings and flower centers
  • 03
    15 g black for bee stripes and facial details
  • 04
    I used DROPS PARIS but any similar 10 ply yarn will work

β€” Tools Required

  • 01
    Crochet hook size 2.5 mm (UK 12 / C2 US)
  • 02
    Optional: crochet hook up to 5 mm (UK 6 / H8 US) if you prefer a looser fabric
  • 03
    Polyester fiberfill for stuffing
  • 04
    Small round magnets (approx. 2 cm / 0.8 in diameter) – I used 28 pcs
  • 05
    Stitch markers
  • 06
    Yarn needle for sewing and hiding ends
  • 07
    Scissors
  • 08
    Optional safety eyes (around 5 mm) if you choose not to embroider eyes
  • 09
    Pins for assembly (optional)

Progress Tracker

0% Complete

β€” Notes :

Info :

This pattern is written in US terminology and it is worked in continuous rounds unless otherwise stated. If you are from UK don’t worry, the differences between US and UK terminology in this pattern are: β€œsingle crochet (sc)” which is a double crochet for you. β€œdouble crochet (dc)” which is a treble crochet for you. β€œtreble crochet/ triple crochet (tc)” which is a double treble crochet for you.

Infos :

What you will need: 280 grams of yarn: 35 gr for each rainbow color (7 colors). 20 gr white. 15 gr black. I used DROPS PARIS but you can use any other yarn (10 ply) in your favorite colors. crochet hook: 12 UK = 2,5mm = C2 US (you can use up to 6 UK/5 mm/H8 US hook for this yarn, but I like my work to be tidy). Polyester fiberfill. Magnets – I used 28 pcs because mine were not strong, I got them from the stationary shop, but if yours are strong even 14 will be enough (they are small magnets 2 cm / 0,8 inches in diameter). Stitch markers. Needle. Scissors. Safety eyes – I did not use any, but if you want to, they should be around 5mm.

β€” Abbreviations :

Info :

Chain (ch). Magic ring (MR). Single crochet (sc) -this is double crochet in UK terminology. Double crochet (dc) -this is treble crochet in UK terminology. Treble crochet (tc) -this is double treble crochet in UK terminology. Increase (inc) – make 2 sc in the same stitch/ make 2 dc in the same stitch for UK. Decrease (Dec) - 2 sc crocheted together / 2 dc together for UK. Slip stitch (Sl).

β€” Bowls :

Info :

Make 7 in your favorite rainbow colors.

Round 1 :

MR + sc X 6 => 6

Round 2 :

inc X 6 => 12

Info :

Tip! Before pulling the tail to close the ring, insert the hook in the first stitch; in this way you will keep it loose enough for the hook to be inserted in the next row.

Info :

From this row down you should make "special increases – splnc" instead of normal ones. A special increase is a [sc + ch + sc] in the same stitch. You should add the extra chain in the increase to make your bowl more like a polygon. Do not count or work in the extra chain when working the next rows – it just helps with the shape so just ignore it.

Round 3 :

(1 sc + 1 splnc) X 6 => 18

Round 4 :

(2 sc + 1 splnc) X 6 => 24

Round 5 :

(3 sc + 1 splnc) X 6 => 30

Round 6 :

(4 sc + 1 splnc) X 6 => 36

Round 7 :

(5 sc + 1 splnc) X 6 => 42

Round 8 :

BLO sc X 48 => 48

Round 9-16 :

sc X 48 => 48

Info :

Now we are going to do the 6 edges on the sides of the bowls.

Info :

Repeat X 6: SL X 8. Like in the 3rd picture bellow go down with 9 X sc (you will be working over rows 16-8) (make sure your last sc is in the front loop of row 8). Go back up with 10 X SL – the slip stitches should be on the back of the single chains you just made (the last one should be at the top).

Info :

Optionally you can sew the bowls together like I did. There is no technique for this, but you will need a lot of patience.

β€” Bee :

Make the magnet support :

R1: MR + sc X 6 => 6, slip stitch in the first sc, leave a tail for sewing

Round 2 :

inc X 6 => 12

Info :

(the magnet should be small enough to fit in this pocket; however if yours is bigger just make an extra row to cover it βž” R2: inc X 6 => 12)

Make 2 wings (with white) :

R1: MR + sc X 6 => 6

Round 2 :

inc X 6 => 12, slip stitch in the first sc, leave a tail for sewing; sew the two wings together and leave the tail for sewing into the bee

Make the bee (with main color) :

R1: MR + sc X 6 => 6

Round 2 :

inc X 6 => 12

Round 3 :

(1 sc + 1 inc) X 6 => 18

Info :

Stop and sew the magnet socket (with the magnet inside) around rows 1/2. Make sure all your magnets are inserted in the same direction. To test this, use another magnet that should connect with all the bees on the same side.

Round 4-5 :

sc X 18 => 18

Info :

Sew also the eyes in increases 1 and 3 of row 2, using black needle. If you choose safety eyes go for the smallest you can find (5 mm or smaller).

With black :

R6: sc X 18

Info :

When changing the color: at row 6, in the last single crochet, make half of the stitch with your main color but then finish with the other color (black in this case) like in the pictures below.

With main color :

R7: sc X 18 => 18

With black :

R8: sc X 18 => 18

With main color :

R9: sc X 18 => 18

With black :

R10: (4 sc + 1 dec) X 3 => 15

Info :

Sew the wings between rows 7 and 9. Make sure they are centered between the eyes. Start stuffing the bee, stuff as you go.

With main color :

R11: (3 sc + 1 dec) X 3 => 12

With black :

R12: (2 sc + 1 dec) X 3 => 9

Round 13 :

(1 sc + 1 dec) X 3 => 6

Round 14 :

close the bee with a needle: insert a needle in the front loop of every stitch from the exterior to the middle of the stitch; after covering all 6 stitches pull firmly to close the ring. Insert the needle a couple of extra times under the stitches to make sure it’s well secured. Hide the yarn.

β€” Flower :

Make the magnet support :

R1: MR + sc X 6 => 6, slip stitch in the first sc, leave a tail for sewing

Round 2 :

inc X 6 => 12

Make the flower (with white) :

R1: MR + DC X 13 => 13, sl stitch in the second DC. We will not work on the first DC, so we will consider 12 DC, we will use them for 6 petals.

Info :

With the main color (change color at the slip stitch as learn before) REPEAT 6 times: Sc X 2 in the current stitch. 3 TREBLE CROCHET in the next stitch, sc X2 in the current stitch. Slip stitch in the next stitch.

Info :

Sew the magnet cover, containing the magnet in the back of the flower – make sure the magnet is in the correct direction – to test this just place the bee in front of the flower and they should connect like in the picture.

β€” Finishing :

Info :

Your sorting toy is now finished! Make sure to test all magnets for correct polarity and security before giving the toy to a child.

Assembly Instructions

  • Sew the magnet socket into the bee around rows 1–2, placing the magnet inside and leaving the sewing tail to secure it; make sure all bee magnets face the same direction.
  • Sew the magnet cover into the back of each flower, ensuring the magnet polarity is correct so bees connect to flowers as shown in the photos.
  • Attach the wings to the bee between rows 7 and 9, centering them between the eyes and sewing securely so they do not detach during play.
  • Optionally sew the bowls together by aligning hexagon edges and whipstitching them together; pin first to ensure correct placement and symmetry.

Important Notes

  • πŸ’‘Please supervise your kid while playing with this set and ensure magnets are fully secured inside pieces before use.
  • πŸ’‘Use stitch markers to keep track of rounds, especially when working continuous rounds and color changes for bee stripes.
  • πŸ’‘Stuff the bees gradually while shaping to avoid lumps and maintain a smooth, rounded body.
  • πŸ’‘Test magnet direction before final assembly so all bees connect to flowers and bowls as intended.

This cheerful Sorting Bees set brings color, counting and fine motor fun together in one handmade toy. Make a full rainbow of bowls, bees and flowers to create a playful matching game for little hands. Enjoy customizing colors and teaching sorting, matching and imaginative play with this tactile magnetic set. 🐝🧢✨

You ask,

we answer.

FAQs

What size will the finished pieces be?

Each bee measures approximately 3-4 cm tall and each hexagon bowl is approximately 6-7 cm across when using the recommended yarn and 2.5 mm hook; exact sizes vary with tension and yarn choice.

Can I use different yarn weights for this pattern?

Yes, you can use different yarn weights but your finished set will change in size; choose an appropriate hook for your yarn and remember stronger magnets may be needed for larger pieces.

Are magnets safe to use in toys for children?

Magnets can be hazardous if loose; follow the instructions to sew magnet covers securely and supervise young children while playing; ensure magnets are fully enclosed and tested before giving the toy to a child.

Do I need advanced crochet skills to make this set?

This pattern is rated intermediate β€” basic amigurumi skills, continuous rounds, color changes and simple sewing are required, but full step-by-step rounds are provided to guide you.