🧢 Beautiful ✨ Detailed πŸ’ Adorable

Snowman Friends Amigurumi Pattern

Snowman Friends Amigurumi Pattern
4.4β˜… Rating
2-3 Hours Time Needed
1.8K Made This
βœ‚οΈ

Intermediate Level

Ideal for those with basic crochet experience, featuring slightly more advanced stitches and techniques to expand your skills.

⏱️

Bite-Sized Project

Finishes in 2-4 hoursβ€”perfect for an afternoon of creative relaxation.

🧸

Cute Companion

An adorable friend to cherish, handcrafted with love to bring comfort and joy for years to come.

About This Snowman Friends Amigurumi Pattern

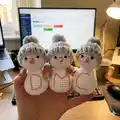
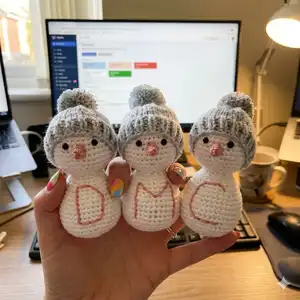
This pattern creates a charming little snowman amigurumi complete with a knit-style pom-pom hat and a tiny carrot nose. The head and body are crocheted in one piece using single crochet rounds, while the hat is knitted on double pointed needles for a textured look. You can embroider initials or add buttons for personalized detail. The finished snowman stands about 5.6 inches (14.22 cm) tall.

Snowman Friends Amigurumi Pattern crochet pattern - detailed view of completed project

Includes full round-by-round instructions for the head, body, nose, knit pom-pom hat, and assembly. Uses US crochet terminology and provides notes for stuffing and finishing.

Why You'll Love This Snowman Friends Amigurumi Pattern

I absolutely love this pattern because it combines simple amigurumi construction with a sweet knit-style hat that adds a lot of personality. I enjoy how the double-strand metallic detail gives the hats a subtle sparkle without being overwhelming. The pieces are quick to make, so I find they are perfect for gifting or making a small set as a holiday display. I also love that the design allows for easy customization β€” you can embroider initials, swap colors, or add tiny accessories to make each snowman unique.

Snowman Friends Amigurumi Pattern step 1 - construction progress Snowman Friends Amigurumi Pattern step 2 - assembly progress Snowman Friends Amigurumi Pattern step 3 - details and accessories Snowman Friends Amigurumi Pattern step 4 - final assembly and finishing

Switch Things Up

I love how easy it is to customize these Snowman Friends by changing colors, so I often try pastel shades for a softer look or bright colors for a playful vibe.

Want a larger or smaller snowman? I change the yarn weight and hook size to scale the pattern up or down; a bulkier yarn makes a chunky friend while thin yarn creates a tiny keychain version.

I sometimes replace safety eyes with embroidered eyes for a softer, baby-safe toy and I always test placement before securing them permanently.

I add different noses too β€” try an embroidered triangular nose instead of the crocheted carrot for a flatter profile.

I enjoy creating themed sets by changing hat colors and embroidering initials or tiny motifs on the body for custom gifts.

To make the hats even fancier, I experiment with different metallic threads or add a small pom-pom in contrasting colors for a pop.

If you want a posed snowman, add a small gauge wire inside the body to make the head slightly tilt or pose the hats at different angles.

I often swap the knit hat for a crocheted beanie using front post and back post stitches to create a ribbed effect if I prefer not to knit.

For a more rustic look, try natural or undyed yarns and use wooden buttons instead of embroidered initials for a classic feel.

I sometimes create tiny scarves or mittens to dress up the snowmen; these small accessories can be quick little add-ons that personalize each piece.

Make a set in graduated sizes and arrange them as a family on a mantel for a charming holiday display β€” each one can have different hat styles or colors to tell a story.

Common Mistakes & How to Fix Them

βœ— Not using a stitch marker can make you lose track of the beginning of each round; place a stitch marker at the first stitch of every round to keep your counts consistent. βœ— Forgetting to stuff as you go will result in a lumpy or misshapen body; firmly stuff in small increments and overstuff slightly before finishing to achieve a smooth shape. βœ— Skipping invisible decreases leads to a visible gap in the crochet fabric; practice and use invisible decrease for a neater finish around the head and body. βœ— Misplacing safety eyes will affect facial symmetry; attach safety eyes between rounds 8 and 9 and ensure they are 4 stitches apart for the intended look.

Snowman Friends Amigurumi Pattern

Create a set of adorable Snowman Friends with this complete crochet and knit-hat pattern. You will make the head and body in one piece, add a sweet embroidered detail, and top them with a tiny pom-pom hat. The pattern is designed to be approachable yet satisfying, and makes a perfect gift or holiday decoration for your home.

Intermediate 2-3 Hours

Materials Needed for Snowman Friends Amigurumi Pattern

β€” Main Fabric

  • 01
    Paintbox Yarns Simply Aran Acrylic - Color A: Paper White (1 x 100g / 170 yd)
  • 02
    Paintbox Yarns Simply Aran Acrylic - Color B: Stormy Grey (1 x 100g / 170 yd)
  • 03
    Small amount of Pink / Peach yarn for nose (approx a few grams)
  • 04
    Pattern can be made with any sport or worsted weight yarn (adjust hook size as needed)

β€” Tools Required

  • 01
    Crochet hook size 3.5 mm (US size E)
  • 02
    1 set double pointed needles size 3.75 mm (US size E)
  • 03
    3 ply metallic embroidery thread (for hat sparkle)
  • 04
    Fiberfill for stuffing
  • 05
    6 mm safety eyes (2 pieces)
  • 06
    Tapestry needle for sewing and weaving ends
  • 07
    Stitch marker

Progress Tracker

0% Complete

β€” Notes :

Infos :

1. Work in continuous rounds without joining the round with a slip stitch. Do not turn at the end of each round. 2. Use a stitch marker to keep track of the beginning of each round. 3. Head and body are worked in one piece. Beginning at the top of the head, working down the body. 4. I recommend using invisible decrease to avoid the gap in the stitches. 5. Firmly stuff as you work and overstuff slightly before finishing the section being worked. This will allow for the stuffing to fill out the shape after the crocheting is done. 6. I have used double strand knitting technique to create a shiny texture on the hats. This is a technique in which yarn and metallic thread 7. If you do not want to use double strand knitting technique any store bought sparkly yarn would do (you will likely get a uniform shine this way, not the subtle twinkling effect created by the double strand technique). 8. I have embroidered initials onto the body as these were created for a custom order. If you do not wish to do so, you can easily sew in buttons for a more traditional snowman.

β€” Head + Body :

Info :

Using the color A (Paper White) yarn and 3.5 mm crochet hook, begin with a MR.

Round 1 :

6 sc in MR [6]

Round 2 :

(inc in each st) x 6 [12]

Round 3 :

(1 sc; inc) x 6 [18]

Round 4 :

(2 sc; inc) x 6 [24]

Round 5 :

(3 sc; inc) x 6 [30]

Round 6 :

(4 sc; inc) x 6 [36]

Round 7-12 :

sc in each st around [36]

Round 13 :

(4 sc; dec) x 6 [30]

Round 14 :

(3 sc; dec) x 6 [24]

Info :

Attach safety eyes between rows 8 and 9, with 4 sts apart.

Round 15 :

(2 sc; dec) x 6 [18]

Round 16 :

(1 sc; dec) x 6 [12]

Round 17 :

(inc in each st) x 6 [24]

Round 18-19 :

(sc in each st) around [24]

Round 20 :

(3 sc; inc) x 6 [30]

Info :

Stuff the head as you continue to work.

Round 21 :

sc in each st around [30]

Round 22 :

(4 sc; inc) x 6 [36]

Round 23 :

sc in each st around [36]

Round 24 :

(5 sc; inc) x 6 [42]

Round 25-29 :

sc in each sts around [42]

Round 30 :

(5 sc; dec) x 6 [36]

Round 31 :

(4 sc; dec) x 6 [30]

Info :

Start stuffing the body.

Round 32 :

(3 sc; dec) x 6 [24]

Round 33 :

(sc in next 2 sts; dec) [18]

Round 34 :

(1sc; dec) x 6 [12]

Round 35 :

(dec) x 6 [6]

Info :

Fill the head and body with fiberfill firmly. F/O and thread tail end of yarn onto a tapestry needle, insert the needle in and out of the remaining sts, pull tight to close and weave in end.

β€” Nose :

Info :

Using your Peach or Pink color yarn, begin with an MR.

Round 1 :

4 sc in MR

Round 2 :

inc, sc in next 3 sts around [5]

Round 3 :

inc, sc in next 4 sts around [6]

Round 4 :

sc in each st around [6]

Info :

Sl st in next st and F/O leaving a tail for sewing.

β€” Pom-Pom Hat :

Info :

Using 3.75 mm double pointed needles, with color B (Stormy Grey) yarn and metallic embroidery thread, holding the two strands together cast on 36 sts. Divide sts evenly among 3 needles. Place marker and join (being careful not to twist) to work in the round.

Ribbing :

K1 P1 for 5 rounds

Body :

Knit 7 rounds

Shape Top - Round 1 :

(k4; k2tog) around [30 sts]

Shape Top - Round 2 :

knit

Shape Top - Round 3 :

(k3; k2tog) around [24]

Shape Top - Round 4 :

knit

Shape Top - Round 5 :

(k2; k2tog) around [18]

Shape Top - Round 6 :

(k1; k2tog) around [12]

Shape Top - Round 7 :

(k2tog) around [6]

Info :

Cut yarn leaving a tail. Thread tail end of yarn onto a tapestry needle, insert the needle through remaining sts and pull tight to close. Make a small pom-pom using blue yarn and metallic thread and attach to the top of the hat.

β€” Assembly :

Step 1 :

Stuff the nose lightly and sew it between the eyes beginning from the row 8.

Step 2 :

Use color Peach yarn to embroider the letters on the body (if desired). If using buttons, sew them on the body now.

Step 3 :

Just place the heads and your Snowman Friends are ready to frolic in the snow!

Assembly Instructions

  • Stuff the nose lightly and sew it between the eyes beginning from the row 8, securing with small stitches so it sits centered between the safety eyes.
  • Use color Peach yarn to embroider letters or initials onto the body as desired, following photos for placement or sketching a guide before stitching.
  • If you prefer buttons instead of embroidery, sew buttons onto the front of the body now, spacing them evenly down the chest.
  • Attach the knit pom-pom hat to the top of the head by sewing through the hat and into the head to secure, and weave in all ends neatly.

Important Notes

  • πŸ’‘Work in continuous rounds without joining with a slip stitch and do not turn at the end of each round to maintain the amigurumi spiral.
  • πŸ’‘Use a stitch marker to keep track of the beginning of each round so increases and decreases stay accurate.
  • πŸ’‘Stuff firmly as you go and slightly overstuff before finishing each section to ensure the final shape holds without gaps.
  • πŸ’‘Attach safety eyes between rounds 8 and 9 and ensure they are 4 stitches apart for correct facial placement.

These sweet Snowman Friends are designed to bring a little handmade magic to your home this season. Whether you embroider initials or add tiny buttons, each one becomes a unique keepsake to gift or display. Make a whole family in different colors and watch them spread smiles and cozy vibes. β„οΈπŸ§Ά

You ask,

we answer.

FAQs

What size will the finished piece be?

Each Snowman measures approximately 5.6 inches (14.22 cm) tall when made with the recommended yarn and hook size.

Can I use different yarn weights for this pattern?

Yes, you can use different yarn weights, but this will change the finished size; choose an appropriate hook and adjust details like safety eye size accordingly.

Do I need knitting experience for the hat?

Basic circular knitting on double pointed needles is used for the hat; intermediate knit skills are helpful, but the rib and simple decreases are straightforward.

How much time does this project typically take?

Most crocheters finish a single snowman in a couple of hours; this pattern is a bite-sized project and may take 2-3 hours depending on experience and finishing.

Can I make the hat entirely by crochet instead of knitting?

Yes, you can substitute a small crocheted beanie or use a free crochet pom-pom hat pattern as an alternative to the knitted hat.